Live streaming in Lecture Capture
Live-streaming of classes enables students to view the Lecture Capture recording as it is recorded, rather than waiting for the recording to conclude and be made available on the LMS.
Live streaming from the Lecture Capture system has now been enabled at the University of Melbourne.
There are two ways live streaming can be enabled for students to view your lecture live:
- If your lecture or seminar is scheduled in a Lecture Capture-enabled venue in the central timetable, you will automatically have Lecture Capture live-stream mode enabled (as of Semester 2, 2021).
- You can enable live streaming while making a presentation/recording in Universal Capture which is available/published to a subject.
See our planning for a live-streamed session guide for ideas on how to make this a more interactive experience for students.
Live streaming from a Lecture Capture-enabled venue
Live-streamed sessions are streamed using the Echo360 Lecture Capture technology that is installed in a large number of teaching spaces.
Remote students can watch the session live and participate in online activities that teaching staff conduct during the session, such as Poll Everywhere polls, live LMS chats or discussions, Padlet or Office365 interactive document activities.
If your lecture or seminar is scheduled in a Lecture Capture-enabled venue you will automatically have Lecture Capture live-stream mode enabled (as of Semester 2, 2021).
The recording will automatically start at the scheduled time of the session and staff do not need to start the recording, set up the live streaming, or stop the recording at the end.
Staff may opt-out of live-streamed sessions by submitting a request to Learning Environments.
Events scheduled in the timetable as a tutorial will NOT be automatically recorded or live-streamed via Lecture Capture.
Live streaming using Universal Capture
Universal Capture can be used to live steam lectures where all the students are attending remotely or if you are in a room that is not Lecture Capture enabled and wish remote students to watch live.
Set up a live stream in Universal Capture
- Open Universal Capture on your computer. Instructions on how to download Universal Capture are available in the Universal Capture guide.
- Log in using your University of Melbourne username and password.
- Click on the pencil icon to set up a new recording.
![]()
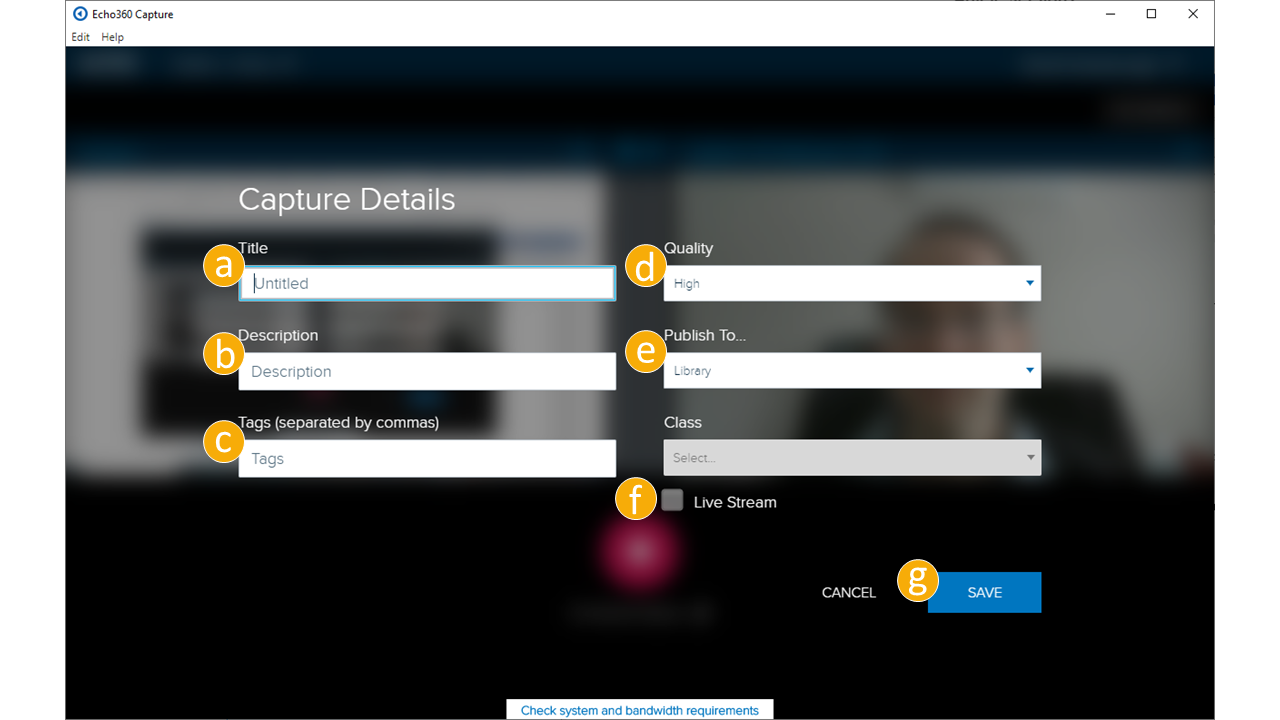
- Complete the following details:
- The title of the recording e.g. Week 5 lecture on......
- A description of the recording (optional).
- Tags (optional).
- Quality - leave on the default (High)
- Using the Publish To drop down list, select the subject from where the live stream will be accessed by students.
- Click the Live Steam checkbox.
- Click Save.

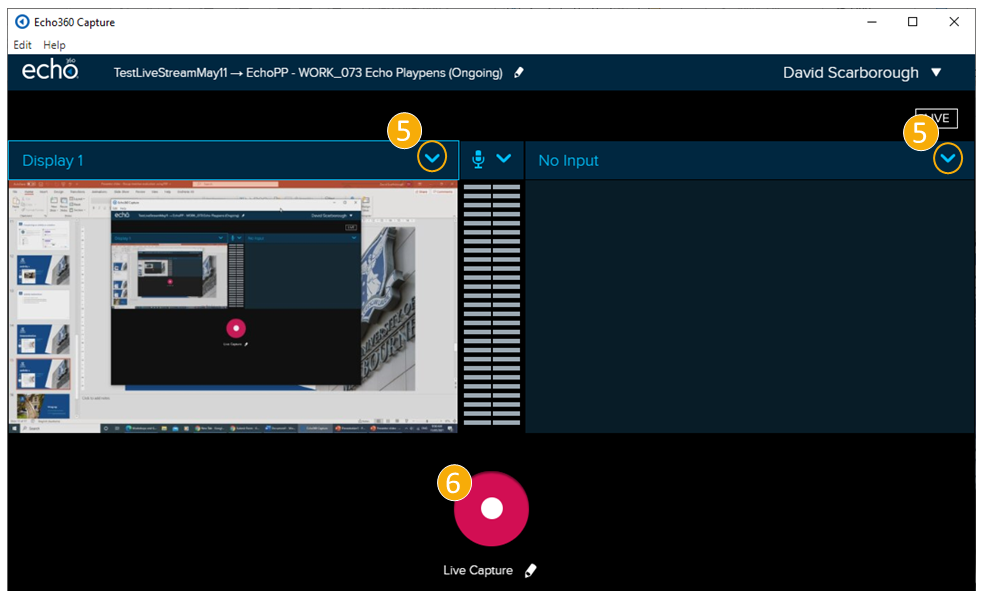
- Use the dropdown menu to select what you want to record, for example your computer screen and/or your webcam feed.
It is important to check your audio is capturing appropriately.
- Click the record button.

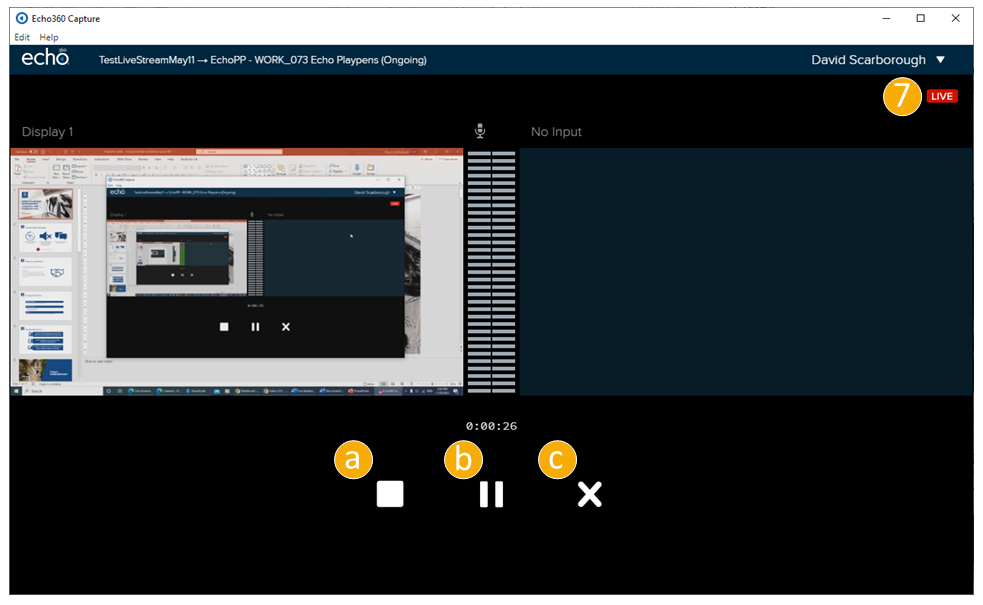
- On clicking record, Universal Capture starts recording, however there is a slight delay between the start of the recording and the stream becoming live. A live stream is indicated by the red LIVE button on the top right.
- Control your stream using the functions:
- Stop live streaming / recording.
- Pause live streaming / recording.
- Cancel live streaming /recording.

- When you have stopped the recording, it will be saved and uploaded to your LMS subject.
- Students can access a live stream by clicking on the live stream name or play icon in the Lecture Capture menu. Live streams will be indicated to students by a green LIVE icon.

Tracking student attendance in Lecture Capture Live
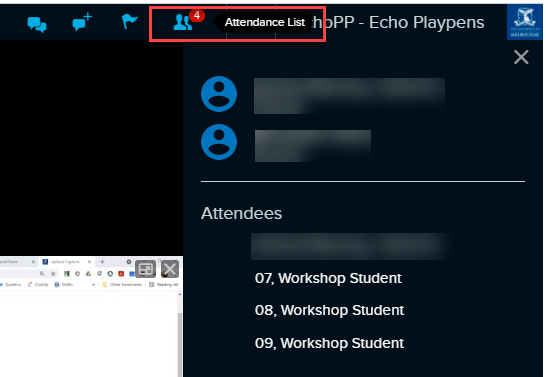
During your lecture in a venue or while streaming your lecture from Universal Capture, you can see which students are attending via the live stream by:
- Using an alternative computer or tablet, go to the Lecture Capture link in your LMS subject.
- Click on the event row to enter the live lecture (ensure your sound is down to avoid feedback loops).

- Click Show Live Stream to see the stream (live streams will not auto-play).

- Click the Live Attendance button to view attendees and/or instructors as needed.

After the lecture, the Analytics tab in your Lecture Capture subject will show who attended your lecture via live-streaming:
- In the Attendance % figures in Classes which tells you % of your students attended via live-streaming. Click of the % number to view the names of the students.
- In the Attendance % column in Students. Click on a student % number to view which lectures they attended live.
This data can be exported for further analysis.

Compulsory attendance of lectures via live-streaming may be very difficult for students in different time zones.
Interactivity during live streams
Some options for interactive elements during a live stream include:
- Questioning using PollEverywhere.
- Student-student or student-teacher discussions using the LMS Discussion forum.
- Discussions or collaborative activities using Padlet walls.
To view a more detailed guide on interactive during a live-streamed session see our guide, live-streamed sessions.
This guide was last updated 12 Mar 2024.
Please report any errors or omissions in this guide by submitting an LMS support request.