Create PebblePad workbooks or other resources and provide them to students
This guide provides you with how to create PebblePad resources – such as workbooks, worksheets or other structured templates, and then make them available to students via ATLAS (PebblePad’s assessment space).
As a subject coordinator, you may wish to share PebblePad resources with your students to complete. Typically these will be PebblePad workbooks for assessment purposes, but could be structured worksheets, forms, or other templates you have built in PebblePad for students to complete.
Create or copy your workbook or template resource
First, ensure you have a workbook or template ready for students to use.
In Pebblepad, using the Get Creative option via the ‘burger menu’, either Create a workbook or Create a template as needed.
Refer to the following resources for more information on creating PebblePad Templates or Workbooks:
- Pebble+ Template Builder (PebblePad community guide)
- Pebble+ Workbook Builder (PebblePad community guide).
For further information on the element types and properties available when creating workbooks and templates, refer to:
- Pebble+ Template element types (refers to the same elements available for both templates and workbooks)
- Pebble+ Block and Template Properties (PebblePad Help).
After saving or creating your workbook or template, you should also confirm the type of template you wish it to be saved as, and whether you want the workbook or template to be ‘single use’ (students can only fill in one copy), or to be reused (students can create multiple copies/versions of the same template – useful for template resources or forms that they may reuse to fill in an experience, placement/clinic activity or regularly reflect as needed.
For further information on categories and single vs multi use, refer to Pebble+ Template Properties.
If you are instead modifying an existing resource for a new teaching period, or you have been provided with an existing workbook/resource to use or modify (i.e. someone else has shared a resource with you), ensure you have taken a new copy. Create a copy by using the following process:
- Go to your Resource store and locate the resource within the list of resources (or use the search function).
- Click the information (i) icon to the right of the resource listing.
- Choose I want to…. then Copy.
- Rename the file – we recommend using subject code and year as part of the new file name.
Organise an ATLAS workspace for your subject
Generally, in order to share resources (such as workbooks or worksheets/templates) with students so they can fill in their own copy, it’s best to add these resources onto ATLAS. This way, students can access that template or workbook resource via their Resources store.
In order to add a resource onto ATLAS, you will need to have an ATLAS workspace created and linked to your LMS subject or ensure one has already been created. You will also need an ATLAS workspace if using PebblePad for any formal assessment.
To organise an ATLAS workspace linked to your LMS subject:
- Submit a support request to Learning Environments: Choose PebblePad as the Learning technology and note that you need an ATLAS workspace for your LMS subject. As part of the request, please also include the following details:
- the LMS subject code, year and cohort details so we know which LMS subject requires an ATLAS link. If the subject is a merged subject, please include the Canvas subject url or SIS ID if possible.
- Availability details: Please note some dates and times you are available for further discussion.
- Attend a consult: As part of setting up the ATLAS workspace, the Learning Environments team will consult with you to confirm ATLAS settings. The team will be in contact with you to organise a further meeting, based on your availability.
- Set up any assignments and assignment details: The Learning Environments team will set up a default ATLAS workspace hidden in ‘Setup’ mode and will work with you to confirm assignment settings for ATLAS for any formally assessed work.
Add your resource onto the ATLAS workspace
If you have been provided with a workbook or template resource that someone else has designed or built, first ensure that you have a copy where you are the ‘owner’ in PebblePad. Either ensure you have collaborate rights to the resource, or take a copy of the resource so PebblePad treats you as the owner.
- Navigate to the PebblePad ATLAS Workspace for the subject. Open PebblePad, then click on the ATLAS icon (the blue globe) in the PebblePad banner, and select your subject under Workspaces I am managing.
- Check that you have Lead Tutor role in the ATLAS Workspace. You can check in the workspace under Management, within the Managers tab. Subject coordinators and Instructors within LMS should automatically be given the Lead Tutor role within ATLAS for that subject.
- Once you have your workspace open, select Resources from the menu. Refer to the ATLAS Help guide on Resources for more details.
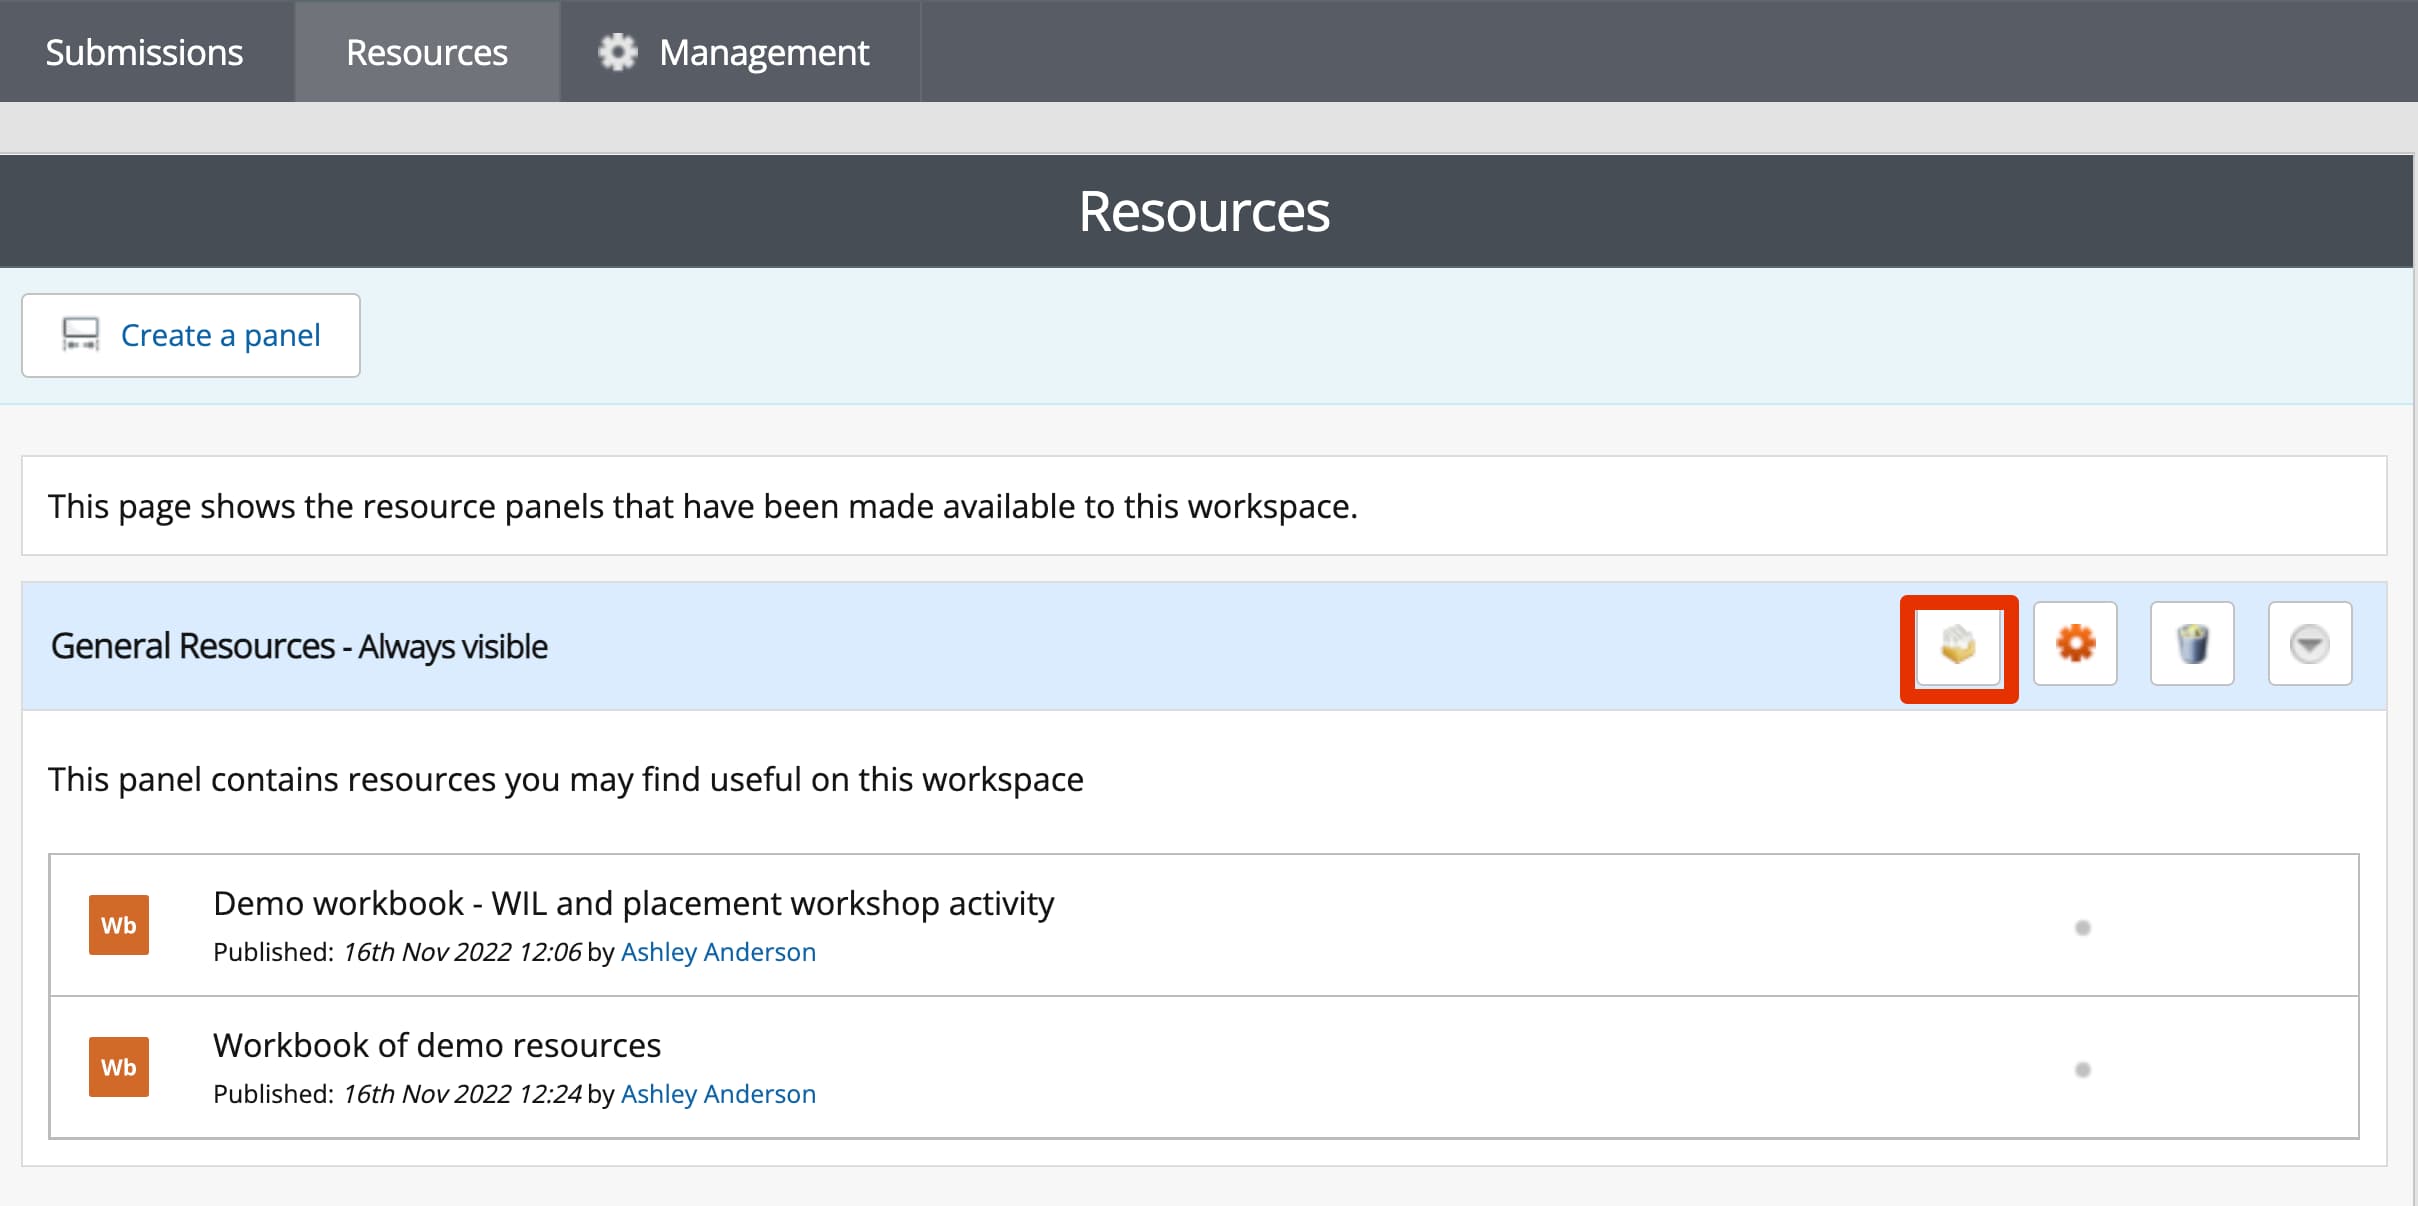
- You should automatically have a panel titled ‘General resources – Always visible’ where you can add resources.
Optional: If you wish to release some resources based on specific availability dates only or organise them under categorised sections, use the Create a panel button to create then add them under a new panel as needed.

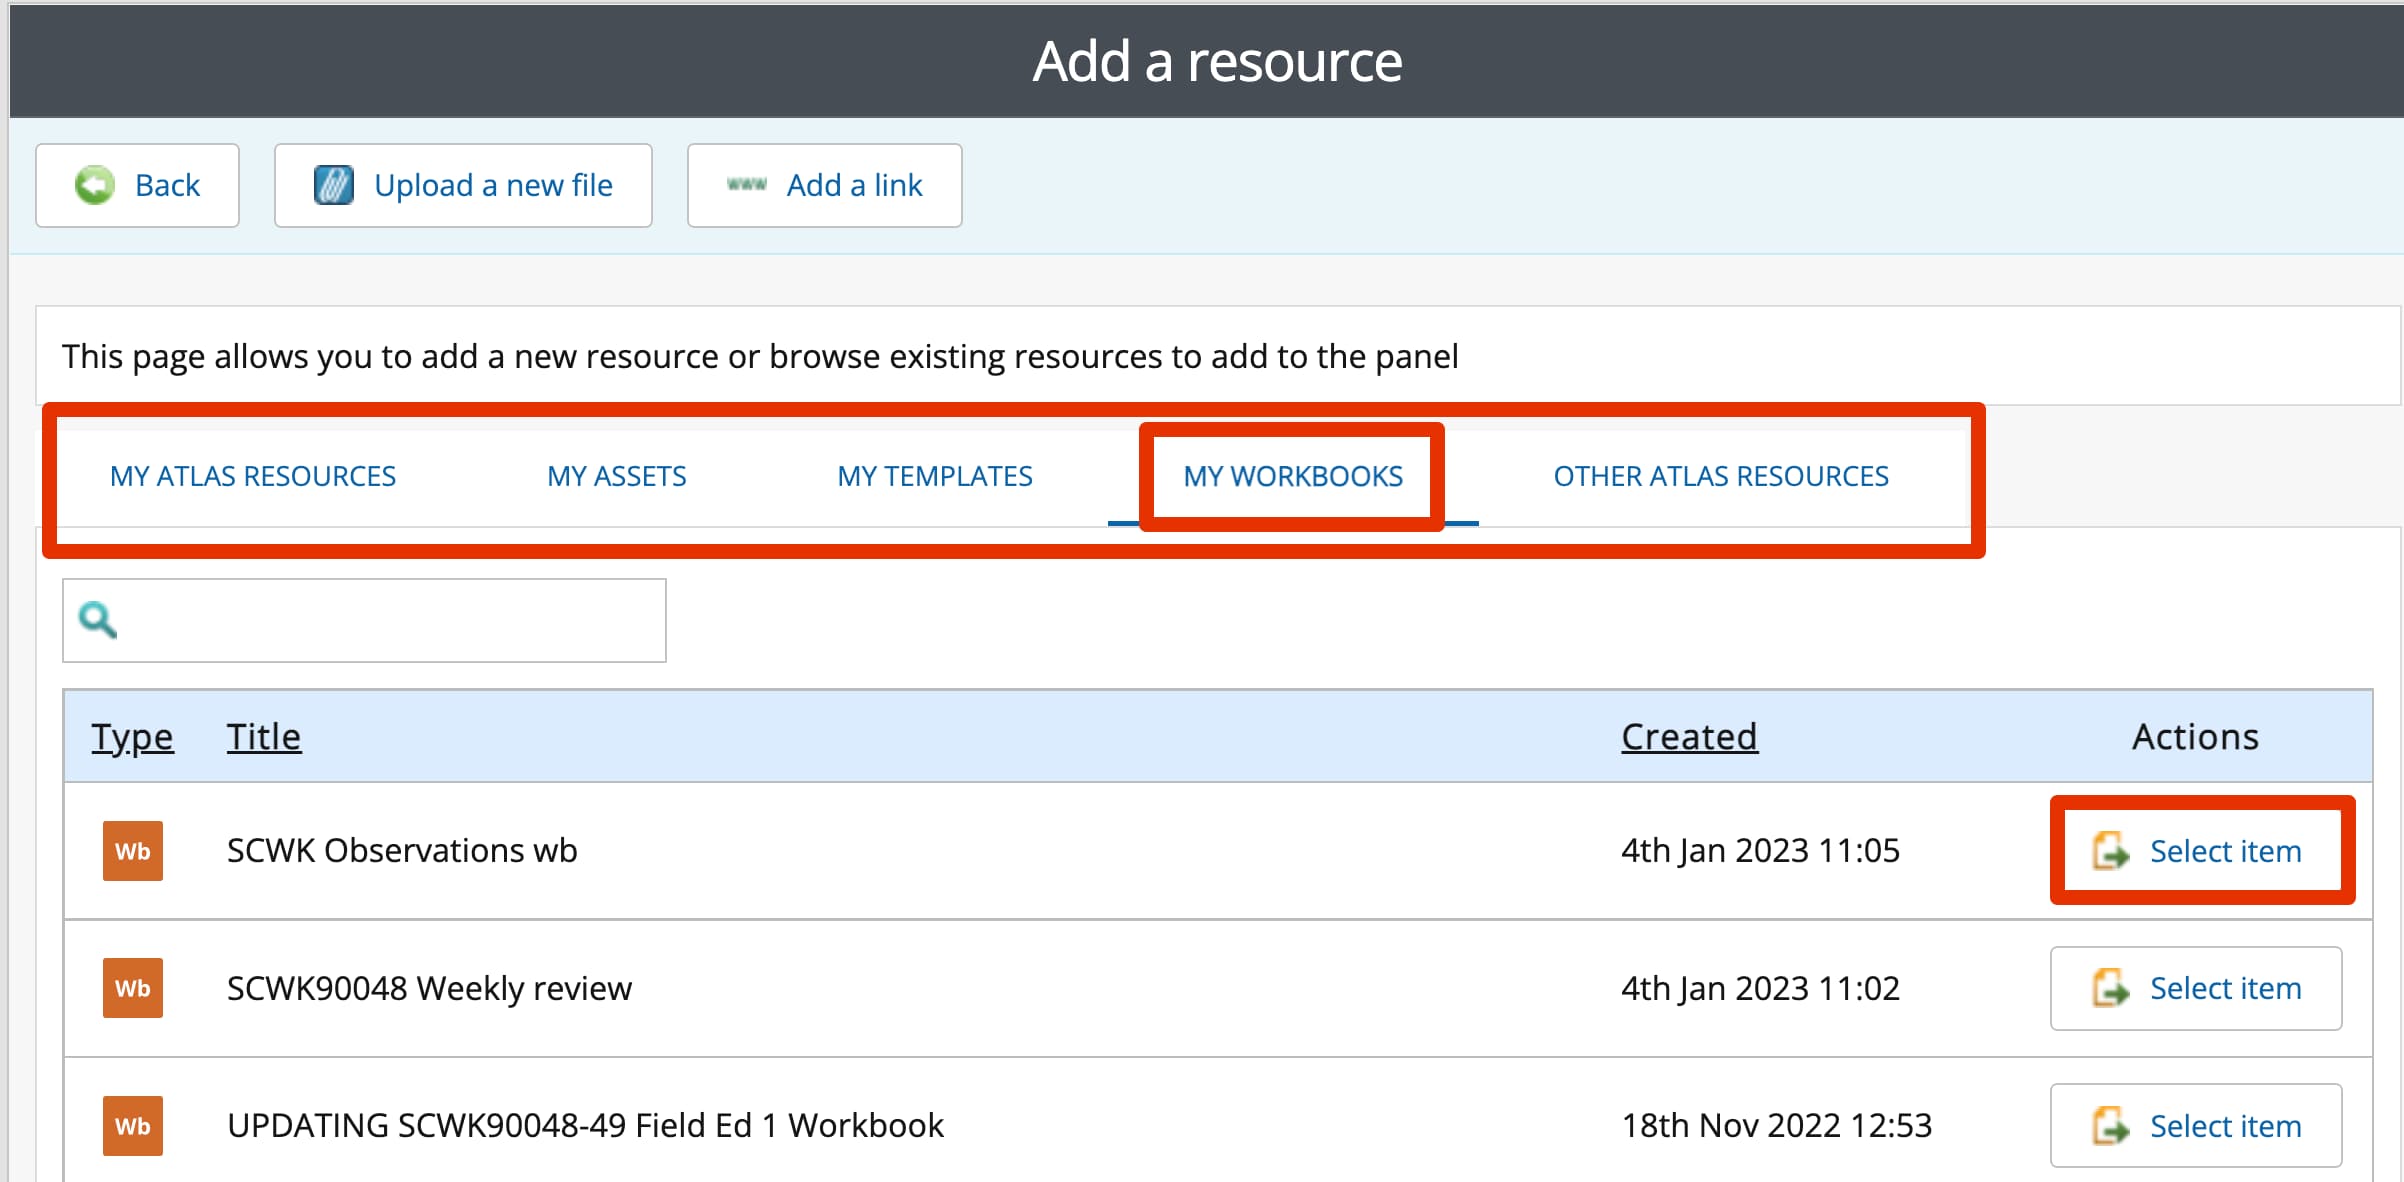
- Select the Add a resource button (folder icon) available to the right in the panel. The Add a resource page will appear where you can select which resource you would like to add.

- Choose from one of the available tabs to locate and choose an existing resource. A list of any available resources you own will be displayed. Most PebblePad resources will be available under My Workbooks or My Templates.
- Once you have located the resource, click the Select item button available under the Actions column to the right of the resources list, to add it to ATLAS.
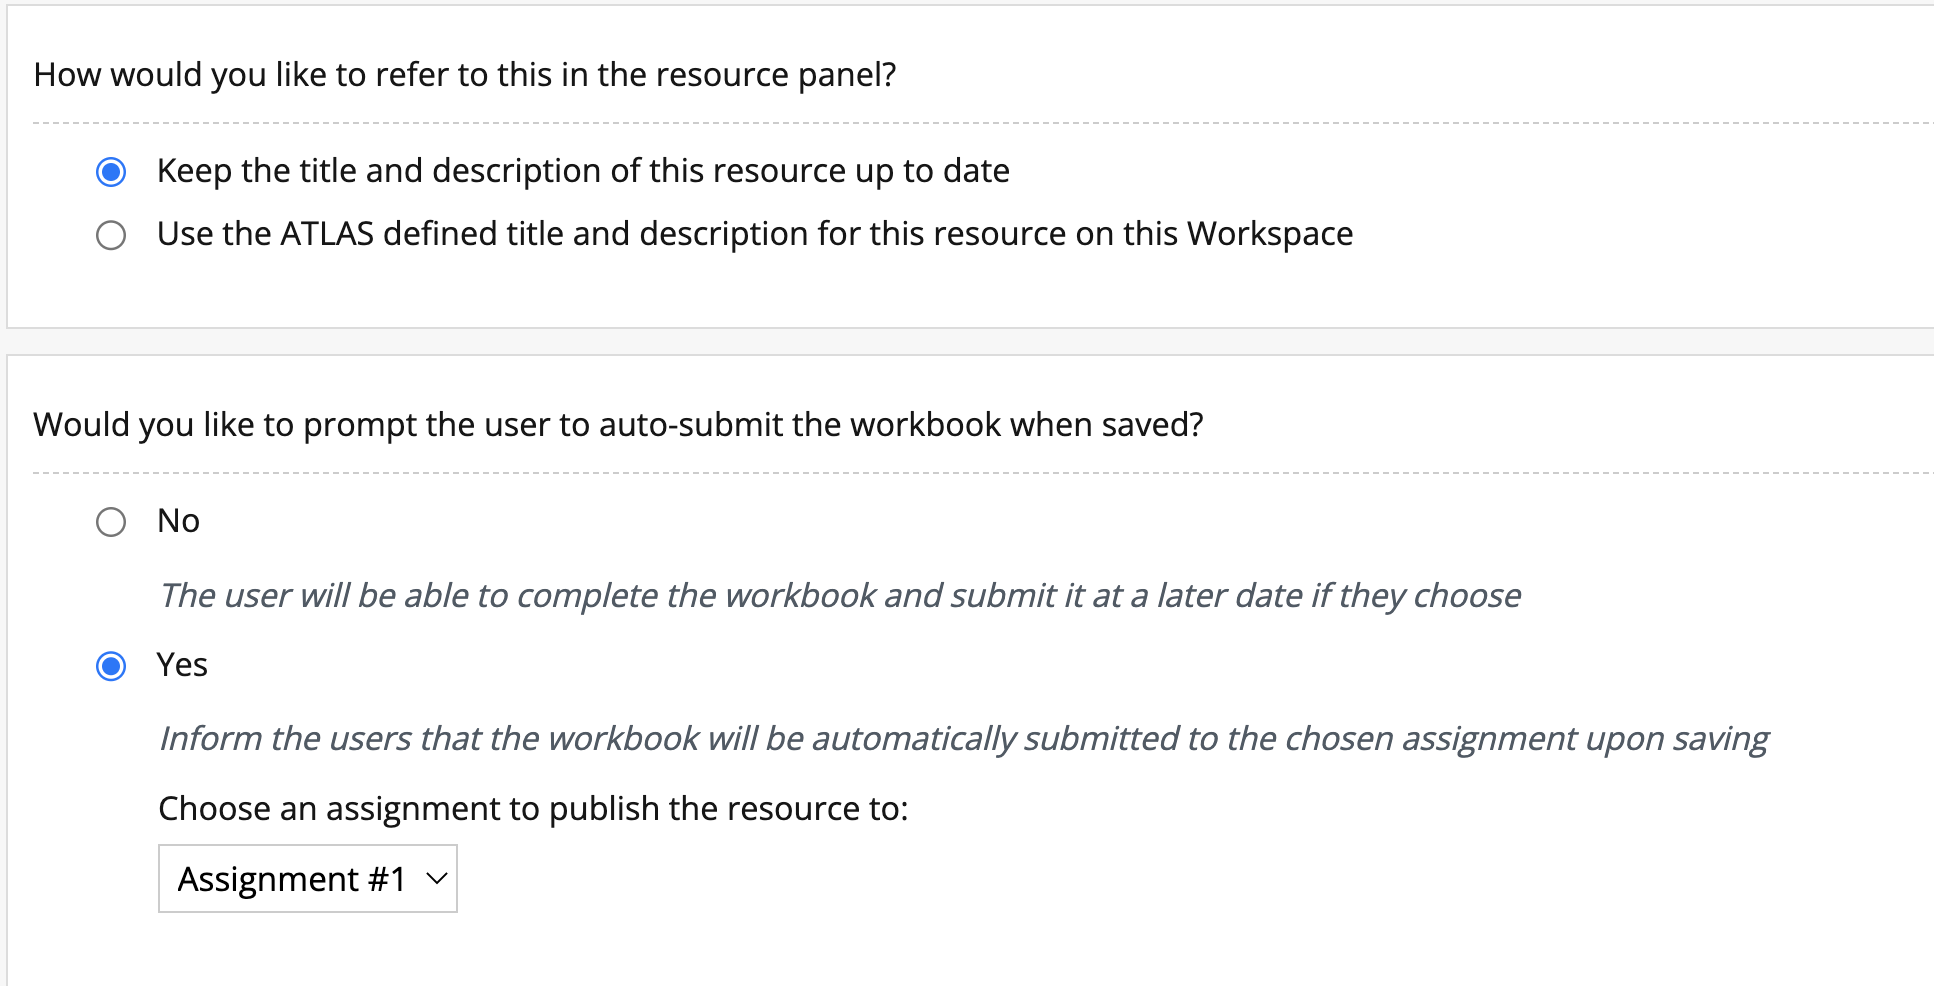
You will then be presented with the Manage the selected resource page to manage the resource’s settings. Most settings can be left as they are currently selected, however you should confirm the naming and auto-submit settings.

- Resource name: Under ‘How would you like to refer to this in the resource panel?’ you have the option to keep the existing name or provide a new name for the resource. Note: All resources should be named appropriately with the subject code, assessment number and year/cohort so students are able to easily identify and access them.
- Auto-submit settings: You have the option to allow students to manually or automatically submit the resource back to ATLAS.
- Under the heading ‘Would you like to prompt the user to auto-submit the workbook when saved?’ Choose Yes if you would like students’ copies of the resource to be auto-shared/auto-submitted back to the ATLAS workspace automatically. Otherwise, leave the existing No option selected.
- If choosing Yes for auto-submit settings, you will then need to Choose an assignment to publish the resource to. This will mean any saved student work using that resource is automatically submitted back to that assignment area in ATLAS. Choose the relevant assignment.
You can only have one resource auto-submitted to one assignment. If you need the same resource submitted to more than one assignment or subject, you will need to ask students to manually submit their work.
For assignments where marking occurs in ATLAS, we recommend auto-submit is set to No. For placement subjects, or for subjects where submission and marking will be undertaken in LMS for assessment and ATLAS is the backup, we recommend you set auto-submit to Yes.
Consult Learning Environments if you are unsure or need further support.
- Tick the agreement notice at the bottom then click Continue.
Further support
For further information on adding Workbooks or Templates as resources, refer to the Templates and workbooks as resources PebblePad Help guide.
How students access resources in PebblePad
Students will gain access to the resource via their Resource store in Pebble+.
Students can access relevant resources directly within PebblePad via the following steps:
- Once logged into PebblePad, from the home page dashboard, select Resources (listed under their account name, under Store). The Resources store will open.
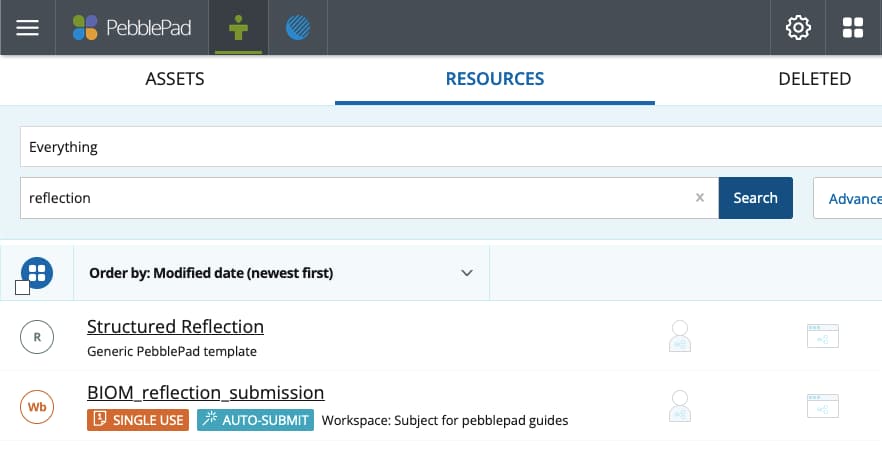
- Shared resources will typically be viewable at the top of the list. Students can also search for the title of a resource using the Search bar at the top of the page or use the Order by dropdown menu to sort the resource list.

- Each resource listed will typically include the following detail:

- An icon showing the type of resource (e.g. Wb for Workbook)
- The title of the resource, which also acts as a link to open the resource.
- Additional information under the title for any resources shared via ATLAS
- The workspace it is available/located on
- Single use (if the work only allows students to take a single copy of the resource)
- Auto-submit (if you have set the resource to be auto-submitted).
If a student cannot view or access a resource
In order for students to be able to view and access the resource, they need to have access to the ATLAS workspace. If students cannot see the resource available in their Resource store, it could be due to the following:
- The ATLAS workspace is not active (you will need to set the Workspace to Active – typically Learning Environments will work with you to do this)
- The LMS subject has not been published to students yet
- The student has not enrolled or has only recently enrolled in the LMS subject or has not accepted the LMS invite. Note: Students are enrolled onto ATLAS via the LMS enrolments, but the sync from the LMS to ATLAS usually happens overnight.
- The student has been enrolled in the incorrect LMS subject
- The student has both staff and student accounts and is accessing PebblePad via the incorrect account
- You have added resources in a panel that has a set date range visibility that means it’s unavailable.
To check student access:
- Confirm that the student is enrolled in the LMS subject (Canvas) and subject is published
- Check the student is listed under Members in the ATLAS workspace
- Check the ATLAS workspace is set to Active.
This guide was last updated 16 Feb 2023.
Please report any errors or omissions in this guide by submitting an LMS support request.