3D model metadata guide
3D model metadata guide
Introduction
To preserve models for future use, facilitate optimisation by another party, and support scholarly re-use of 3D data, it is important for the metadata associated with the creation of a 3D model to be retained. With innovations in computer-learning based analysis rapidly progressing and ongoing improvements in processing abilities, it is important to retain the metadata of 3D models to facilitate potential analyses that may emerge in the future.
This guide provides details on how to retain metadata on 3D models that are to be uploaded to Pedestal 3D. It does not provide guidance on how to create 3D models. Short courses are available through the Melbourne School of Design training page and consultations can be arranged through the University Digitisation Centre.
This guide is divided into sections based on the type of 3D modelling method you are using. It includes sections on structure-from-motion photogrammetry, structured light scanning, computed tomography (CT) scanning, and laser scanning. It is not necessary to read the entire document, only the section relevant to the process you are using.
Depending on the type of object you are digitising, the following guides may be helpful:
- For natural history collections: the Handbook of Best practice and Standards for 2D+ and 3D Imaging of Natural History Collections by Jonathan Brecko and Aurore Mathys (2020).
- For heritage collections:Applied Digital Documentation in the Historic Environment by Historic Environment Scotland (2018) and Photogrammetric Applications for Cultural Heritage: Guidance for Good Practice by Historic England (2017).
- For architectural collections:The DURAARK Project: Long-Term Preservation of Architectural 3D-Data by Michelle Lindlar and Hedda Saemann (2014).
Data management
Data used to create 3D models should be retained in an organised manner that allows it to be accessed upon request for future re-use. It is recommended to follow a consistent, organised, and discernible naming convention and file structure so that the data can be discovered in future. It is likewise recommended to wherever possible store data in a format that is archival and non-proprietary so that it may be preserved and accessible in the future.
The Community Standards for 3D Data Preservation (CS3DP; Moore, Rountrey and Kettler 2022) advocates for 3D model metadata retention in the interest of FAIR principles: findability, accessibility, interoperability, and re-use. This guide provides details of metadata recording and data retention practices for 3D models that will assist 3D modellers in adhering to the FAIR principles and assist future research and learning using 3D models. File format recommendations are provided here based on archiveability and interoperability in consultation with the recommendations of CS3DP and the Digital Preservation Coalition (2021).
Naming conventions
Regardless of which modelling technique is used, it is important to follow consistent naming conventions to ensure models are discoverable and identifiable.
The following naming convention is recommended, with underscores connecting the elements:
faculty_object-name_accession-number_version-number_level-of-detail
Example 1
An ancient Greek vase called a ‘lekythos’ has been scanned for teaching archaeology students in the Faculty of Arts. This particular lekythos is registered in the potter collection under the accession number 1931.0003.000.000. After the original upload, some adjustments were made to the model to correct for scaling issues that were missed in the original upload. This model has been reduced in size to 20,000 triangles to allow users to view the model on low processing-power mobile phones. As such, it should be uploaded under the name:
Arts_Lekythos_1931-0003_v02_lp
- Arts indicates that the object is used by the Faculty of Arts
- Lekythos identifies what it is
- 1931-0003 lets us know which one this model represents
- v02 indicates this is the second version uploaded
- lp indicates the model is ‘low poly’.
This way if the model is downloaded and used for research purposes, or one day the University transitions its models to a different hosting platform, the model will be able to be identified by someone other than its creator.
Example 2
A concrete core sample from the Heritage Building Materials Collection has been modelled for teaching in Architecture, Building and Planning. This sample is registered in the Heritage Building Materials Collection under accession number 2.116. This is the first model that was uploaded for this item, and it is the maximum detail version of that model. As such, it should be uploaded under the name:
ABP_Core-sample_2-116_v01_hp
- ABP indicates that the object is used by the Faculty of Architecture, Building, and Planning
- Core-sample tells us what the object is
- 2-116 tells us specifically which core sample is represented
- v01 indicates it is the first version of the model
- hp indicates the model is high-poly, for maximum detail.
Basic metadata
3D Objects can be further identified by associating or ‘tagging’ metadata to the object. These are distinct identifiers manually entered during the uploading process and can be altered. Users can use the search bar to find models associated with metadata terms.
When preparing models for upload, it is recommended to consider the kind of metadata you would like to have associated with the object, as this will influence the future discoverability of the model and the information that is available to people who are accessing it. The kind of metadata relevant to each object will differ based on the type of model, but the following groups of information should be considered:
Title
The name of the object, or a brief description.
Author
The copyright holder of the original item, not the 3D model. In the case of objects that are out of copyright, this will be the faculty in possession of the object.
User
The account uploading the model.
Division
The faculty or department for whom the object is relevant.
Copyright
The standard copyright guidelines for models in the University’s Pedestal 3D collections is to apply an ‘All Rights Reserved’ license to the model.
Copyright of 3D scans is associated with the original scanned object rather than the scan itself, which is considered a reproduction rather than a new creative work. If you wish to apply an alternative copyright license, such as a Public Domain dedication or a CC-BY license, you must respect the copyright of the original scanned object and take this into consideration before uploading the model under one of these other licenses.
Many objects that are scanned by or for the University of Melbourne are out of copyright or are by nature in the public domain. Creative works retain copyright for 70 years after the death of the author, after which they enter the public domain. Natural specimens do not contain copyright and are always in the public domain. These considerations may influence your decision to apply an alternative copyright licence. A CC-BY license may be appropriate if you wish for the university to be attributed as the steward of the original object and/or the creator of the digital model.
If uploading born-digital creative works or scans of creative works produced for the University of Melbourne, you should consult the terms under which the work was created to determine copyright and attribution requirements.
For a detailed description of the various copyright licenses available, consult the selecting a licence for your work guide, or for further advice, contact the Copyright Office.
Description
A brief written description of the uploaded object.
Keywords can be included here, which will make the model more discoverable by the search bar.
Long description
A longer written description. This section can contain whatever information the publisher feels could be relevant to users viewing and analysing the 3D model. Web pages can be hyperlinked to connect the 3D model to other records of the original object.
Photogrammetry

Structure-from-motion photogrammetry (henceforth simply ‘photogrammetry’) is the process of generating a 3D digital model of a real-world object from many photographs of the object. It is the most commonly used method of 3D digitsation of cultural heritage collections worldwide as well as for models on the University of Melbourne’s Pedestal 3D page.
Photogrammetric modelling can be regarded in three stages, each of which involves different forms of data that should be recorded and retained in some manner. The steps and associated data are listed here:
- Data capture
- RAW format digital photographs (such as ARW, CRW, ORF, RW2)
- Photography metadata (recorded in a README.txt file)
- Lighting conditions, camera settings, the use of a turntable, camera settings, etc. Any information which would be helpful for future users to understand the capture process used to replicate the model.
- Processed and converted digital photographs (adjustments recorded in the same README.txt file; DNG and TIFF are recommended).
- Processing
- Photogrammetry software project file (PSX for Agisoft Metashape or RCPROJ for Reality Capture)
- Associated project folder containing the data used by the photogrammetry software
- Model editing metadata and software version number (recorded in the same README.txt file)
- Export
- 3D mesh data (OBJ)
- Diffuse texture files: colour data for the 3D mesh (PNG or JPEG)
- Material file: informs rendering software how textures are applied to the mesh (MTL)
- Supplementary texture files: such as normal maps or occlusion maps that impact how the 3D model appears (PNG or JPEG).
- Modelling reports (PDF)

Data capture
Photography for photogrammetry may produce anywhere between a few dozen and several thousand images depending on the needs of the subject and the desired level of detail for the 3D model. For optimal results, photography should be undertaken in your camera’s RAW format, as JPEG compression can remove details that may be important for photogrammetric modelling. RAW photos also retain more data than JPEGs, which provides more opportunities for processing photos prior to modelling.
During the process of data capture, it is advisable to separately record associated metadata about the project and save it in a README.txt file that will be stored with the project files. Metadata may include data such as the name of the project, the name of the target object/area/environment being modelled, an ID code associated with the target (such as a museum acquisition number), a brief description of the target, the date of the data capture, the lighting conditions under which the target was photographed, the camera used to photograph the object, and the name of the person operating it. If you feel any additional information is relevant, this is the time to write it down and save it in this document.
Photogrammetric modelling can also be improved by editing photos to eliminate areas that are over or under exposed and diminish the influence of shadows. It can be helpful to white balance the photographs or generate a colour profile to control for the impact of lighting. Editing photos can be undertaken using programs such as Adobe Lightroom. If changes are made to the photographs, it is best practice to keep a record of any adjustments made.
Many camera RAW files are in a proprietary format that may not be readable by photogrammetry software or accessible to other users. As such, it is recommended to convert these files to a non-proprietary format for processing, such as DNG or TIFF. There are many software options that can accomplish this, but most photo editing software is capable of the task. This also provides an extra layer of file management, offering an opportunity to rename the images to something recognisable rather than the titles automatically assigned (for example, ‘DJI0257’ becomes ‘haliartos_acropolis_112’).
Naming systems should accommodate both human and machine readability, such that they can be easily recognised and ordered. Numbers should begin with zeros so that they are machine ordered (e.g. 001-999 rather than 1-999).
It is best to convert the files to an archival file format that retains the image metadata, is readable across many platforms, and is minimally or losslessly compressed. The top recommended formats that fulfil these criteria are:
- DNG (Adobe Digital Negative): an openly documented archival format specifically developed for raw image processing.
- TIF/TIFF (Tagged Image File): the standard file format for archival storage of uncompressed images. This format comes at a significant cost in storage space.
These converted photos are more important to retain than the original RAW images, as they are the photos which will be used in processing. If records have been kept on any applied adjustments and the images are exported into an archival format, it may not be necessary to retain those original raw images (if storage space is a concern).
Processing
Once images are organised and any processing is completed, they can be used for photogrammetric modelling. Some commonly used programs are RealityCapture, Agisoft Metashape, and 3DF Zephyr.
Each of these programs will create a project file where the user is able to save their work and make edits or adjustments along the modelling pipeline. A project folder will be created where the data used in the project is stored – this folder must be retained for the project file to be usable.
Projects should be saved under a recognisable title following the recommended naming convention for discoverability. The photographs themselves are not stored in the project folder: they are accessed in their stored location as needed, following a fixed file directory. As such, it is important that you do not move the stored images once you begin processing. If images are accidentally moved the file path can be manually restored, but it is best to avoid this as much as possible, particularly for reuse by others.
Photogrammetric modelling produces 3D meshes which can be uploaded to Pedestal 3D, but it can also create other forms of data that may be useful for future research or analysis, such as point clouds and digital elevation models. As such, it is recommended to retain project files and folders so that this data can be accessed in the future without requiring the images to be reprocessed. These files can be saved in their default proprietary format. It is recommended to record the software version (e.g. Metashape Standard v1.8.2) in the README.txt file in the main project folder for backwards compatibility.
Photogrammetrists have influence over how the final model is created: photogrammetry is rarely an entirely automated process. As such, it is prudent for photogrammetrists to retain a record of their decisions and manipulations across the modelling pipeline so that the result can be better understood. Some examples of decisions that may be worth recording include whether the model was generated using point clouds or depth maps, whether aberrant points were deleted, whether and how multiple chunks were aligned together into a single model. Some of this information is saved by photogrammetry software, some will be lost if not deliberately recorded. This metadata can be saved in the README.txt file created during the process of data capture.
Pedestal 3D allows for high, medium, and low detail versions of the same model to be uploaded. Particularly if the model is quite large (>500,000 polygons) this option can make the models more accessible on low processing power devices. High detail models can be decimated to create medium and low detail models within photogrammetry software. It is recommended to generate 8192x8192 pixel texture for the high detail model, a 4096x4096 pixel texture for the medium detail model, and a 2048x2048 pixel texture for the low detail model. Normal maps can also be generated to provide the impression of finer resolution geometry on the medium and low detail 3D models.
Exports
Once a model has been finalised, it is ready for export and upload to Pedestal 3D. The high, medium, and low detail models should be exported separately and named according to the conventions outlined in the Pedestal 3D Upload Guide. The models should all be named identically except for _hp, _mp, or _lp at the end of the title to indicate high, medium, or low detail respectively. The following 3D mesh and image size are recommended for each level of detail:
- Low detail (lp): Up to 100,000 triangles and a 2048x2048 pixel texture.
- Medium detail (mp): 100,000 to 500,000 triangles and a 4096x4096 pixel texture
- High detail (hp): the full detail model and a 8192x8192 pixel texture
- If higher resolution colour data is required, it is recommended to upload multiple 8192x8192 pixel images rather than an individually higher resolution image.
Models should be exported as OBJ files for upload to Pedestal 3D, with the diffuse texture exported separately as an image file. An MTL file will also be produced informing hosting software how to connect the image file to the 3D mesh. As Pedestal 3D has upload limitations, it is recommended to export diffuse textures as JPEG or PNG images to allow more upload space for the 3D mesh. Normal maps, if you wish to use them, should also be exported in these formats.
Some photogrammetry software, such as Agisoft Metashape or RealityCapture provide an option to generate a modelling report which provides details on how modelling was completed and the estimated degree of error. If this option is available, it is worth exporting the report as a PDF file and saving it in the project folder for future records.
The following convention is recommended, with underscores connecting the elements:
faculty_object-name_accession-number_version-number_level-of-detail
Structured light scanning
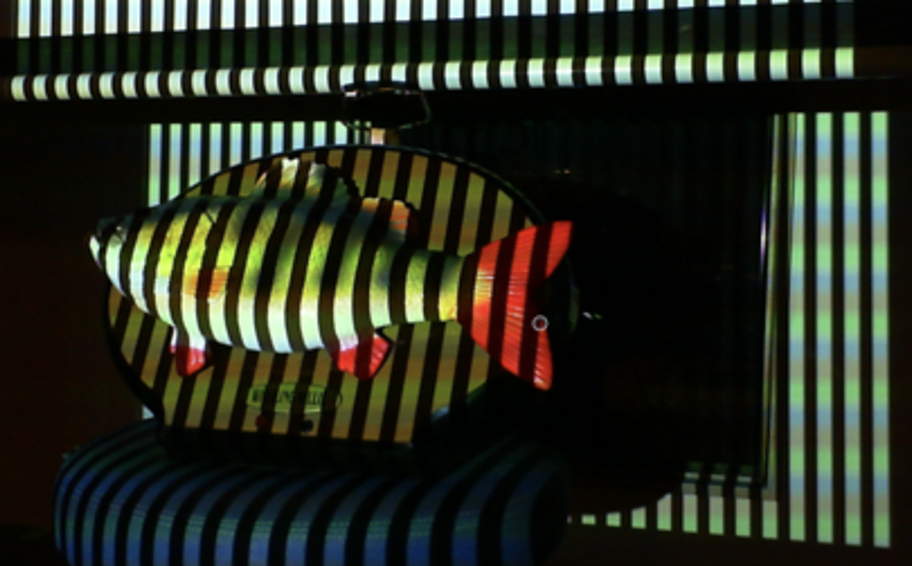
Structured light scanning (SLS) is a method of 3D modelling that measures the deformation of a projected light pattern on a real-world object to calculate geometry and generate a 3D digital mesh. SLS is generally much faster than photogrammetric modelling but tends to create models with lower resolution diffuse textures.
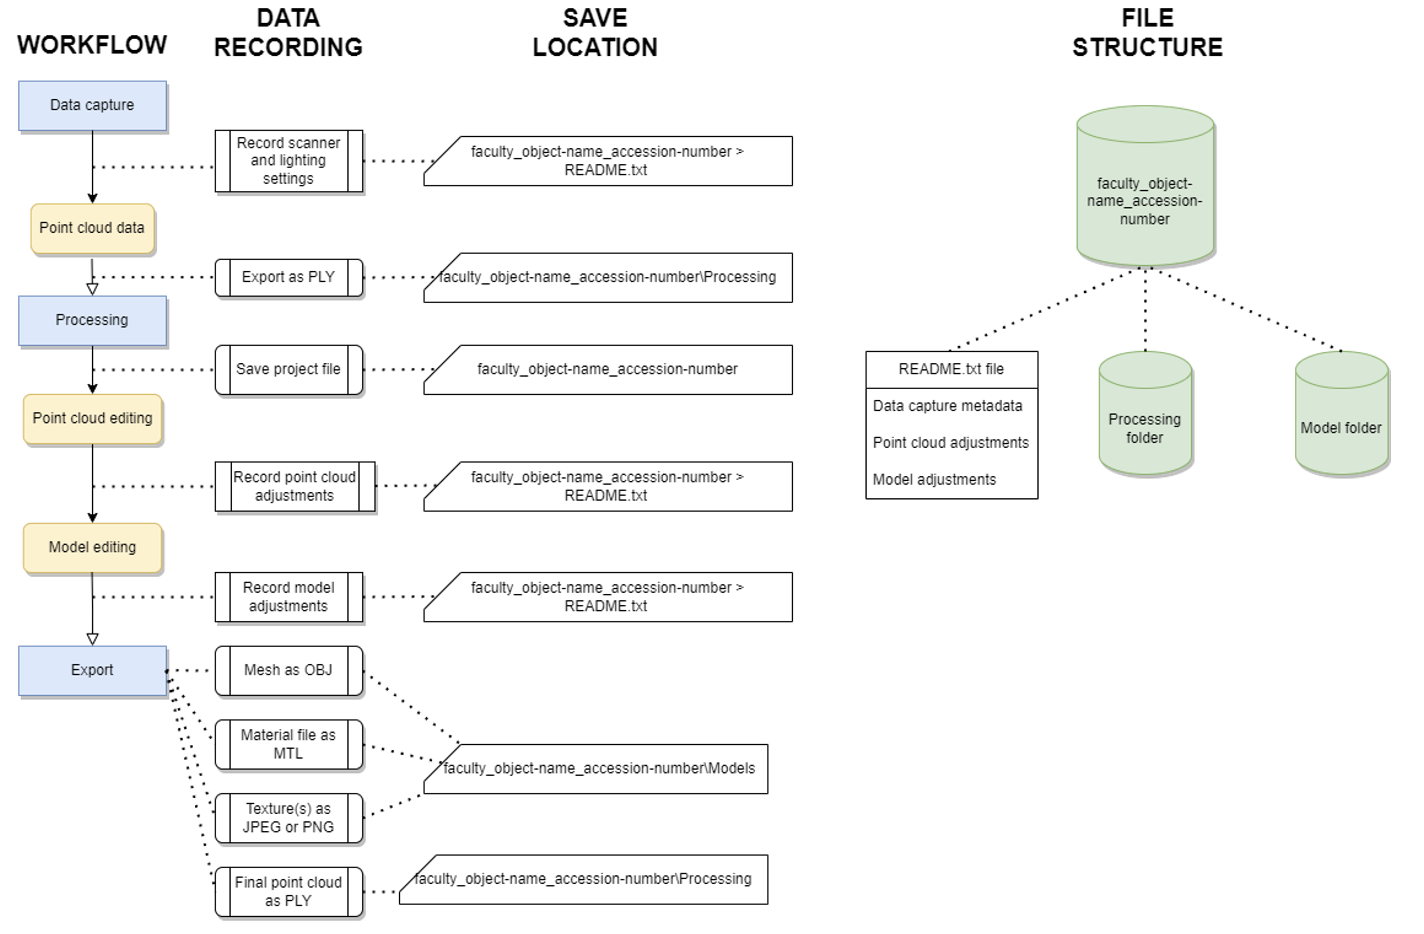
SLS can be regarded in three stages, each of which involves different forms of data that should be recorded and retained in some manner. The steps and associated data are listed here:
- Data capture
- Point cloud data (PLY)
- Capture metadata (recorded in a README.txt file saved in the main project file)
- Lighting conditions, scanner settings, the use of a turntable, etc. Any information which would be helpful for future users to understand the capture process used to replicate the model.
- Processing
- Project file: often saved in a proprietary format such as SPROJ for Artec Studio
- Point cloud editing metadata (recorded in the same README.txt file)
- 3D mesh editing metadata (recorded in the same README.txt file)
- Export
- 3D mesh data (OBJ)
- Diffuse texture files: colour data for the 3D mesh (PNG or JPEG)
- Material file: informs rendering software how textures are applied to the mesh (MTL)
Data capture
Data capture using a structured light scanner involves recording point clouds using a structured light pattern projected on to the target object which is recorded by the scanner’s camera. Basic scanners only record the geometry of the target object; more complex scanners may feature a second camera that simultaneously records the colour data of the target object to produce a diffuse texture. Data capture may involve a single scan or multiple scans which are to be aligned during processing.
Details of the data capture process should be recorded and saved in a README.txt file that is saved in the main project folder. Details such as the scanner and other equipment used, lighting conditions, and the number of perspectives scanned should be recorded here.
Captured point cloud data should be exported from the scanning device and saved as a non-proprietary ASCII format(PLY) within an organised and consistent file structure that follows a discernible naming convention to assist with future discoverability.
If a colour texture is also being produced, the photographs taken and used to create the image texture should be saved in a discoverable folder in a lossless compression format. Most scanners do not provide the option for images to be saved in raw format or in DNG format: if this is the case, photographs should be saved in PNG or TIFF format.
During the process of data capture, it is advisable to separately record associated metadata about the project and save it in a README.txt file that will be stored with the project files. Metadata may include data such as the name of the project, the name of the target object/area/environment being modelled, an ID code associated with the target (such as a museum acquisition number), a brief description of the target, the date of the data capture, the instrument used to scan the object, and the name of the person operating it. If you feel any additional information is relevant, this is the time to write it down and save it in this document.
Processing
Once scanning data has been acquired, it must be processed to create a 3D model. Some scanners may have viewports that show a 3D model being generated on-the-fly – it is important to recognise that this model is only a low-detail preview intended to indicate the comprehensiveness of the data captured, not act as a final model. Many scanners use proprietary software to create models. However, models can be created from the exported point cloud data in a variety of software packages provided the data is exported in a non-proprietary file format.
Processing SLS data often requires alignment of multiple scans to create a complete model, and this process will typically include manually editing the separate scans. Details such as this should be recorded in a README.txt file saved in the main project folder. Details of the processing software (including version number) used should also be included here, as should details of the texture generation process.
Once the final alignment is complete and a 3D model has been created, lower-detail versions should be produced so that the model is accessible on a variety of devices when uploaded to Pedestal 3D. Some proprietary SLS software such as Artec Studio v18 have in-built decimation features that allow you to create lower polygon versions. If this is not available in the modelling software used, open-source software such as Blender or MeshLab have decimation functions available.
Export
The high, medium, and low detail models should be exported separately and named according to the conventions outlined in the Pedestal 3D Upload Guide. The models should all be named identically except for_hp, _mp, or _lp at the end of the title to indicate high, medium, or low detail respectively. The following 3D mesh and image size are recommended for each level of detail:
- Low detail (lp): Up to 100,000 triangles.
- Medium detail (mp): 100,000 to 500,000 triangles
- High detail (hp): the full detail model
The following convention is recommended, with underscores connecting the elements:
faculty_object-name_accession-number_version-number_level-of-detail
Models should be exported as OBJ files for upload to Pedestal 3D, with the diffuse texture exported separately as an image file. An MTL file will also be produced informing hosting software how to connect the image file to the 3D mesh. As Pedestal 3D has upload limitations, it is recommended to export diffuse textures as JPEG or PNG images to allow more upload space for the 3D mesh.
PLY point cloud files of the final model should be exported separately for archival purposes, although they will not be uploaded to Pedestal 3D. They should be titled in the same format as the 3D model. It is not necessary to export point cloud data of the decimated models.
CT scanning
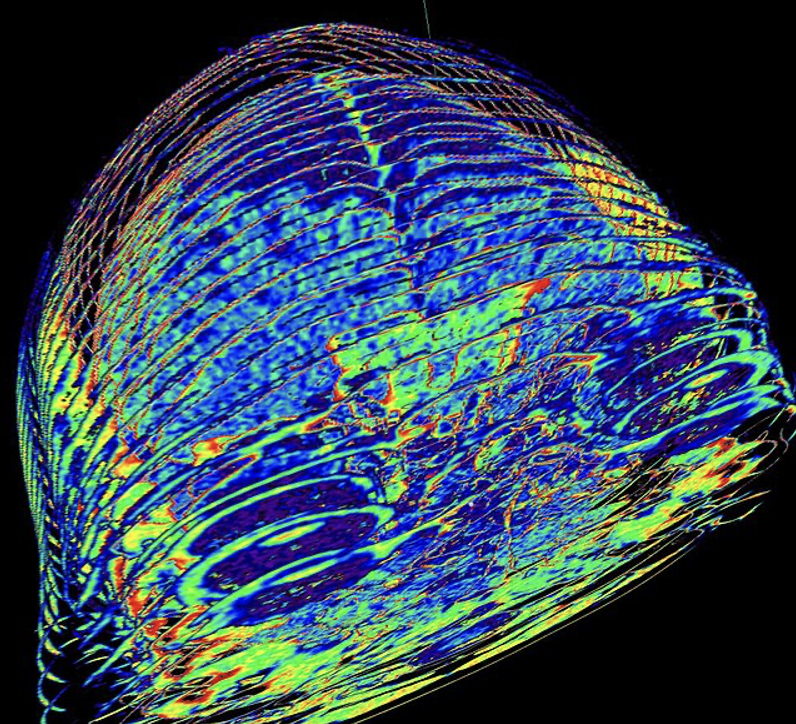
Computed tomography (CT) scanning is a non-destructive geometry acquisition technique which provides a series of cross-sections of an object that can be compiled into a 3D model. Traditionally CT scanning has been used in medical research and practice, but it is beginning to be used in other applications, particularly modelling of skeletal remains for zoological or archaeological analysis.
In comparison to other methods of 3D modelling, CT scanning has the advantage of significantly higher 3D resolution and creates geometry using volumetric ‘voxel’ data rather than surface mesh data, facilitating the creation of 3D models with both external and internal structures accurately modelled. The drawbacks of CT scanning are that it does not capture colour data, creating a model in a uniform, arbitrarily selected base colour, and requires specialised equipment and training that may not be worth the investment for certain modelling projects. Best practice guidelines for producing 3D models from CT scanning are presented in Robles et al. (2020).
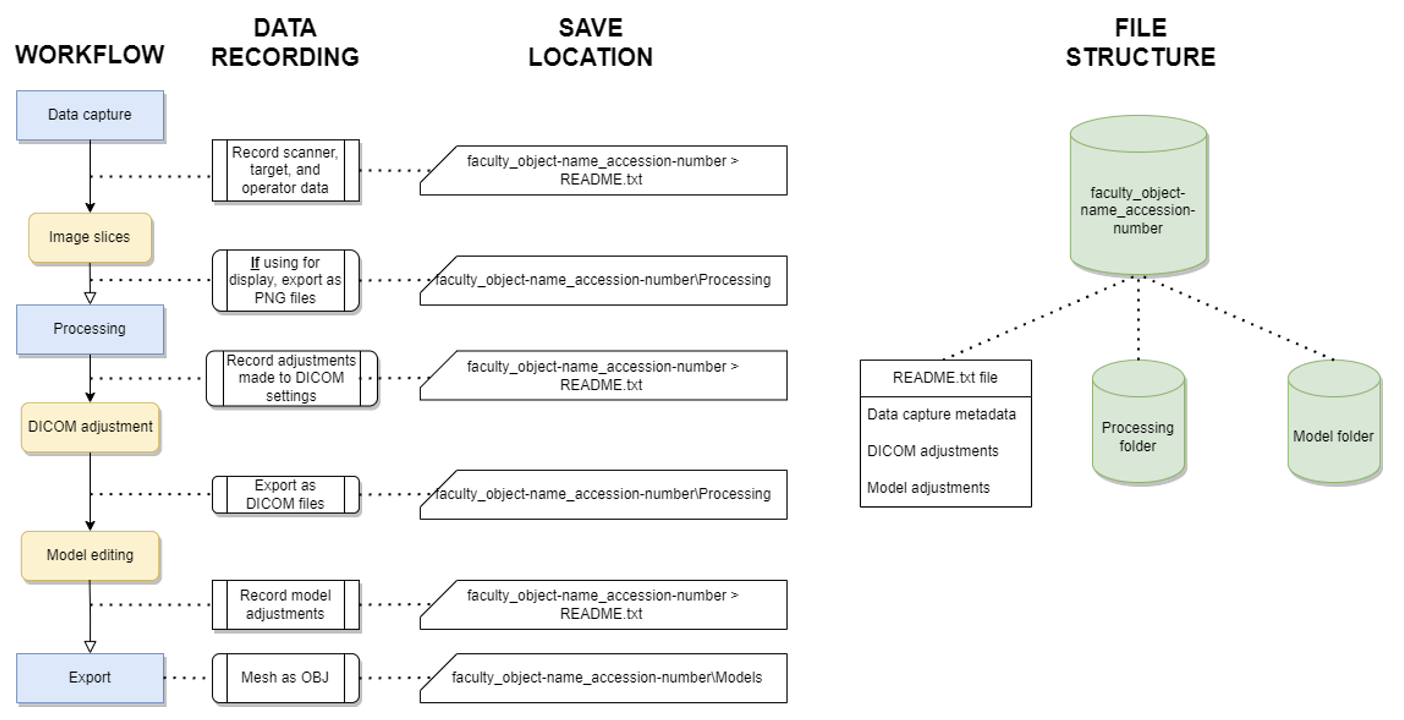
CT scanning can be regarded in three stages, each of which involves different forms of data that should be recorded and retained in some manner. The steps and associated data are listed here:
- Data capture
- Image slices in DICOM format.
- Capture metadata (recorded in a README.txt file saved in the main project folder)
- Processing
- Export
- Export formats will vary based on the reconstruction software used, but most software allows for exports in STL and OBJ formats. If possible, exporting to OBJ format is preferred as it is widely accepted across most 3D rendering platforms. However, converting STL models to OBJ format is easily accomplished in many platforms.
Data capture
Data captured using CT scanning are a series of image slices produced through beams of ionising radiation passed through a sample, recorded as Digital imaging and Communications in Medicine (DICOM) data. This data should be edited according to the needs of the project prior to 3D modelling.
During the process of data capture, it is advisable to separately record associated metadata about the project and save it in a README.txt file that will be stored with the project files. Metadata may include data such as the name of the project, the name of the target object being modelled, an ID code associated with the target (such as a museum acquisition number), a brief description of the target, the date of the data capture, the instrument used to scan the object, and the name of the person operating it. If you feel any additional information is relevant, this is the time to write it down and save it in this document. The aim is to allow a future user to understand what the model is and how it was created.
Processing
DICOM images must first be processed using an operation known as ‘segmentation’ to prepare them for 3D modelling. Segmentation prepares the DICOM data by manipulating the visibility of different levels of material density, which allows medical practitioners to obscure skin and flesh to view only high-density bone structures. Depending on the target object being modelled, this process may not require much investment in time. Segmentation is accomplished in DICOM viewing software.
Once the desired adjustments have been made, all images from the set should be exported as DICOM files (DCM) which will incorporate both the generated image files and the associated metadata. The files should be exported to a coherently labelled and discoverable folder. Naming systems should accommodate both human and machine readability, such that they can be easily recognised and ordered. They should be named such that a human can associate them with the project, and numbers should begin with zeros so that they are machine ordered (e.g. 001-999 rather than 1-999).
DICOM files will require specific viewing software to view them as images. If the individual images are intended to be used for presentation or sharing, it may be wise to convert them to a more widely accepted format such as PNG.
3D reconstruction of the target object from the DICOM files may be accomplished either in the same DICOM viewing software or require a separate program to complete. The 3D reconstruction software project should be saved in the same location as the DICOM files with a title that matches the DICOM image folder. If adjustments are made in the reconstruction software, such as mesh editing or data correction, these should be noted in a TXT file saved as a README.txt file in the same folder containing the DICOM file folder and the saved project file. This allows for the final process to be replicated by another user and reduces the risk of the target having to be re-scanned in the future.
Pedestal 3D allows for high, medium, and low detail versions of the same model to be uploaded. Particularly if the model is quite large (>500,000 polygons) this option can make models more accessible on low processing power devices. High detail models can be decimated to create medium and low detail models. This may be an option available in the CT reconstruction software, or it can be accomplished in third-party open-source software such as MeshLab and Blender.
Exporting
The high, medium, and low detail models should be exported separately and named according to the conventions outlined in the Pedestal 3D Upload Guide. The models should all be named identically except for_hp, _mp, or _lp at the end of the title to indicate high, medium, or low detail respectively. Models should be exported as OBJ files for upload to Pedestal 3D. The following 3D mesh and image size are recommended for each level of detail:
- Low: Up to 100,000 triangles.
- Medium: 100,000 to 500,000 triangles
- High: the full detail model
The following convention is recommended, with underscores connecting the elements:
faculty_object-name_accession-number_version-number_level-of-detail
Laser scanning
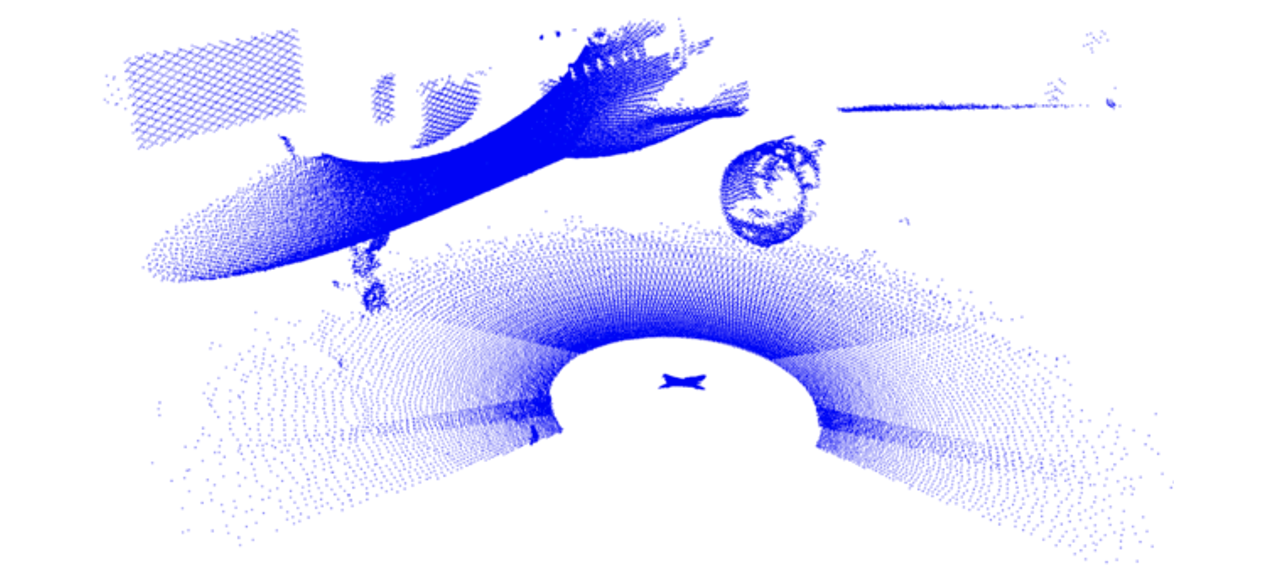
Laser scanning is a method of 3D modelling which calculates the geometry of a target object or environment by recording the response of laser pulses emitted from a scanner after they are reflected from the target surface. Laser scanners may use time-of-flight’, phase shift, or triangulation to calculate surface geometry. Detailed guides to best practices with laser scanning is presented in Andrews, Bedford and Bryan (2015) and Payne and Niven (2023).
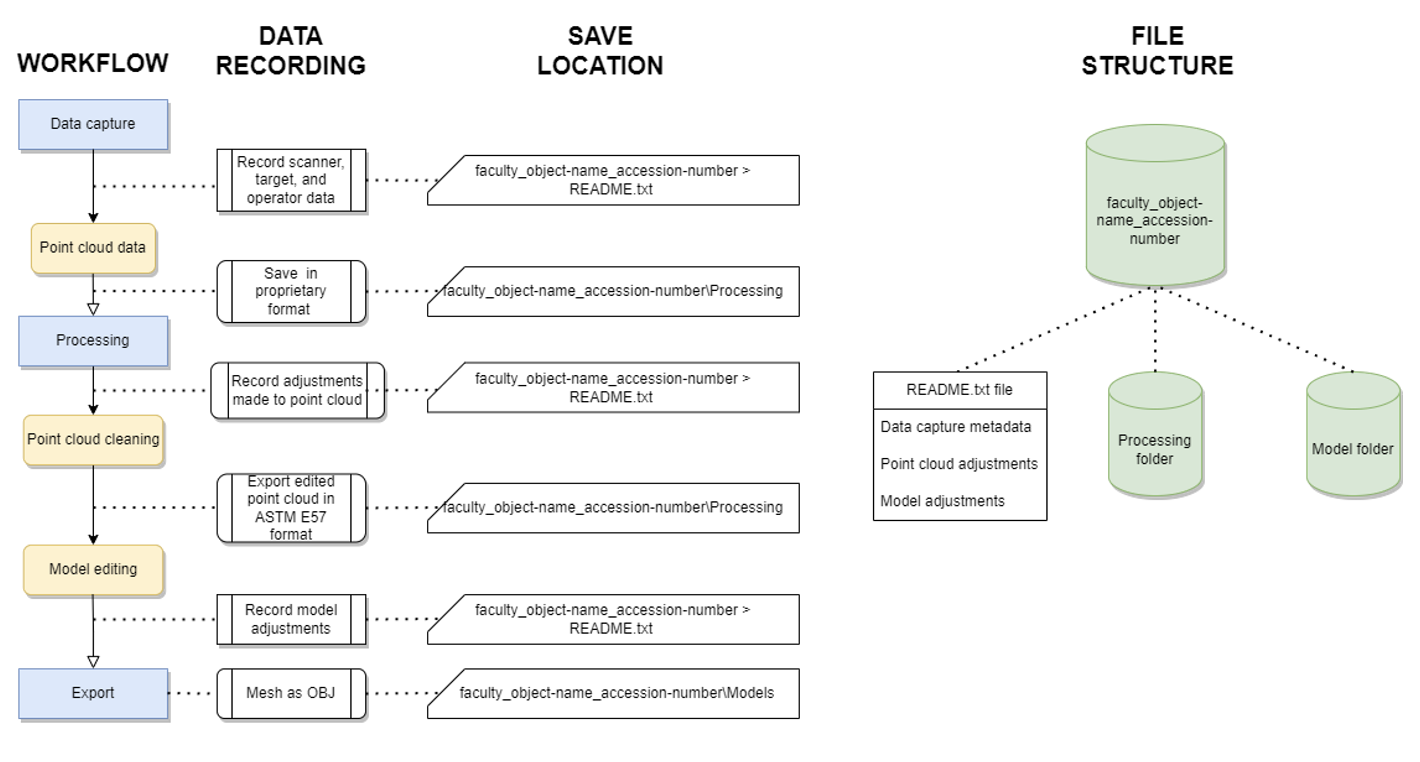
Laser scanning can be regarded in three stages, each of which involves different forms of data that should be recorded and retained in some manner. The steps and associated data are listed here:
- Data capture
- Point cloud data: typically in a proprietary format (such as E57, PTS, or PTG)
- Image data (if using a scanner which captures RGB images).Point cloud
- Processing
- Point cloud calibration and editing: usually accomplished in proprietary software developed for the scanner used.
- Export
- Exporting point cloud data: ASTM E57 is the preferred file format for exporting as it is vendor-neutral and can be accessed with a variety of platforms. If it is not possible to export to this format, open-source software such as CloudCompare may be able to convert the data for you.
- Export formats will vary based on the reconstruction software used, but most software allows for exports in STL and OBJ formats. If possible, exporting to OBJ format is preferred as it is widely accepted across most 3D rendering platforms. However, converting STL models to OBJ format is easily accomplished in many platforms.
Data capture
All laser scanners generate a point cloud of data points that vary across X, Y, and Z axes in relation to the laser scanner. This point cloud is used to generate a 3D mesh of connected geometry. Laser scanners may or may not include an RGB camera which produces a texture image to provide colour data to the 3D point cloud and model. Laser scanner data is typically captured on the scanning devices, and the data must be exported to a hard drive and transferred to a computer for further processing.
During the process of data capture, it is advisable to separately record associated metadata about the project and save it in a README.txt file that will be stored with the project files. Metadata may include data such as the name of the project, the name of the target object/area/environment being modelled, an ID code associated with the target (such as a museum acquisition number), a brief description of the target, the date of the data capture, the lighting or weather conditions impacting the appearance of the target, the instrument used to scan the object, and the name of the person operating it. If you feel any additional information is relevant, this is the time to write it down and save it in this document.
Processing
As the raw data produced in laser scanning is typically only viewable within the proprietary software associated with the scanner used, it is important to create and extract processed 3D data that can be used in other applications. A variety of deliverables can be produced for a variety of purposes, such as digital elevation models, CAD drawings, and cross sections. For this guide, we are focused only on the creation, recording, and exporting of 3D data. Before making any changes, it is wise to save the raw data to a separate folder where it can be recovered if necessary. The folder should be coherently named and discoverable to reduce the probability of needing to re-scan the target.
The first step to creating a high-quality 3D model from laser scanner data is cleaning the point cloud to remove errant or extraneous data. This process can be completed manually in 3D scan software. Adjustment parameters may be applied to the point cloud depending on the needs of the project; however it is generally advised to reserve most smoothing and optimisation until after the mesh is generated. Once the point cloud is cleaned, a 3D mesh can be generated. With the generated mesh, optimisation and cleaning processes such as hole filling, smoothing, texture mapping, and colour editing can be undertaken. All of these processes should be recorded in the metadata README.txt file, as should the version number of the software used.
Pedestal 3D allows for high, medium, and low detail versions of the same model to be uploaded. Particularly if the model is quite large (>500,000 polygons) this option can make models more accessible on low processing power devices. High detail models can be decimated to create medium and low detail models. This may be an option available in the laser scanning software, or it can be accomplished in third-party open-source software such as MeshLab and Blender.
Exporting
The point cloud data should be exported in ASTM E57 format. The high, medium, and low detail 3D mesh models should be exported separately and named according to the conventions outlined in the Pedestal 3D Upload Guide. The models should all be named identically except for _hp, _mp, or _lp at the end of the title to indicate high, medium, or low detail respectively. The following 3D mesh and image size are recommended for each level of detail:
- Low: Up to 100,000 triangles.
- Medium: 100,000 to 500,000 triangles
- High: the full detail model
The following convention is recommended, with underscores connecting the elements:
faculty_object-name_accession-number_version-number_level-of-detail
Models should be exported as OBJ files for upload to Pedestal 3D. If an image texture containing colour data has been created, it should be exported separately as an image file. An MTL file will also be produced informing hosting software how to connect the image file to the 3D mesh. As Pedestal 3D has upload limitations, it is recommended to export diffuse textures as JPEG or PNG images to allow more upload space for the 3D mesh.
References
Andrews, D., J. Bedford, and P. Bryan. 2015. Metric Survey Specifications for Cultural Heritage. Swindon: Historic England.
Digital Preservation Coalition. 2021. Preserving 3D: Artefactual Systems and the Digital Preservation Coalition. Great Britain: The Digital Preservation Coalition.
Historic Environment Scotland. 2018. Applied Digital Documentation in the Historic Environment. Edinburgh: Historic Environment Scotland.
Historic England. 2017. Photogrammetric Applications for Cultural Heritage: Guidance for Good Practice. Swindon: Historic England.
Lindlar, M. and H. Saemann. 2014. “The DURAARK Project: Long-Term Preservation of Architectural 3D-Data." Annual Conference of the International Committee for Documentation of ICOM (CIDOC 2014), Dresden, Germany.
Payne, A. and K. Niven, eds. 2023. “Guides to Good Practice: Laser Scanning.” Archaeology Data Service.
Robles, M., R.M. Carew, R.M. Morgan, and C. Rando. 2020. “A step-by-step method for producing 3D crania models from CT data.” Forensic Imaging 23:200404.
Moore, J., A. Rountrey, and H.S. Kettler, eds. 2022. 3D Data Creation to Curation: Community Standards for 3D Data Preservation. Chicago: Association of College and Research Libraries.