Journals and blogs in the LMS
Creating a journal activity
LMS Assignments
LMS Assignments can be used as a journal tool where student submissions are accessible only to staff to review and grade.
You can set up one assignment where students submit multiple journal entries and receive one overall combined grade. Alternatively, you can create one assignment for each journal entry; however, this approach may over-clutter the Assignments page if there are many journal entries to be completed by students.
You can follow the standard process of setting up a LMS Assignment to create a journal assignment. For step-by-step instructions, see how do I add or edit details in an assignment. Note: We recommend setting the Submission Type to Online, then selecting either Text Entry or File Uploads. Both submission types will allow staff and students to view student’s journal submissions along with the submission date and time.
To view and evaluate multiple submissions, refer to the how do I view the details of a submission for a student in SpeedGrader guide for the detailed instructions.
Stackle
Stackle Learning Journal allows you to set up a journal activity consisting of multiple entries in one build, then embed each journal entry where it belongs in your Canvas modules or pages.
Use a Stackle Learning Journal when you want students to:
- Build a habit of short, regular reflection by completing journal entries
- Track progress, decisions, and feedback across the semester
- Bring their journal entries together so students can look back across weeks (and, if enabled, export their journal entries as a Word document for portfolio-style tasks)
How Stackle Learning Journal works in practice
When you create a Stackle Learning Journal, you:
- Build multiple journal entries as a set (for example 10 weekly prompts)
- Embed each journal entry into the relevant Canvas page or module item
- Optionally embed the collated “all prompts” activity so students can review their journal entries across the teaching period in one place
For step-by-step instructions, see creating a Learning Journal with Stackle.
Cadmus
Cadmus Assignment, which operates as a browser-based online assessment tool, can be used as a journal tool to allow students to record their journal entries continuously until the submission due date.
Cadmus offers a range of assessment templates, such as the Reflective Journal template, that you can use to scaffold the journal activity for students.
Cadmus also allows one draft submission per assignment, meaning that you can require students to submit their journal entries as a draft at one point during the assessment and provide feedback on their journal. All submissions in Cadmus will be run through Turnitin to generate similarity reports.
For step-by-step instructions on how to set up and configure settings for a Cadmus Assignment, see setting up a Cadmus link in the LMS and setting assessment requirements (Canvas).
H5P
The H5P Documentation tool allows you to create a structured journal writing activity for students. You can pre-define the structure of the journalling activity with prompts and questions to ensure a consistency amongst student responses.
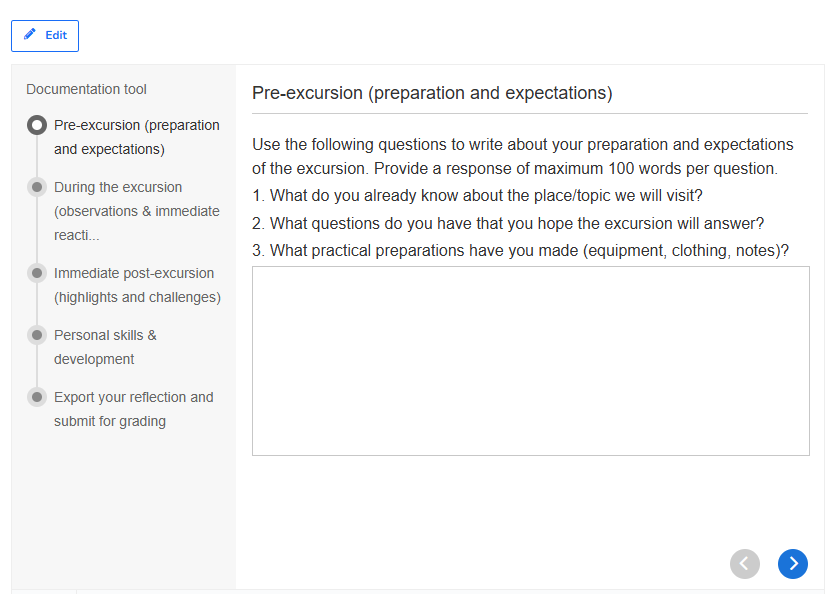
Once students enter their reflection into the provided text box, they can then generate a downloadable document with their responses and submit it to a LMS Assignment for grading.
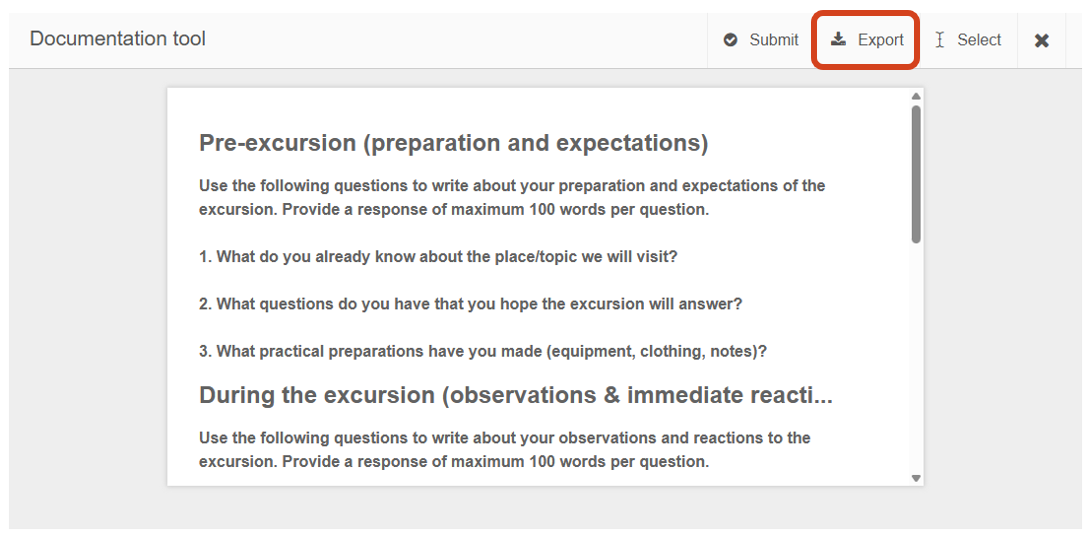
Note: The Submit button saves a copy of student response to H5P which can be viewed by the staff member who is the owner or collaborator on the H5P activity. However, the activity cannot be graded in H5P itself.
For step-by-step instructions on how to add a H5P activity to your LMS subject, see H5P in the LMS.
For detailed instructions on how to set up a H5P Documentation tool, refer to the Documentation Tool tutorial guide.
PebblePad
As PebblePad blogs are private by default, they can be used as journals or shared with peers, with students being able to control share permissions within PebblePad. Students can record and reflect on their learning experiences such as during a project or on a placement. These activities can be completed at a specific point in time or on an ongoing basis. The posts can be displayed in chronological order.
The activity can be unassessed or assessed. However, if you are planning to use it as a summative assessment, contact Teaching and Learning Innovation to discuss your needs and request for PebblePad to be linked with your LMS subject.
For further information on setting up or using blogs, refer to the create a blog guide and the create, edit and share blog posts in PebblePad student guide.
If you would like any support with setting up a journal activity, please submit a support request for assistance.
This guide was last updated 21 Aug 2026.
Submit an LMS support request for further assistance or to report any errors or omissions in this guide.
Creating a blog activity
LMS Discussions
LMS Discussions can be used as a blog tool and they can be set up to allow students to see each other’s posts and comment on them. LMS Discussions can be graded if required.
There are two ways to set up LMS Discussions for a blog activity, either using Sections or Groups within Canvas LMS.
Students complete their blogging activity within a Section
You can assign a LMS Discussion to each section within your subject where students who are in the same section can share their blog posts and interact with other students' blogs. Students from other sections will not see the Discussion that is not assigned to them. Students' blog posts and replies can be graded in SpeedGrader.
For step-by-step instructions on how to assign a LMS Discussion to a section, see how do I create a discussion as an instructor.
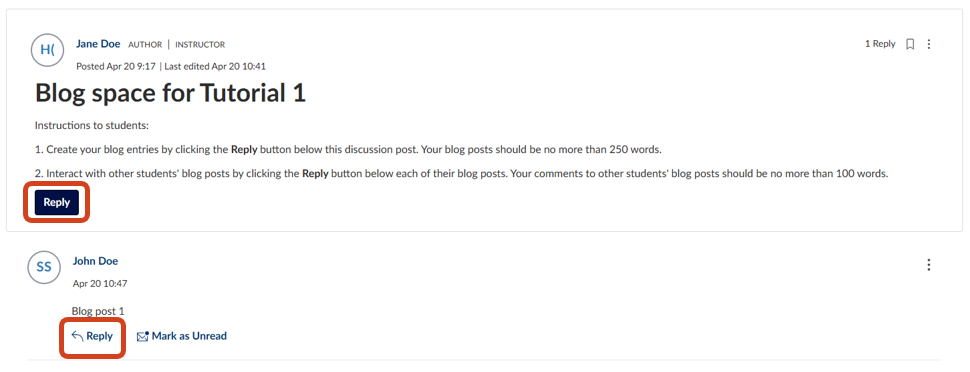
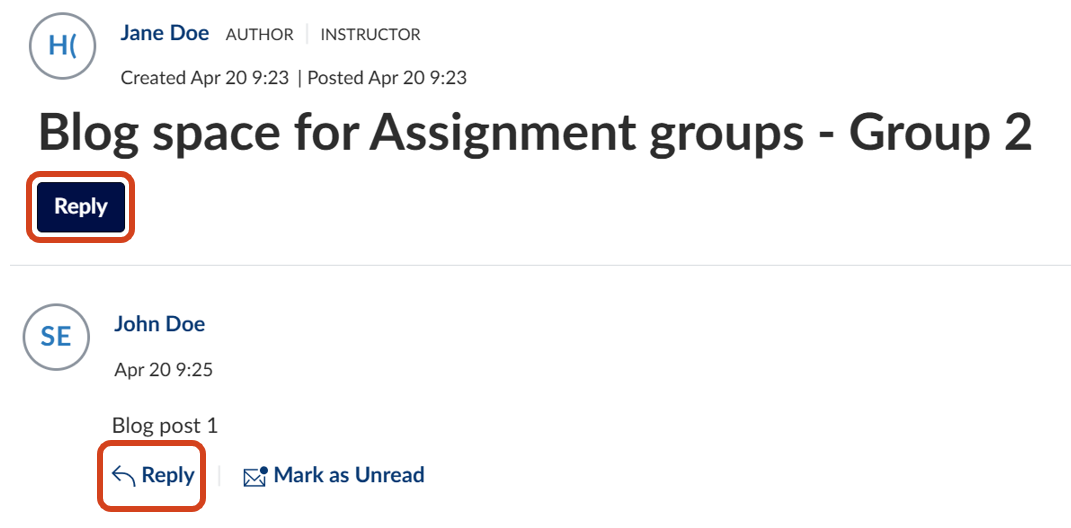
One effective way to manage student blogs with this set up is to request all students within the assigned section to start their blog entries by replying to the main discussion post, where they can find the task instructions. Other students can interact with the blog entry by replying to the individual student discussion threads.
Students complete their blogging activity within a Group
You can set up a group LMS Discussion to allow students within their groups to share their blog posts and interact with other students' blogs. With this set up, there will only be one group LMS Discussion link required. Students' blog posts and replies can be graded in SpeedGrader.
Follow the process below to create groups in your LMS subject and set up a group LMS Discussion.
- Create a group set in your LMS subject, see how do I add a group set in a course. You have the option to allow students to self sign up to a group, and whether to create the groups automatically or manually.
- Create a group LMS Discussion by following the instructions in the how do I create a discussion as an instructor guide, ensuring the This is a Group Discussion checkbox is selected and adding the relevant group set.
- To view different groups in the LMS Discussion, click the Group discussion dropdown and select the relevant group. Note: The navigation thread at the top of the page will change to the Group Homepage when you click on the Group name.
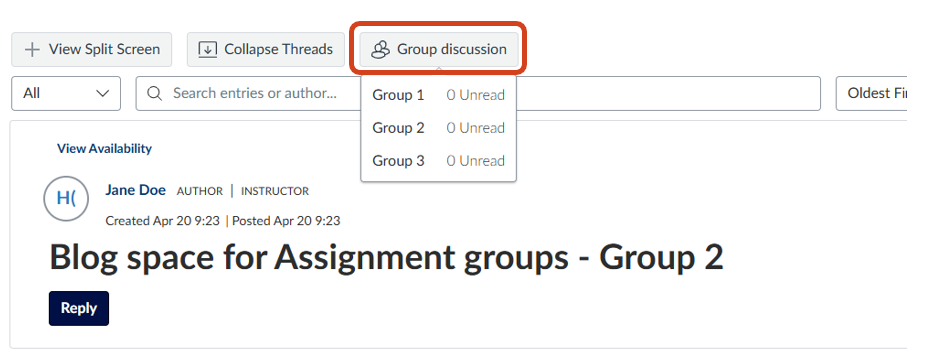
Students can access their group discussion via the Discussion page, via the Assignments page (if grading is enabled in the group discussion settings), or via the Groups icon on the global navigation menu.
One effective way to manage student blogs with this set up is to request all students within their group to start their blog entries by replying to the main discussion post, where they can find the task instructions. Other students can interact with the blog entry by replying to the individual student discussion threads.
PebblePad
PebblePad blogs are private by default. If you want students to publicly share their blog, either with their peers or a wider audience, they will have to configure the access permissions for the blog. Students can use blogs to practise their writing on specific topics for a larger audience.
PebblePad blogs can form part of an unassessed or assessed activity. However, if you are planning to use PebblePad blogs as part of a summative assessment, contact Teaching and Learning Innovation to discuss your needs and request for PebblePad to be linked with your LMS subject.
For further information on setting up or using blogs, refer to the create a blog guide and the create, edit and share blog posts in PebblePad student guide.
FeedbackFruits
The FeedbackFruits Discussion on Topic or Discussion on Work tools facilitate and structure discussion amongst students. Discussion on Topic activities will create individual discussion threads for each student’s response to the topic set by the instructor, while Discussion on Work requires students to submit file(s) that will then be used as a discussion prompt.
While guides with detailed setup instructions for both tools are linked at the end of this section, the following settings are particularly important when configuring these activities for blogs.
- Student Collaboration: Instructors can configure the assignment to require students to complete posts as individuals or as groups, and discussions can take place within or outside of assigned groups
- Required number of posts: Students will be required to complete a minimum or exact number of posts specified
- Required length of posts: Set a minimum word requirement for each post
- Peer discussion:
- Discussion on Topic activities can be set up as a free form discussion with the option to specify the number of posts students will need to choose to discuss; or assigned discussion, where students can see every post but are allocated to a specific number of peers to review (students will have to discuss all of the posts by each assigned peer).
- Discussion on Work activities are assigned discussions by default, and will require students to complete the number of randomly allocated peer reviews required in this step before they’re able to access the open discussion that allows students to see every post and optionally contribute beyond the number of required reviews
- Grading: Configure automated grading for whether the student met the required number of posts/reviews. If you would like to grade students based on the quality of their posts/reviews, contact TLI for advice using the link at the bottom of this page.
- Reflections: Adding this optional step will require students to write a reflection on the Discussion activity following completion of the peer discussion step.
For detailed instructions, follow the relevant vendor guide below:
- Discussion on topic: For teachers (setting up)
- For managing an activity once students have started participating
- Discussion on work: For teachers (setting up)
- For managing an activity once students have started participating
If you would like any support with setting up a blog activity, please submit a support request for assistance.
This guide was last updated 21 Aug 2026.
Submit an LMS support request for further assistance or to report any errors or omissions in this guide.