How do I import questions from Microsoft Word to a Canvas Quiz?
Respondus 4.0 allows you to create and edit your Quiz questions in a Word document then import into the Respondus 4.0 desktop application and publish directly to Canvas as a Quiz.
We focus on multiple choice question types in this guide.
- Other questions types are covered in pages 47 to 55 of the Respondus user guide.
- For information on the Respondus Text Bank Network see page 7 of the Respondus user guide.
Overview
Getting your quiz questions from a Word document to a Canvas Quiz takes a number of steps:
- Formatting in Word
- Installing the Respondus 4.0 software
- Importing questions into Respondus 4.0
- Previewing questions in Respondus 4.0
- Publishing questions into your Canvas LMS subject
Formatting in Word
Respondus allows you to import various question types:
- Multiple choice
- True and false
- Essay
- Fill in the blank
- Matching
- Multiple response.
The questions must be organized in a format that is acceptable to Respondus and the file must be stored in one of the following formats:
- Plain text (.txt)
- Rich text (.rtf)
- Microsoft Word (.doc and .docx)
- Tab/comma delimited (.csv).
The file must be formatted into what is called The Standard Format for Importing Documents.
The Standard Format has required and optional elements.
Required elements
Each question regardless of the question type, must begin with a question number, followed by either a period “.” or a parenthesis “)”.
3)
3.
You can use the Numbered List option in Word to create a number.

The question wording must follow the question number.
- Note: At least one space should be between the question number and the question wording.
3) Who determined the exact speed of light?
3. Who determined the exact speed of light?
Each answer must begin with a letter (A-Z) followed by a period “.” or a parenthesis “)”.
3) Who determined the exact speed of light?
a. Albert Einstein
b. Albert Michelson
c. Thomas Edison
d. Guglielmo Marconi
Again, you can use the numbering function in Word but select the letter list.
Optional elements
A title can be imported with each question. These will be added to each Canvas question as the question name. Titles are defined by writing a line above the question: Title: text of the title.
If not specified, the first 20 characters of the question will be used as the title.
Title: Speed of light
3) Who determined the exact speed of light?
a. Albert Einstein
b. Albert Michelson
c. Thomas Edison
d. Guglielmo Marconi
Answer key for multiple choice
A list of correct answers at the end of the document file is best.
Answers: On the top line with the numbers and correct answer below like this.
Answers:
1. A
2. C
3. B
Or an asterisk (*) immediately (no spaces!) in front of the answer choice.
Title: Speed of light
3) Who determined the exact speed of light?
a. Albert Einstein
*b. Albert Michelson
c. Thomas Edison
d. Guglielmo Marconi
Other question types
For information on importing other question types, see pages 47 to 55 of the Respondus user guide.
Installing the Respondus 4.0 software
Respondus 4.0 is a Windows only desktop application.
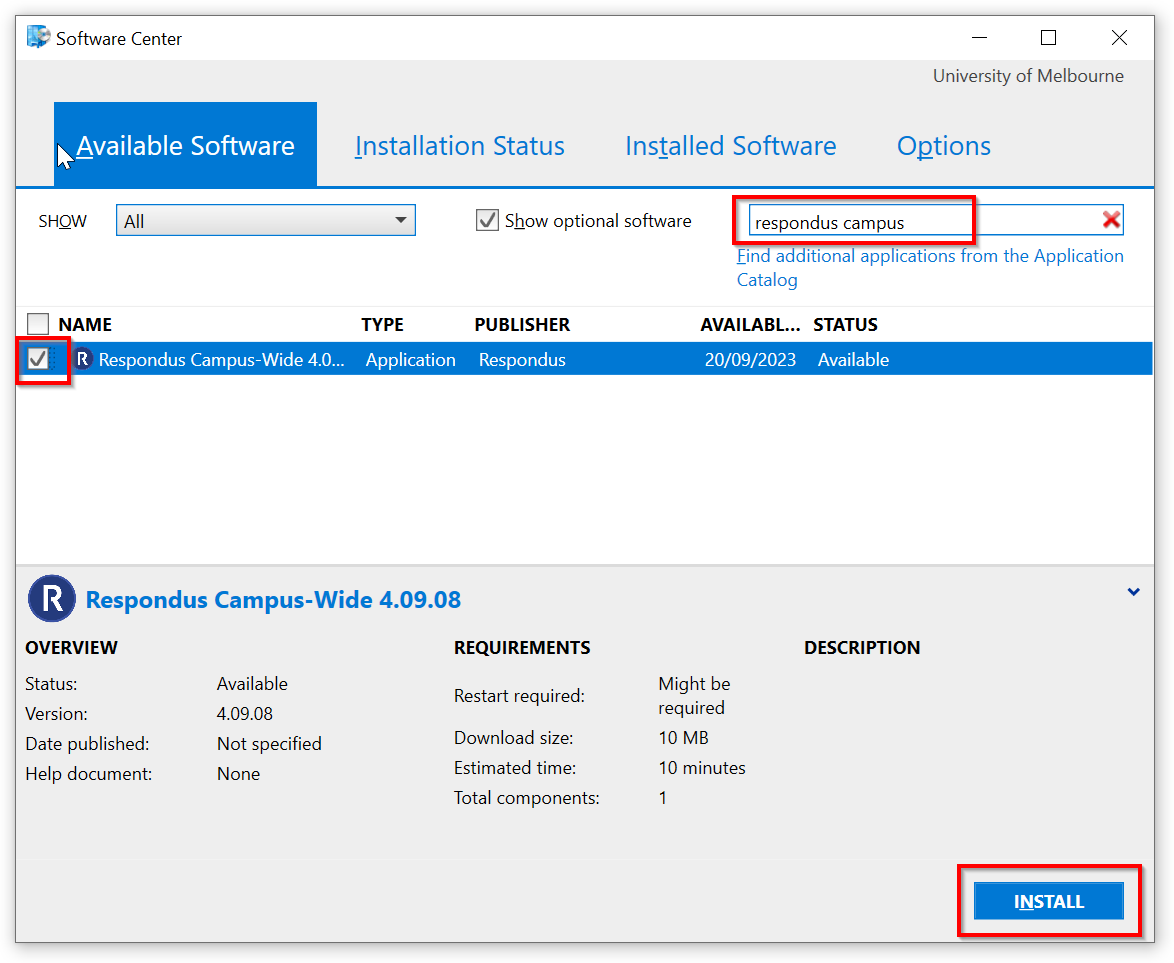
It is licensed University wide and available from the Software Center. See this guide for instructions on how to find and install software from the Software Center.
- Searching for respondus campus in the Software Center on your computer will find Respondus 4.0.
Importing questions into Respondus
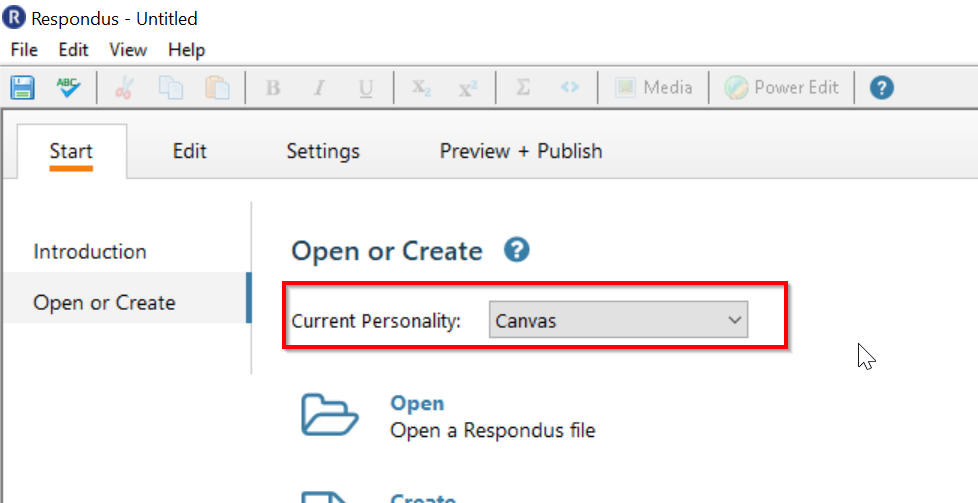
The first step is to import your Word document (or other file type).
- From the Current Personality drop down menu, select Canvas.
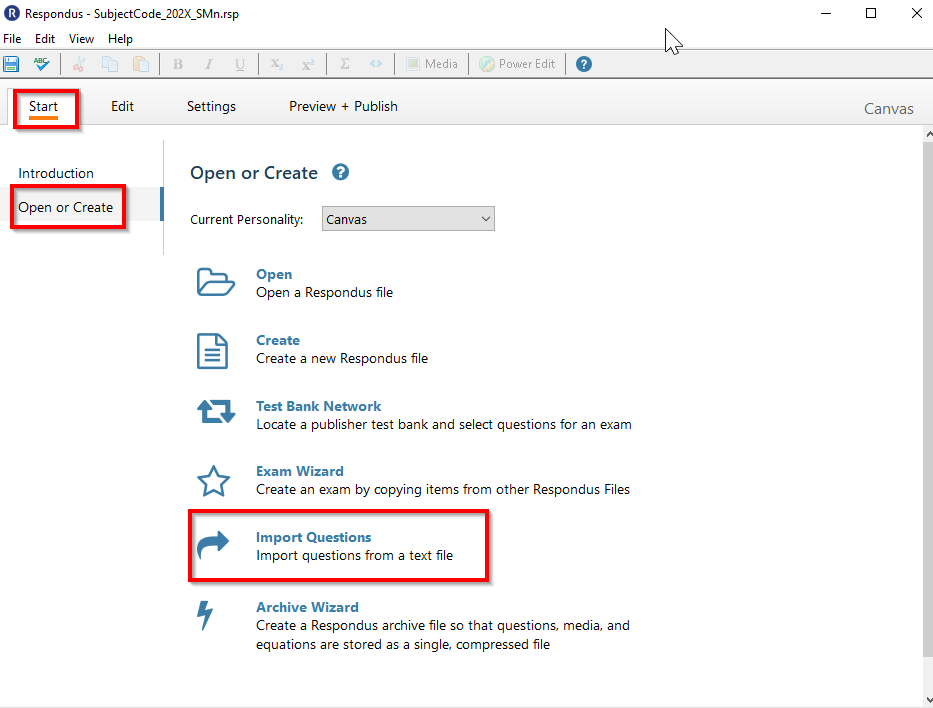
- In the top-left, click the Start tab, then Import Questions.
- The Import Questions window displays.
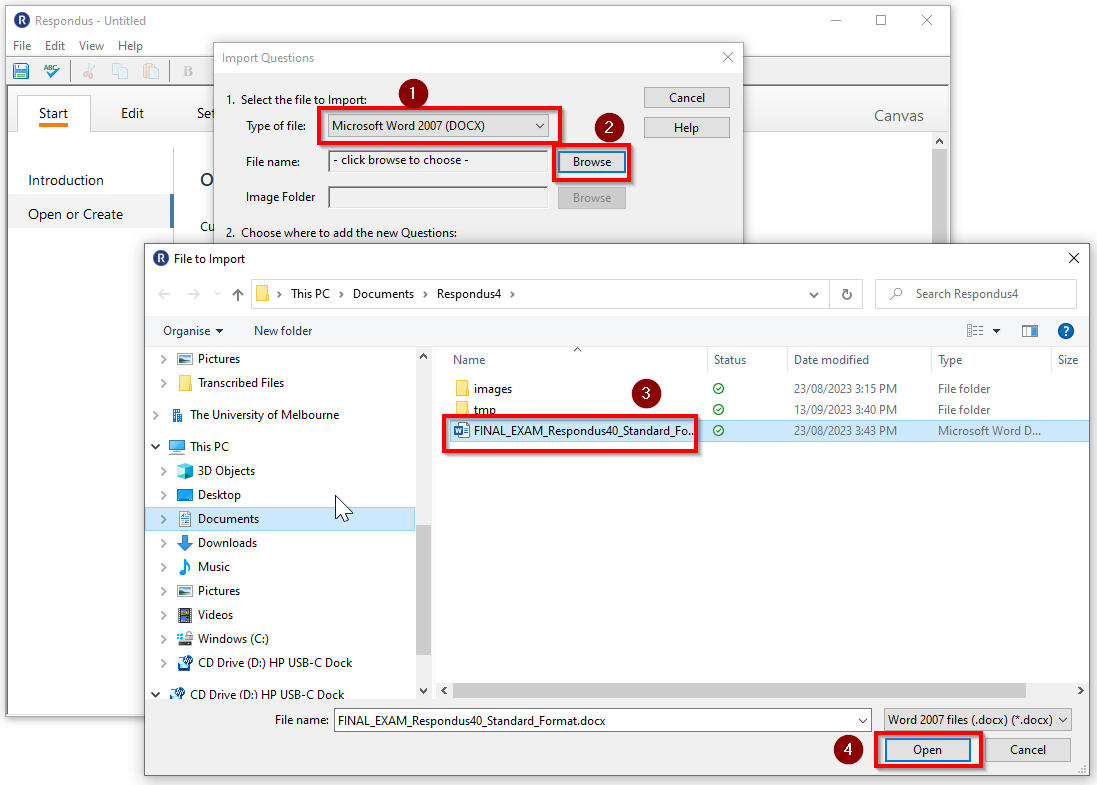
- Select the Type of file you are importing (1).
- Supported files include .txt, .rtf, .doc and .docx.
- Click Browse to locate your file (2).
- Select the file in Windows Explorer (3).
- Click Open (4).
- Select Create a new document named, and in the text field, enter a name.
- This will be the title of the Quiz or Exam when uploaded to Canvas.
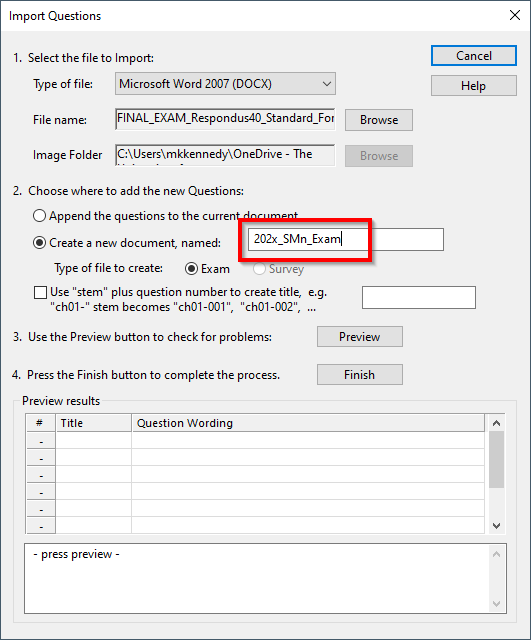
- Click Preview. Preview results will display below, along with any warnings.
- If there are warnings, check the file - it may be a formatting issue in the Word file. Try and clean it up in Word.
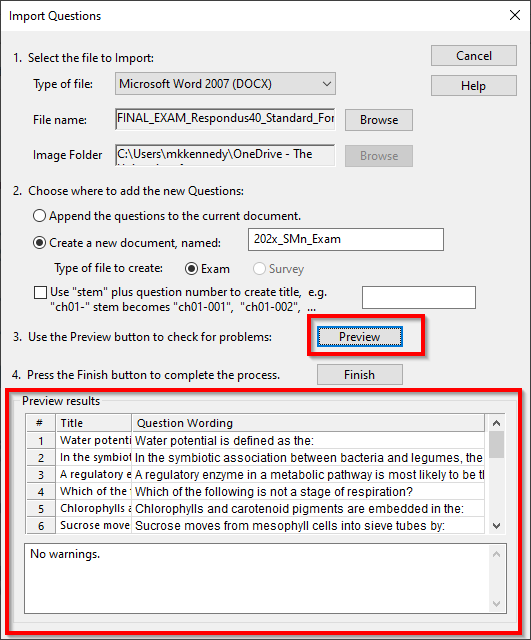
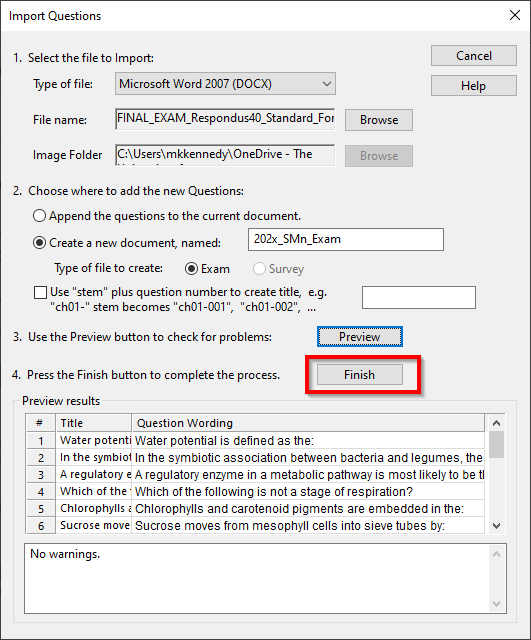
- If the preview is successful, click Finish.
Previewing questions
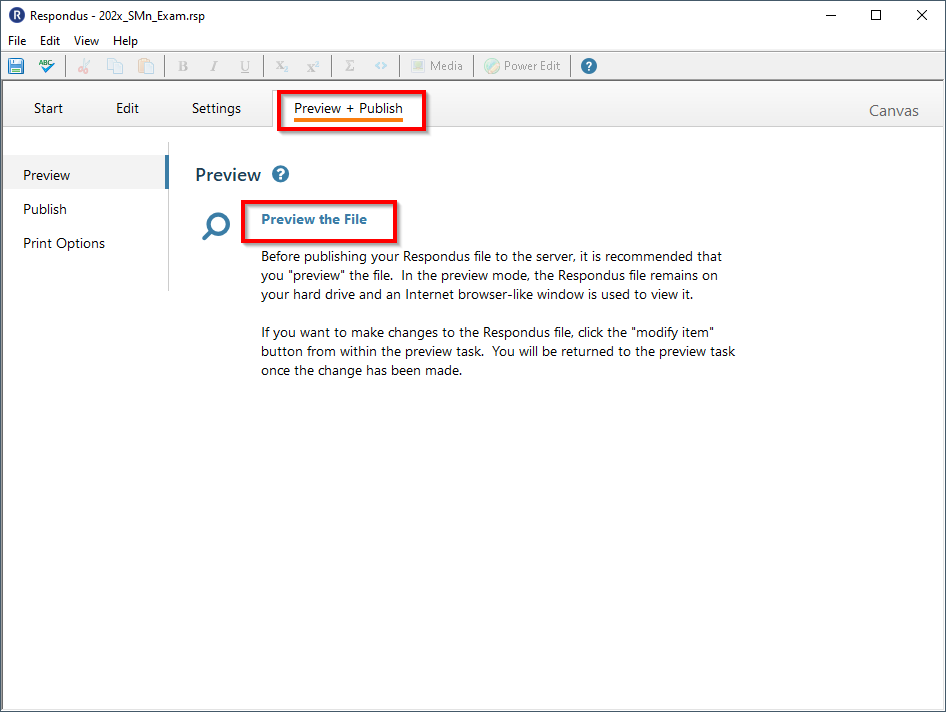
- Click the Preview + Publish tab.
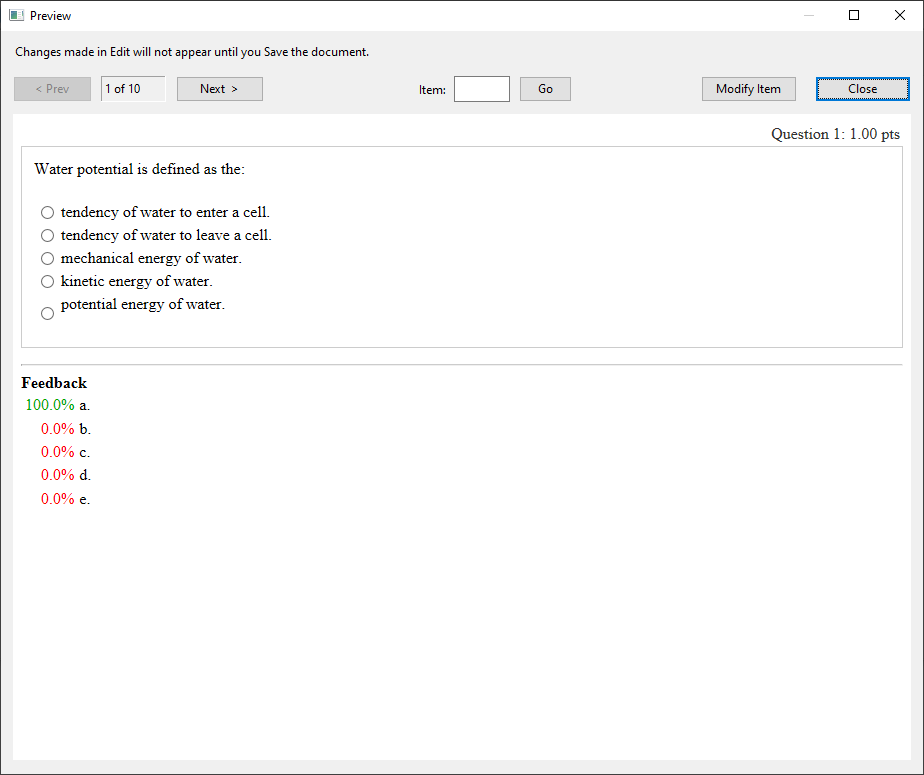
- Click Preview the file.
- Ensure the number of questions listed at top left matches those in the file import.
- Click Next to move through each question, reviewing each answer.
- Pay close attention as you move through the questions in case any questions are combined by mistake.
- Use the Modify Item button to make any changes.
- Click Close when reviewing is complete.
Publishing to Canvas LMS
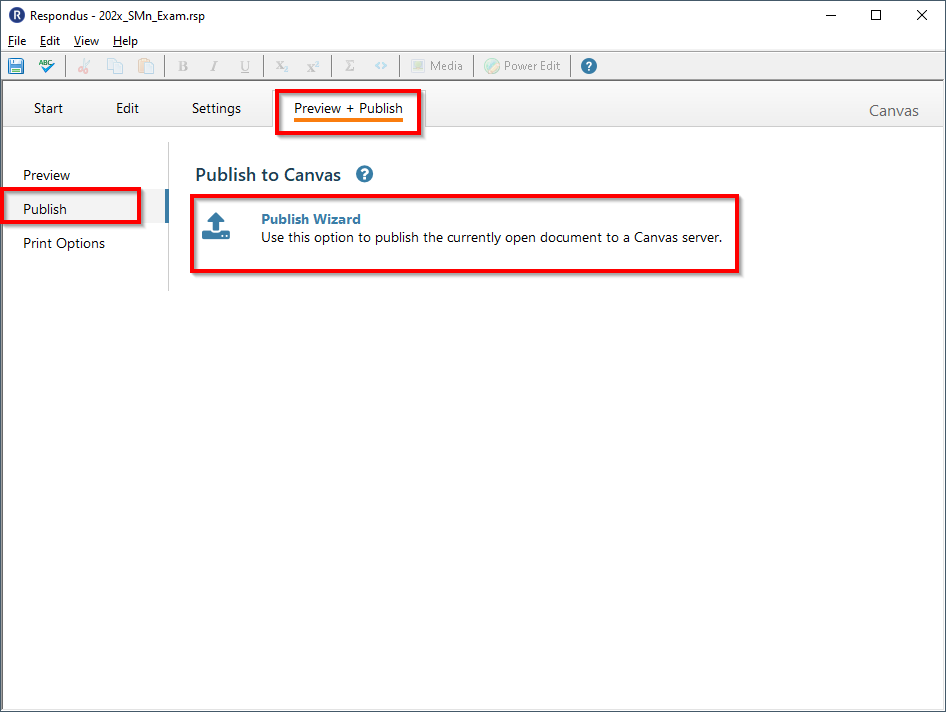
- Click the Preview + Publish tab.
- In the left menu, click Publish.
- Under Publish to Canvas, click Publish Wizard.
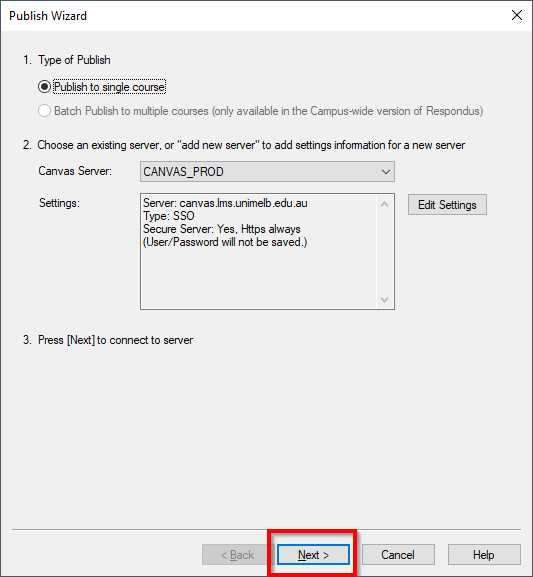
- Without changing any settings, click Next.
- Settings must be:
Server: canvas.lms.unimelb.edu.au
Type: SSO
- Settings must be:
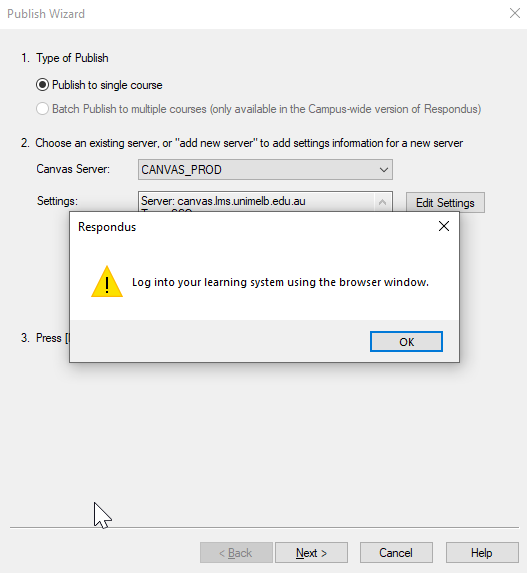
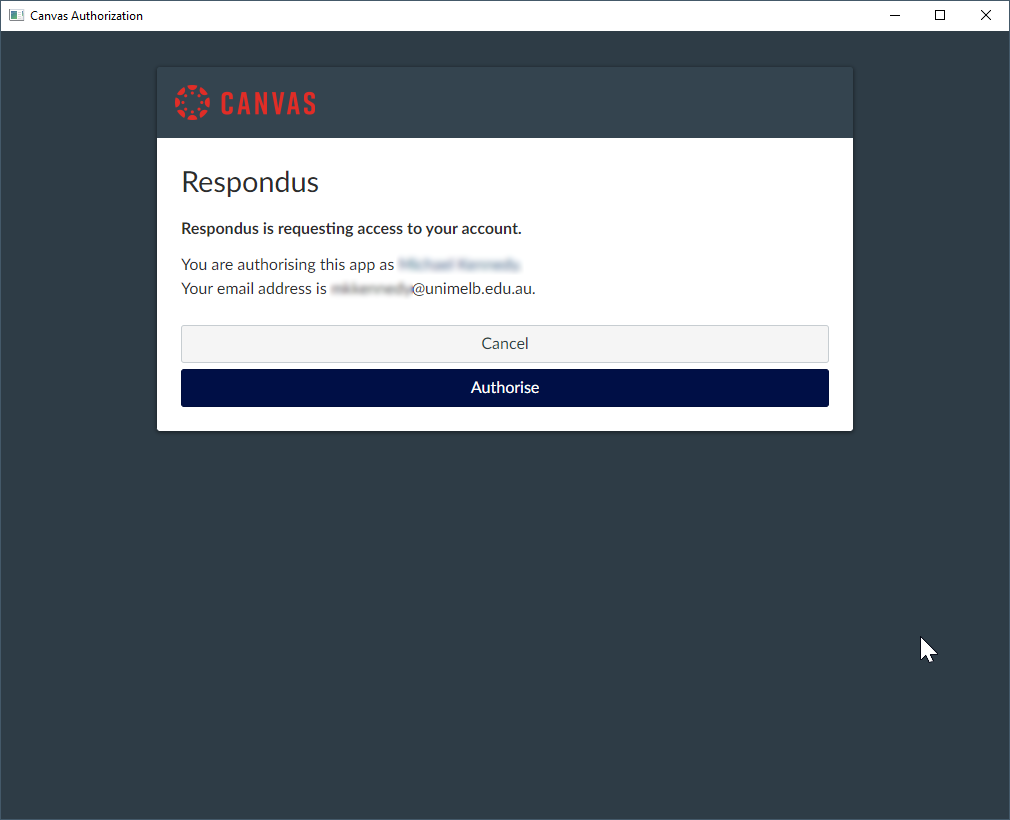
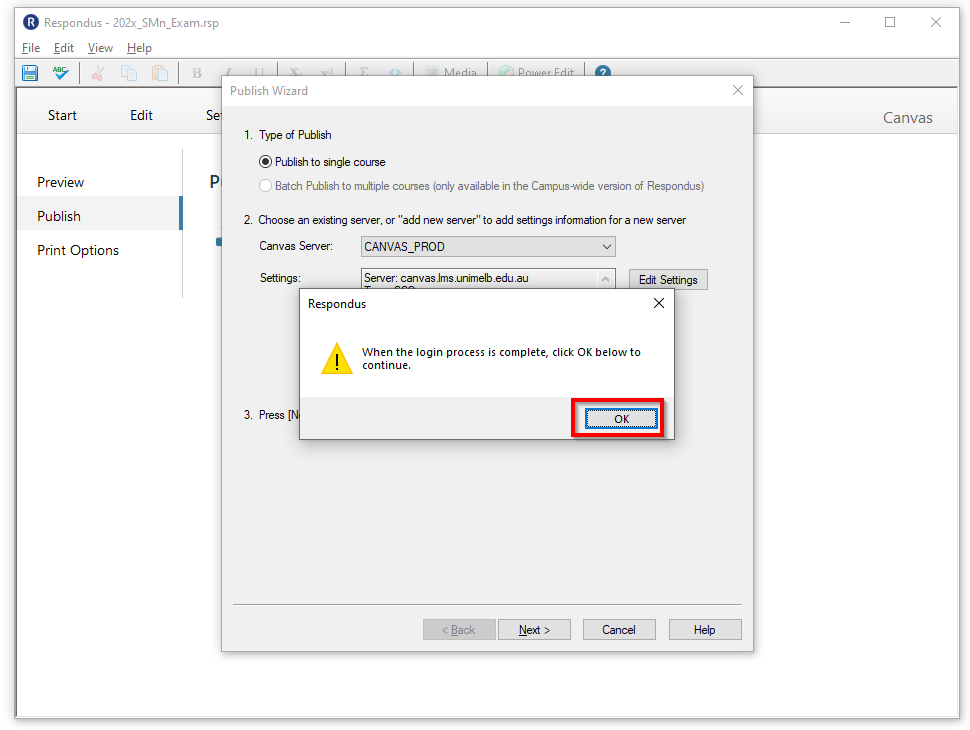
- You will be prompted to Log into your learning system using the browser window, click OK.
- After clicking OK, the Canvas Authorization window will open, follow the steps to log in via SSO.
- See this knowledge base article for instructions.
- Once you have successfully authenticated, Canvas LMS will asks for authorisation of the Respondus request, click Authorise.
- The login process is complete.
- Return to the Respondus 4.0 application and click OK.
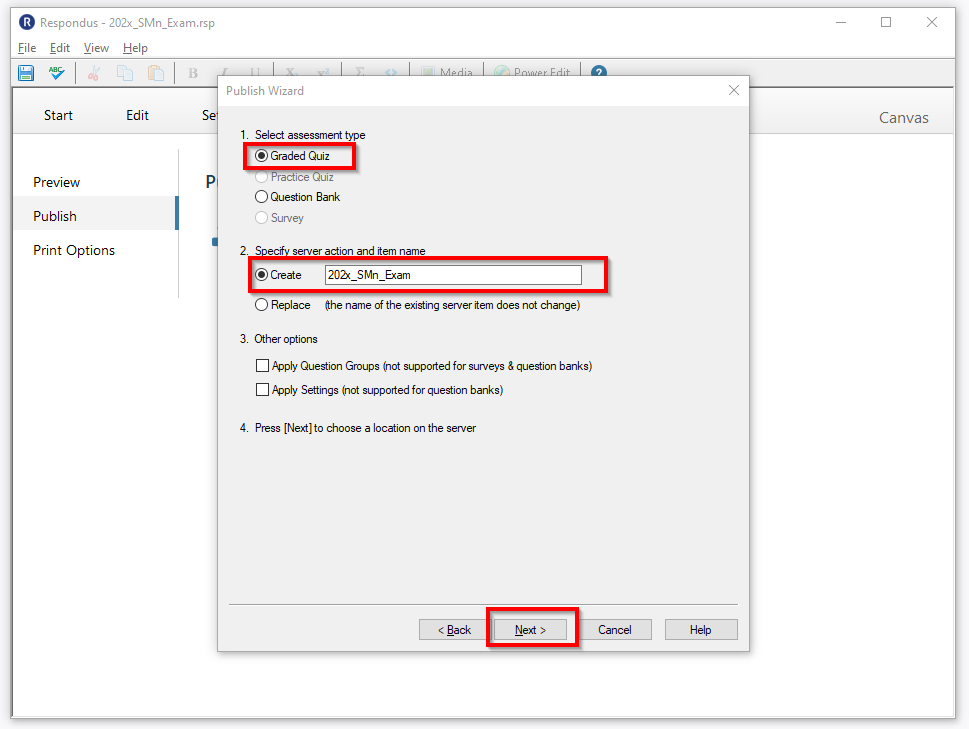
- Review the options, leaving Select assessment type as Graded Quiz.
- Click Next.
Known issue with Canvas Question Banks
There is a known issue with Canvas when publishing questions with images to a Question Bank. It is an issue with Canvas processing the questions after the QTI files is uploaded to Canvas outside of Respondus 4.0. Always choose Graded Quiz.
When publishing to a Graded Quiz, Canvas creates a copy of the quiz as a companion Question Bank. If you want a Question Bank with images, choose Graded Quiz, then use the companion Question Bank after ensuring all images are uploaded to Canvas.
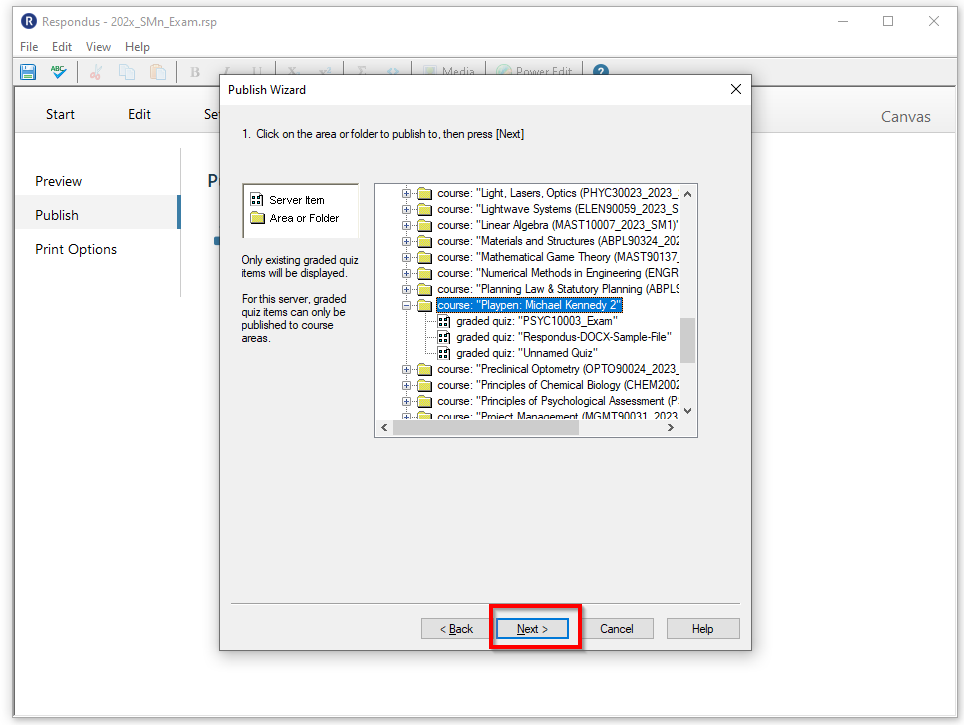
A list of courses (subjects) in Canvas you have permission to publish to displays.
- Select the subject you wish to publish the Quiz to.
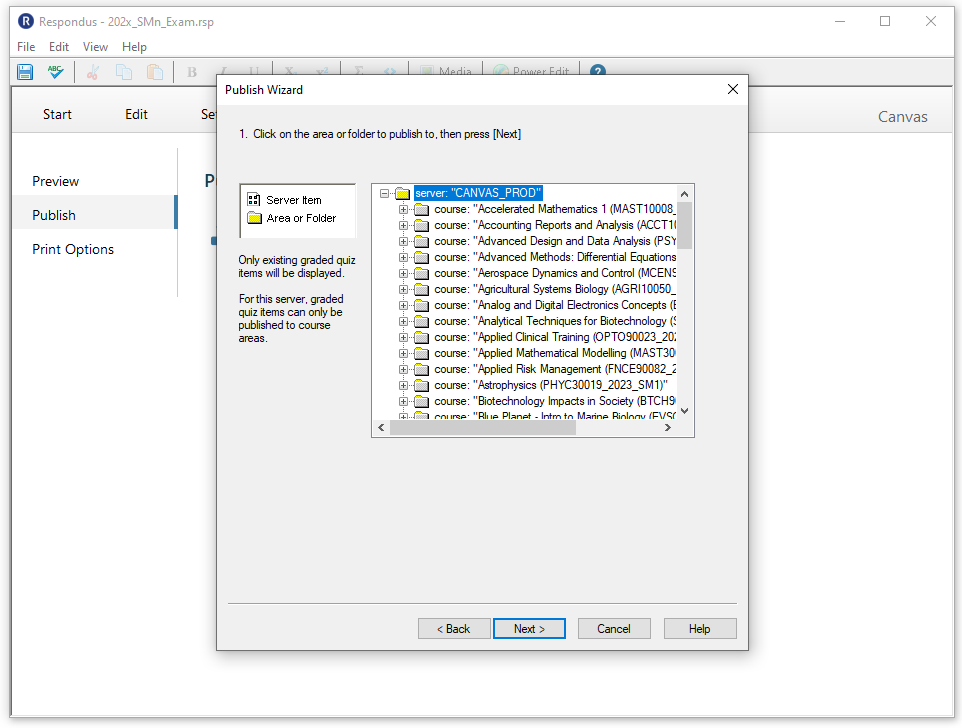
- Click on the subject name to expand the folder and display any pre-existing quizzes.
- Click Next.
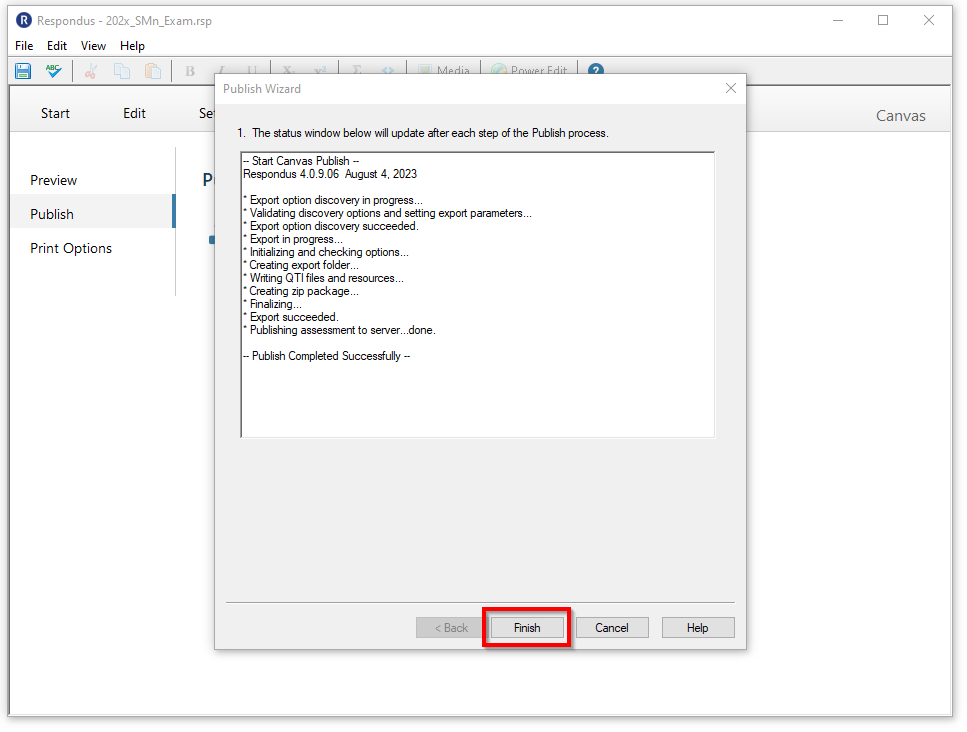
Once upload is complete, the status window will lists the status.
- Click Finish.
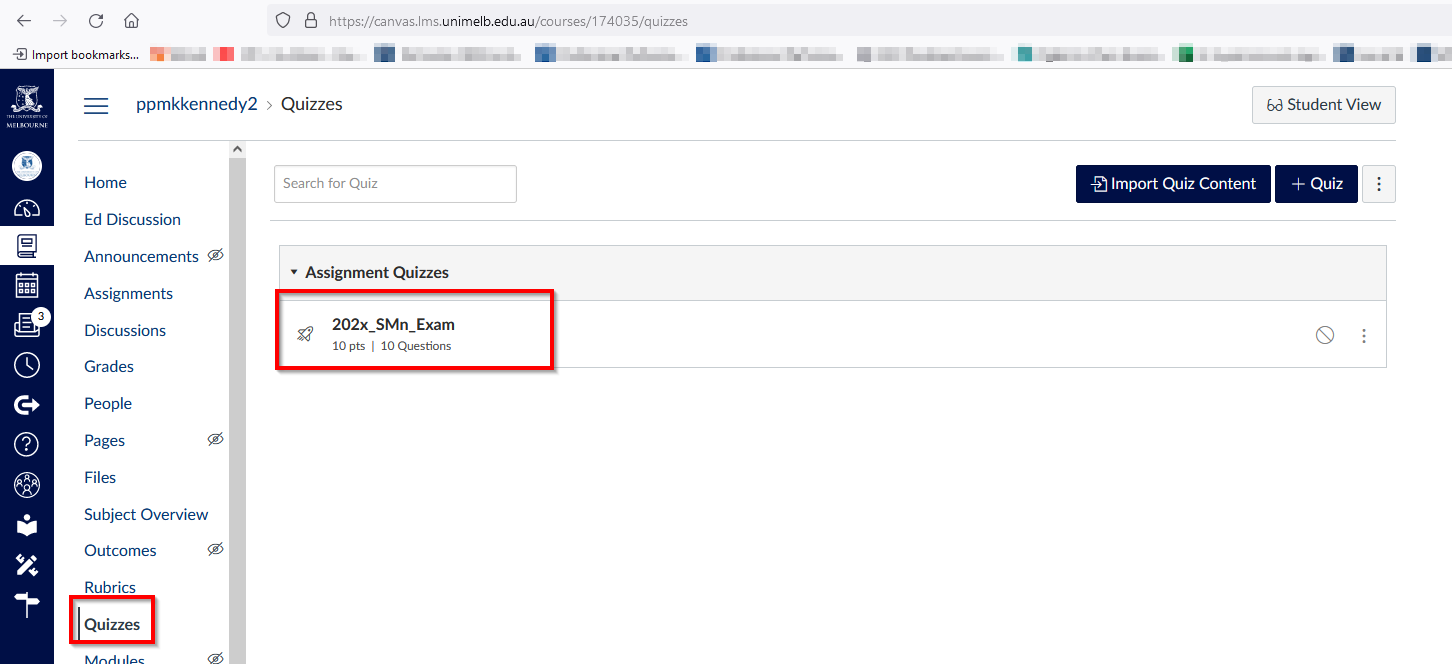
In the Canvas subject, in the Quizzes section, the Quiz is listed.
Verify all the questions, answers, images, points values etc before using.
Reviewing the Question Bank
You can review the companion Question Bank as well:
- Click the 3 dot menu at top right to access the companion Question Bank.
- Click Manage Question Banks.
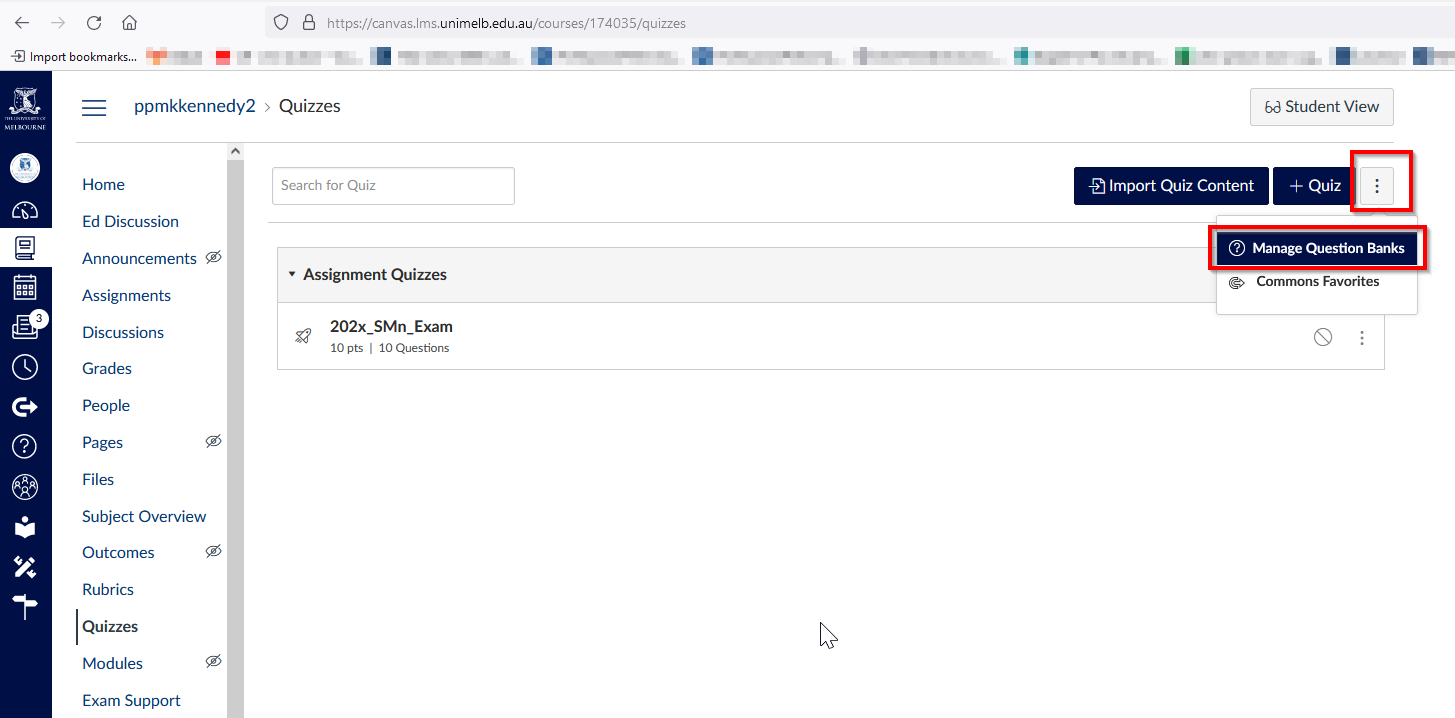
- Click on the name of the Question Bank.
- You can now click through to the Question Bank and review the questions, answers, points value etc.

You can now use the Quiz or question bank as per our Quizzes guides.
This guide was last updated 12 Oct 2023.
Please report any errors or omissions in this guide by submitting an LMS support request.