Getting started with Pedestal 3D
Pedestal 3D is a web-based 3D model hosting platform which allows registered users to upload 3D content, and allows anyone to view, manipulate, and conduct analyses on the uploaded models. This guide provides specific instructions on how to access and use Pedestal 3D at the University of Melbourne.
Pedestal 3D interface
Pedestal 3D has two main interfaces that users can interact with: the Gallery & 3D Viewer interface, and the Library interface (backend). The Gallery & 3D Viewer can be accessed by any user, public or private while the backend library is limited to users with authorised Pedestal 3D accounts. Objects can be accessed as either collections or all together in the Gallery page.
The easiest way to find an object for viewing is to navigate through the collection which contains it. Objects are grouped into collections based on their associated faculty.
For example, building materials are found within the Architecture, Building and Planning collection; paintings and ancient coins can be found within the Arts collection; and optometry equipment and skulls can be found in the Medicine, Dentistry and Health Sciences collection.
Objects can be browsed as a catalogue within these collections, or key terms can be searched via the search bar at the top of the collection gallery. To access your chosen object, scroll over the corresponding icon and select View.
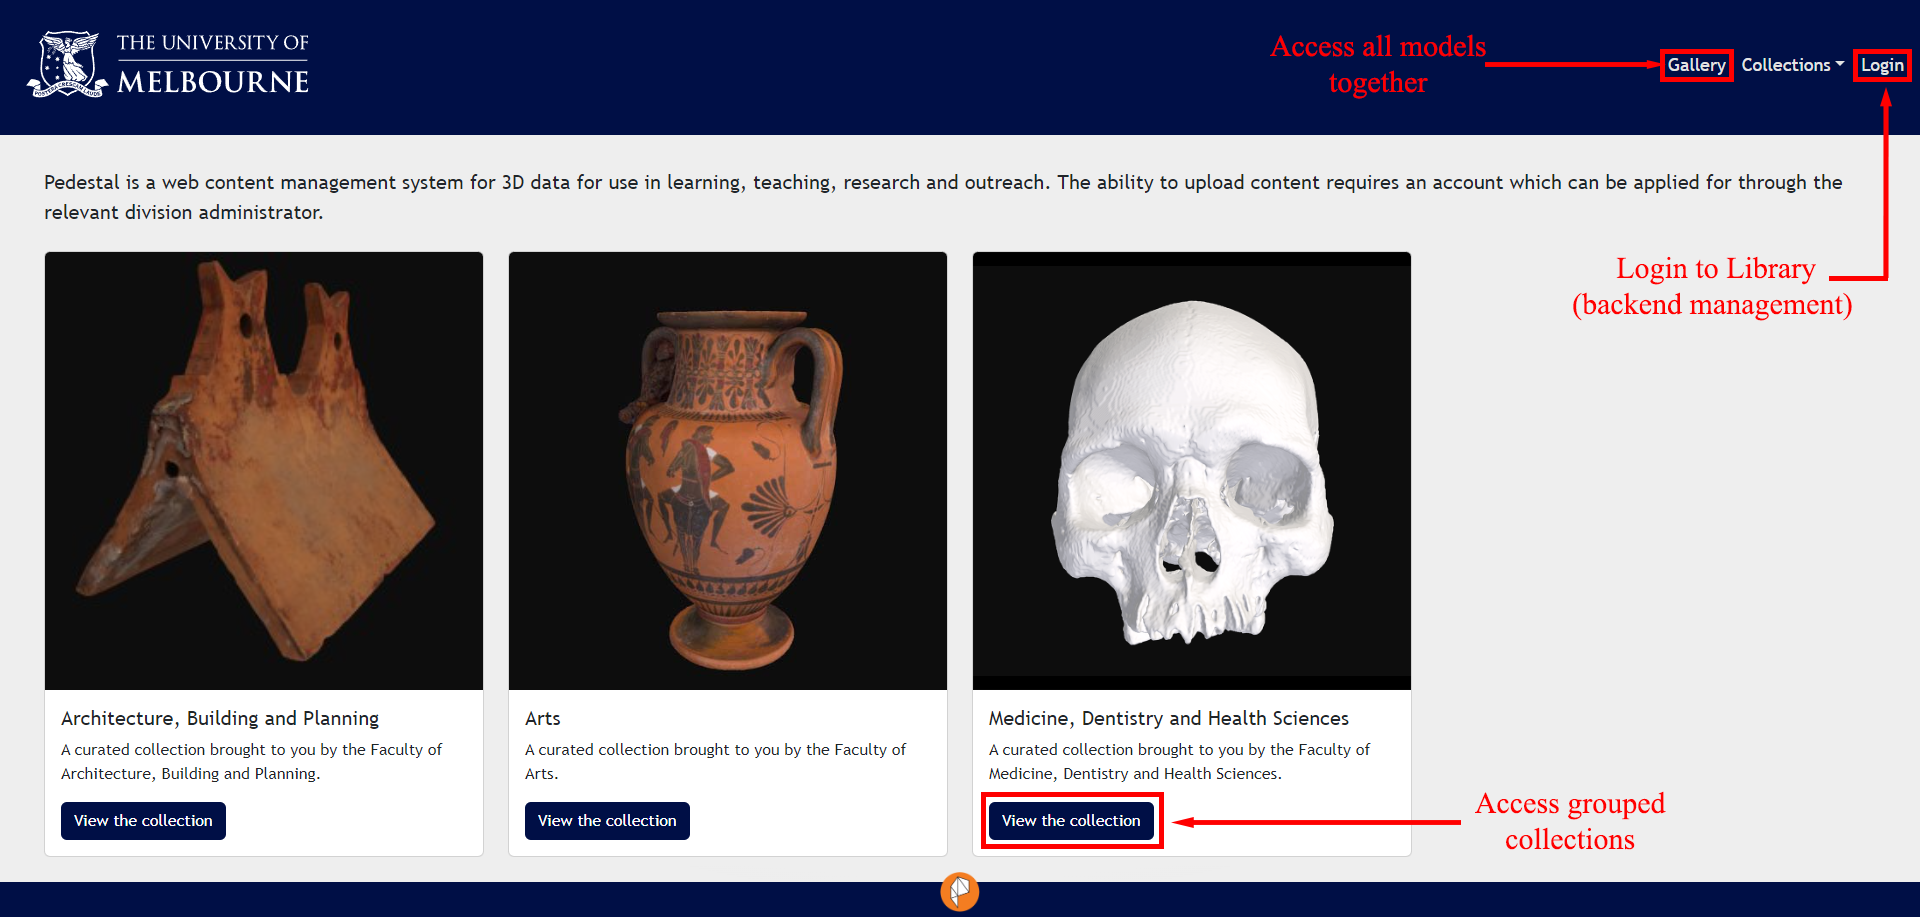
To access the Gallery and 3D Viewer for all available 3D objects, click on Gallery at the right of the top banner. Objects within specific collections can be accessed by clicking the View the Collection button below the model thumbnail. To access the library for backend item management, click on the Login text in the right-hand corner of the top banner. Login is only available to registered Pedestal 3D publishers and administrators and is not necessary to access uploaded objects.
Viewing interface
Once an object has been selected from the Gallery, it will load in a browser window within the Pedestal 3D Viewing Interface. This interface allows you to interact with the 3D model and contains associated object information.
The main pane of the Viewing Interface is the Viewport, which displays a digital 3D object that can be manipulated using a computer mouse, a keyboard, or a touch screen. The object is viewed as though levitating in space, with your display screen displaying a camera’s view of the object (the viewport). The basic interactions available here are:
- Rotating the camera: Moving the camera around the object to view it from different angles.
- Mouse: hold left-click and drag
- Keyboard: arrow keys
- Touchscreen: single finger touch and drag.
- Moving the object: Repositioning the object in relation to the camera.
- Mouse: hold right-click and drag
- Keyboard: WASD keys
- Touchscreen: two finger touch and drag.
- Zoom: View the object from a nearer or further view.
- Mouse: scroll wheel
- Keyboard: + or - keys
- Touchscreen: two finger pinch or stretch.
- Recentre: To return the object to its original position, orientation, and camera view.
- Mouse: double left-click on the object
- Keyboard: R key to reset to the default view
- Touchscreen: double tap on the object.

Toolbar
On the left-hand pane below the University of Melbourne logo is the 3D Viewer Toolbar. Here there is a selection of modules that provide further interactive elements. The toolbar can be hidden for an uninterrupted view of the object using the arrow icon in the top left corner of the viewport and is returned using the same icon. The following modules are available in the 3D Viewer Toolbar:
Information
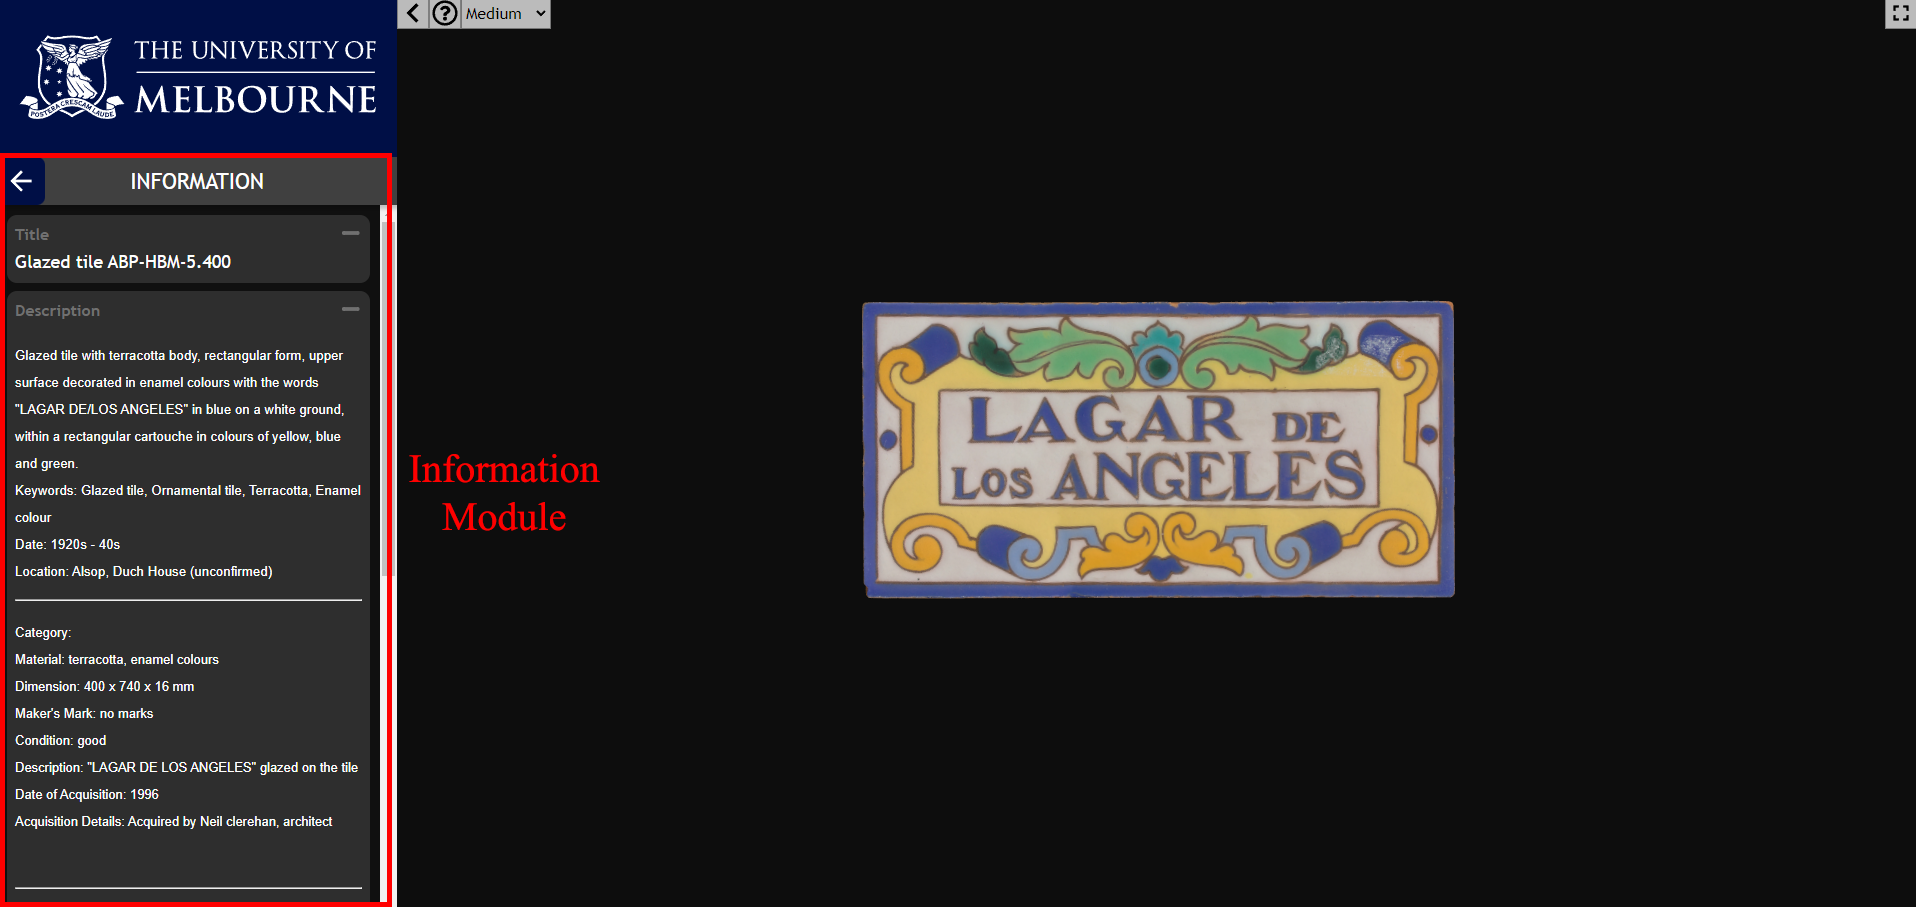
The Information module provides details about the object visible in the viewport. The object title is included, as is a description section where details about the object are available. The description may include contextual information about the object, a museum accession number, details about the 3D model capture process, or supplementary learning materials associated with the object. The details section at the bottom of the information module contains information about the license of the object.
Transform
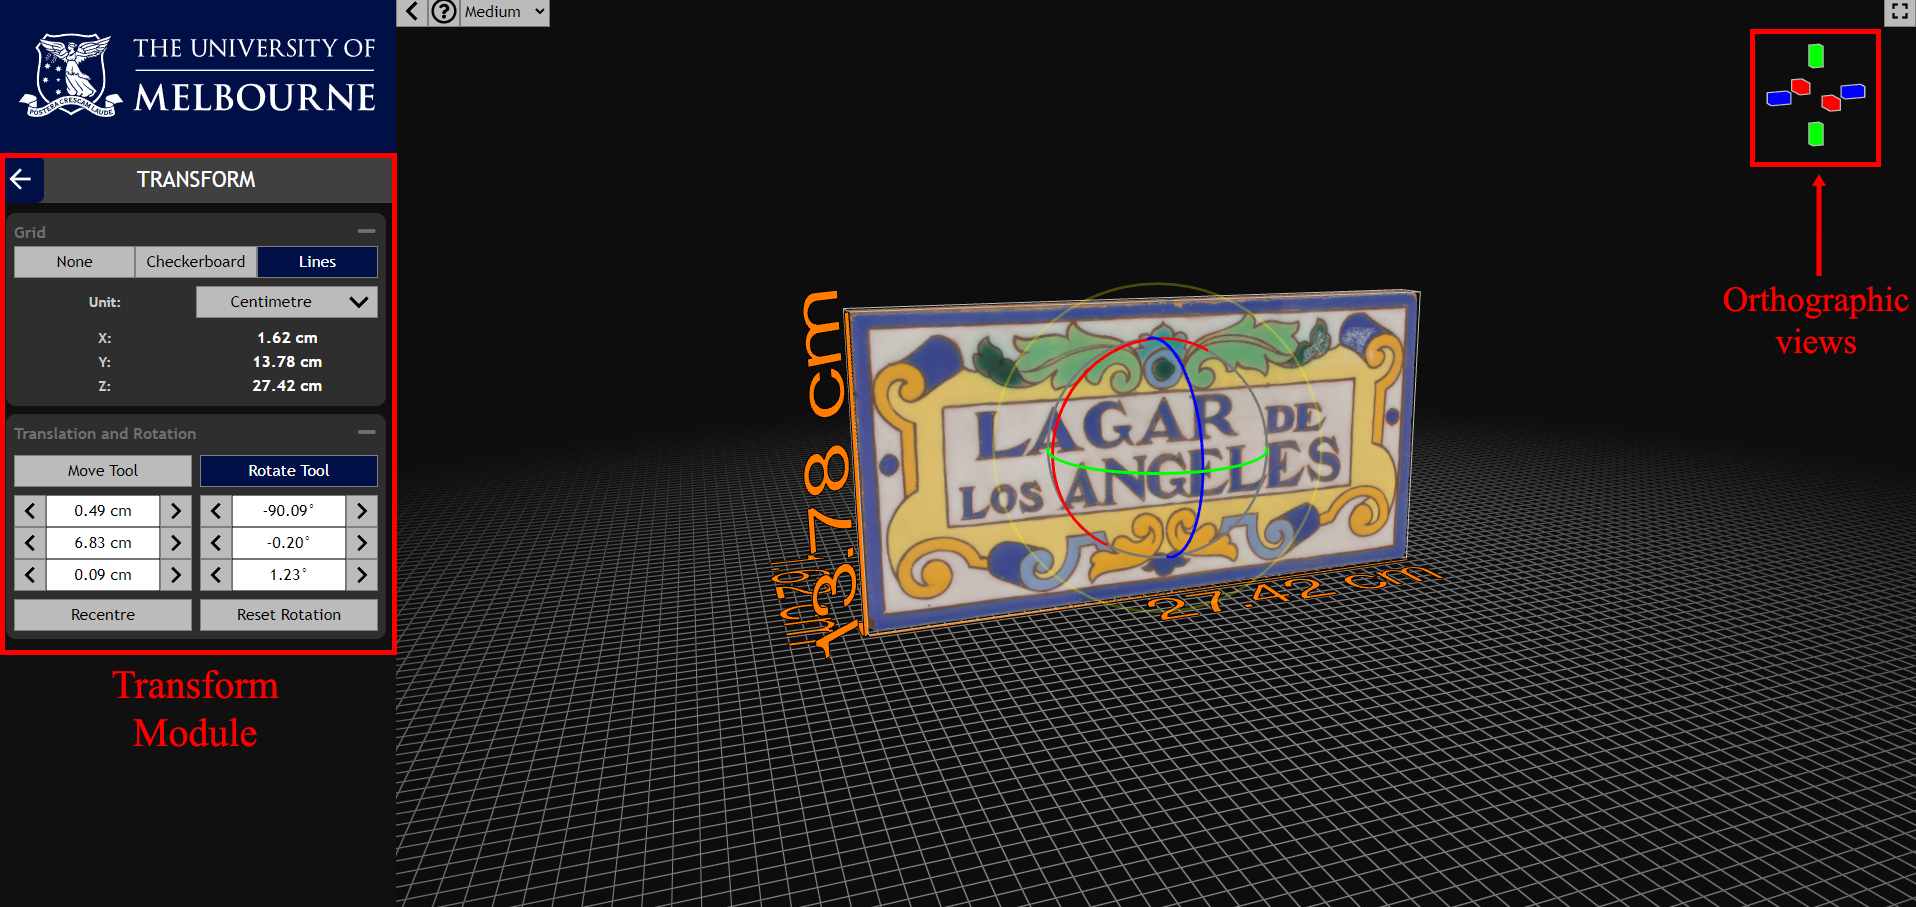
The Transform module provides options to adjust the units of measurement for the object (metric, imperial, astronomical) and to apply fine movements or rotations to the object across specific axes using either the provided fields or the move or rotate tools which appear. An axis for orthographic views becomes available in the top right corner of the viewport while this module is open. Background grid options are also available here, allowing users to switch from the default black background to a grid background that displays the selected units of measurement (e.g. one centimetre or one-inch units).
Surface
The Surface module provides options to adjust the surface appearance of the 3D model.
At the top of the Surface module pane is the option to toggle between Pedestal 3D’s two available material type options: Standard and Xray. The Standard view presents objects as they appear in the real world; the Xray view presents objects as they may appear in a radiograph. The XRay material type is particularly useful for objects that have been CT scanned as it allows users to view the interior structures of the 3D model.
In the Standard material type, models are presented as opaque and coloured. Models that have been generated using photogrammetry will typically be accompanied by an image texture that maps colour information over the surface geometry of the 3D model. This image texture may be toggled on or off in order to see only the surface of the model. Models that have been generated using other techniques, such as CT scanning, may not have image textures and be uniform in colour (base colour). This base colour can also be changed according to preference. The roughness, specular intensity, and and metalness sliders influence how the surface colour interacts with the simulated scene lighting.
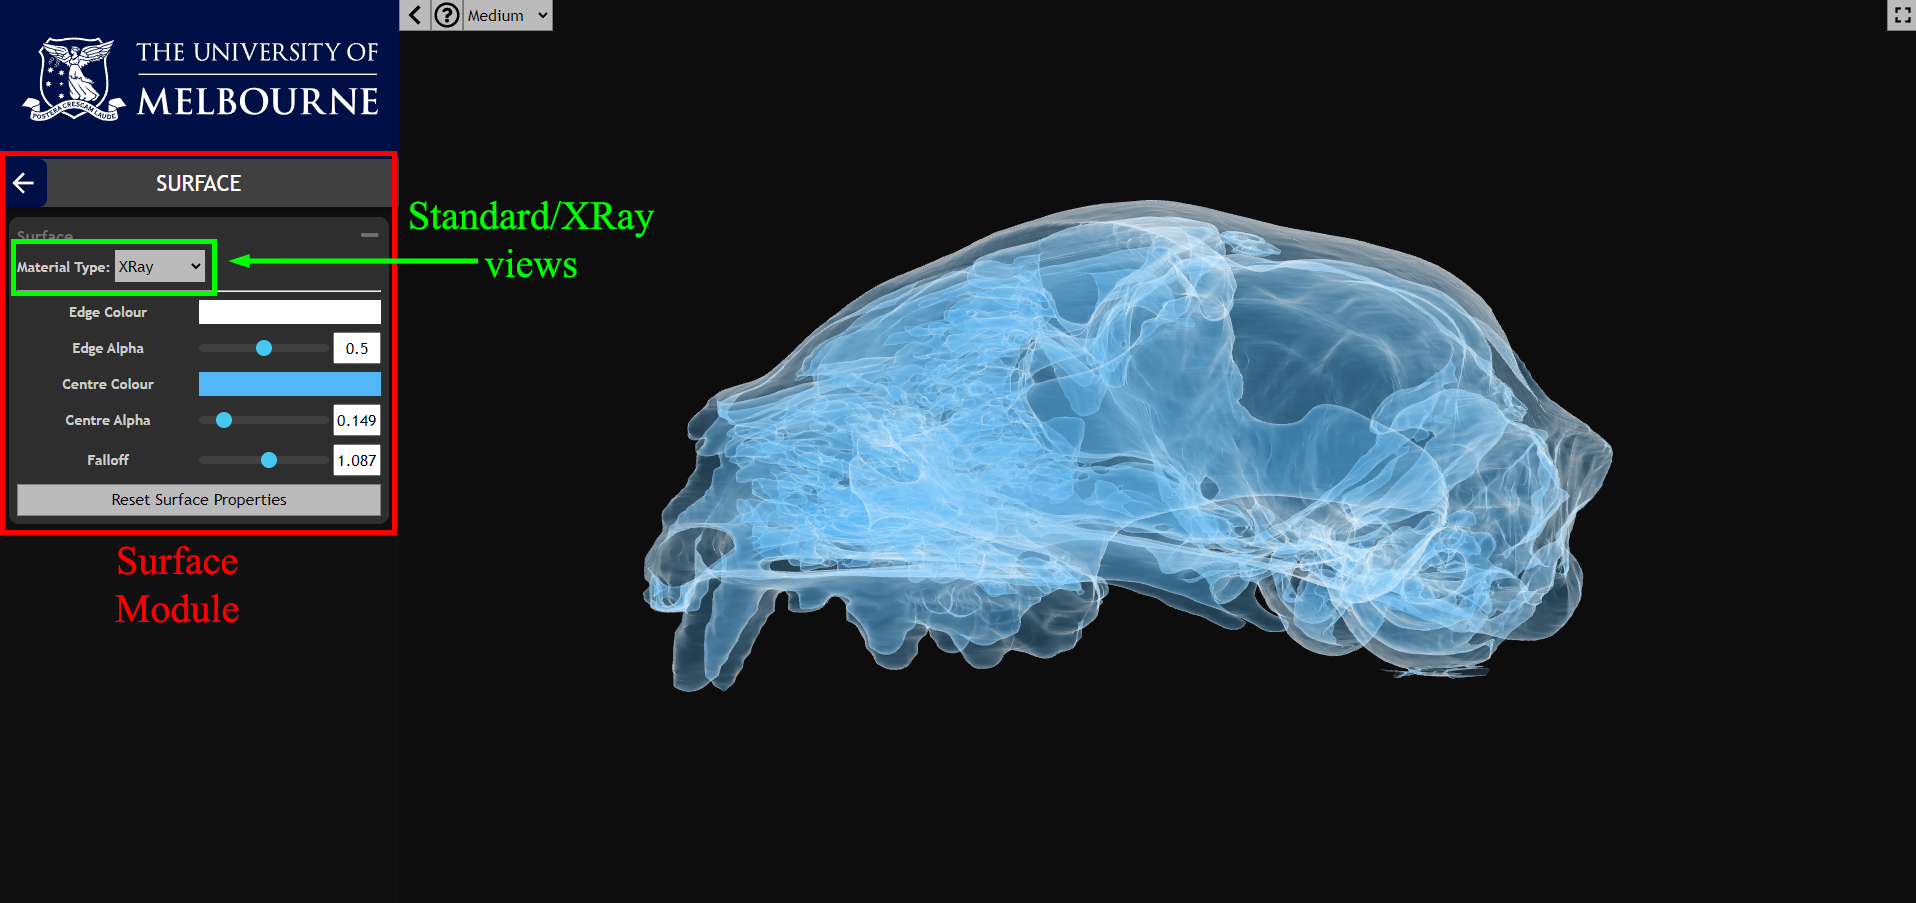
In the XRay material type, models are presented as partially transparent – as they may appear in ‘x-ray vision’. This material type can be applied to any model but is most effectively used on models that have interior geometry. Objects that have been CT-scanned, rather than produced through photogrammetric modelling, often have complex interior geometry captured as part of the 3D model which can be most easily seen in this material type.
In the XRay material view, adjustments can be made to the colours used to represent geometry at the edges of the model and geometry within the centre of the model. The ‘alpha’ of both the edges and the centre can also be adjusted separately: these values influence the opacity of the corresponding geometry. The ‘falloff’ slider adjusts which portions of the geometry are categorised as either ‘edges’ or ‘centre’. It is worth playing around with these interacting sliders and colours to get the best contrast for optimal visibility of the target part of the model.
Lighting
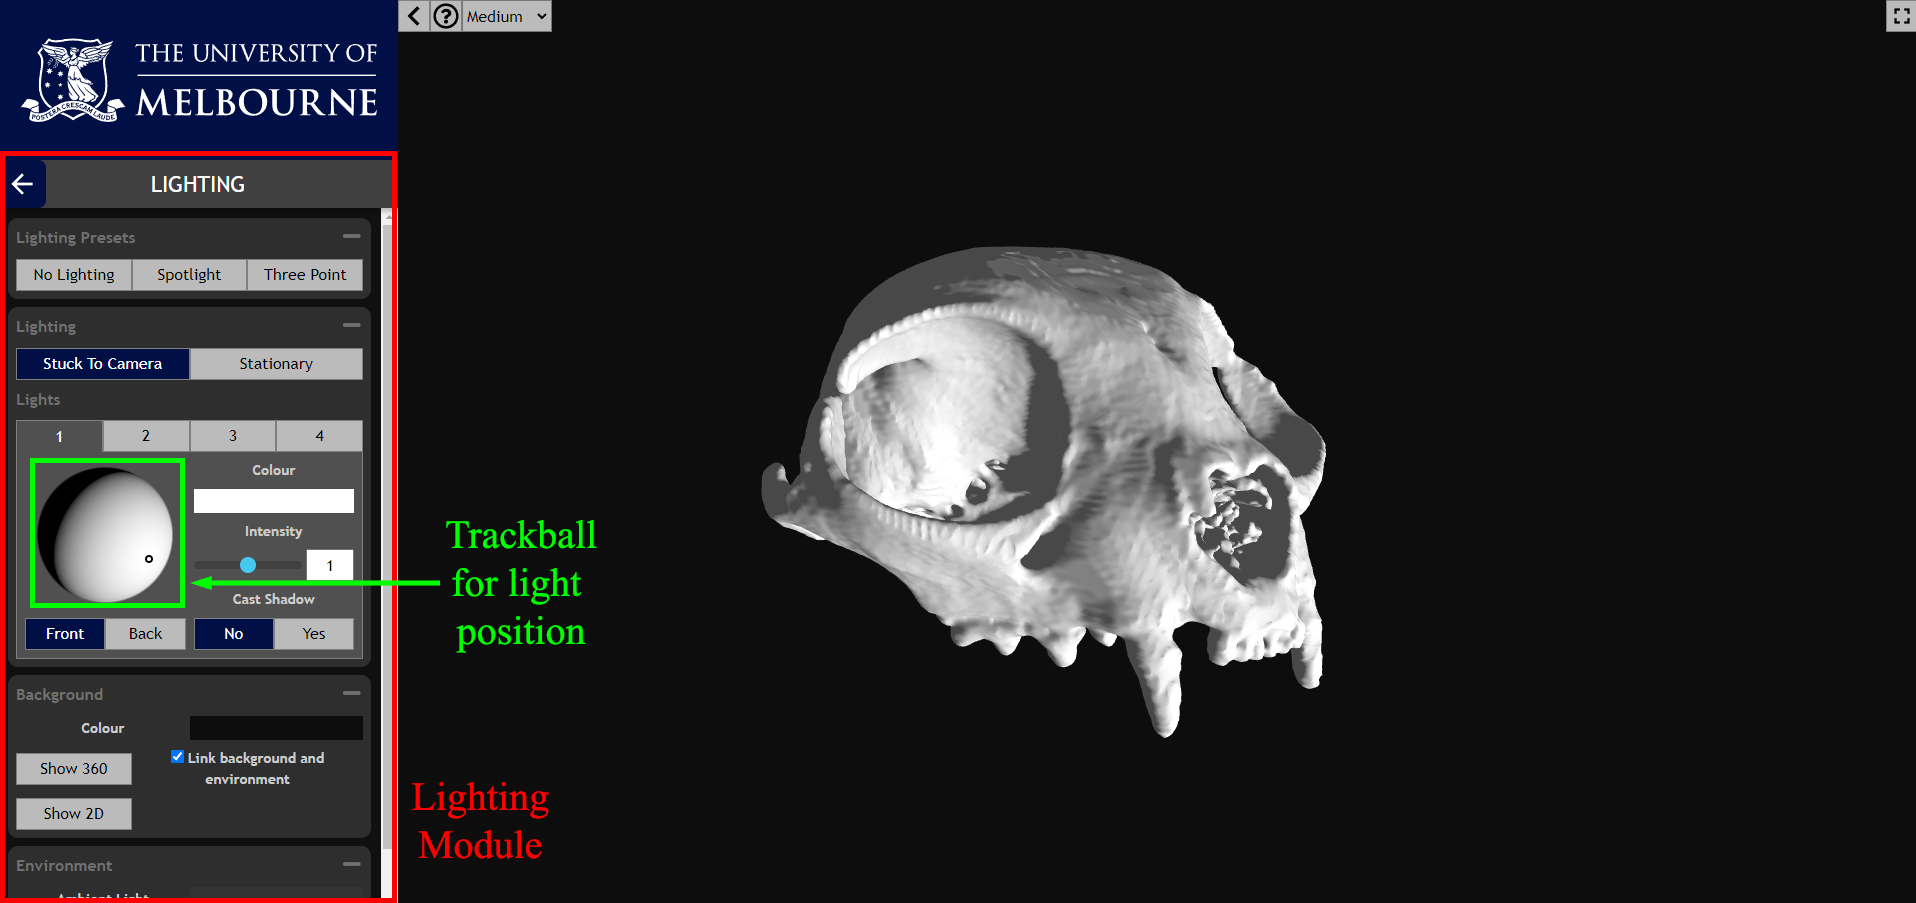
The Lighting modules provides options for users to adjust the brightness, colour, position, and arrangement of the simulated lighting in the 3D viewport. Lighting will typically be set to a three-point lighting system with a key light, fill light, and backlight. The position, colour, and brightness of each light can be adjusted individually. Lighting can be switched to a spotlight preset to view the object lit by only one light source, which can be useful to use shadows to identify edges. The position of lights is adjusted using the trackball in the left-hand pane.
Annotations
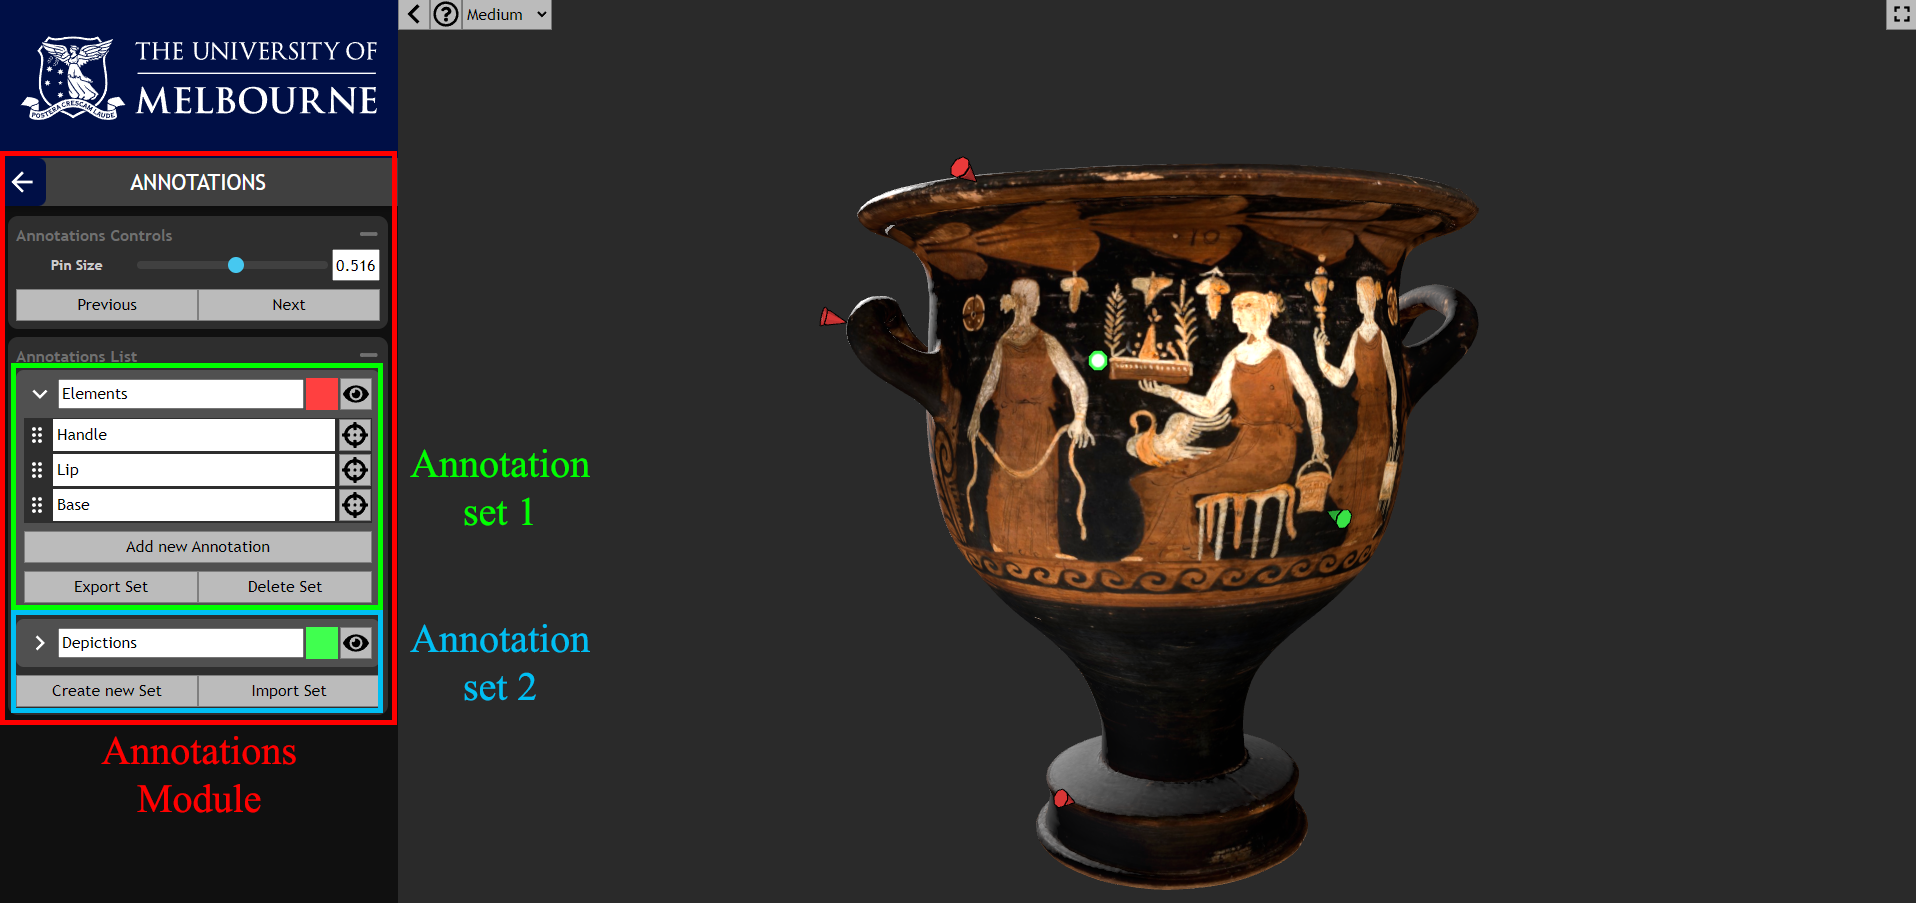
The Annotations module allows users to attach information to parts of the 3D model they are viewing, where they can record observations. Annotations can be downloaded as a file, shared, and imported for viewers to share their observations. Only registered Pedestal 3D administrators or authors can make annotations visible to all users. Annotations are grouped into sets to help categorise observations. Each set is downloaded and imported as a separate file.
The annotation feature can be a useful way for educators to share information about the uploaded objects, pointing out details that may be missed or providing specific information about a part of the object. They can also be used to test students’ comprehension of features or object-based analysis abilities by asking students to create their own annotation sets and send them through to the assessor.
Tools
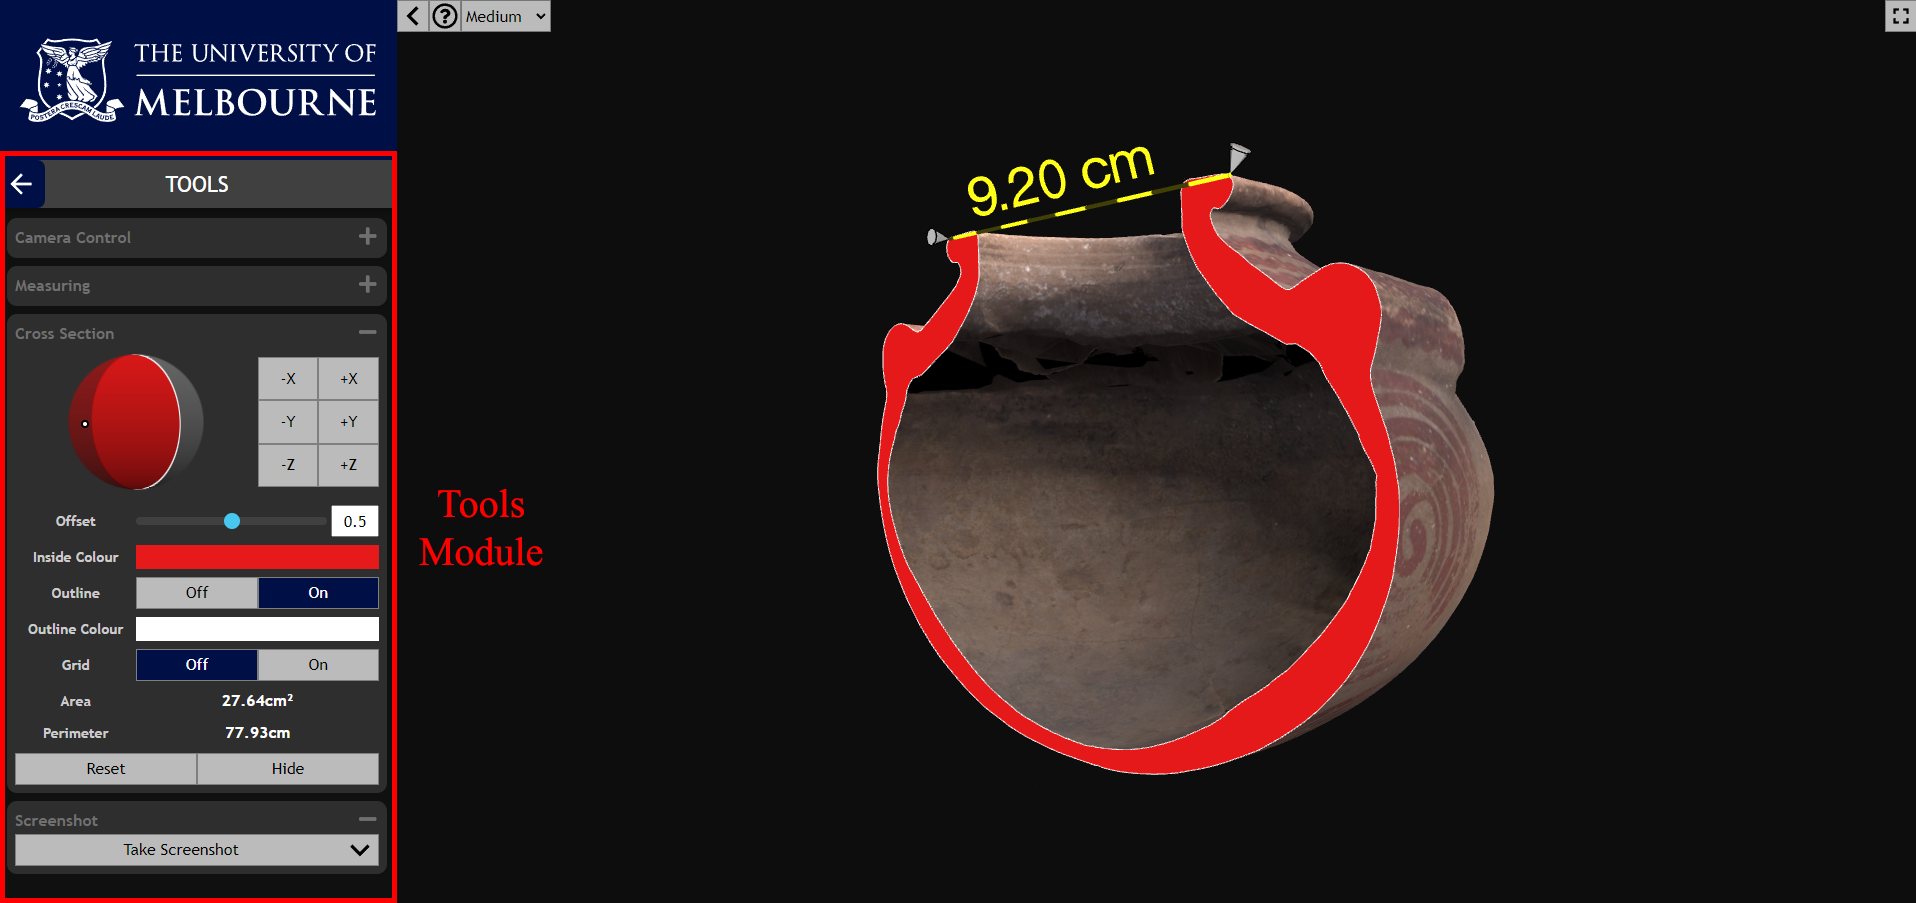
The Tools module contains tools which can be used to assist with analysis of the uploaded objects. The Measuring tools allow users to take measurements from the 3D object, and the Cross Section tool allows the model to be split across any axis.
Three options are available for measuring the 3D model. The Ruler tool measures the distance immediately connecting any two selected points on the model. The Circle function creates a circle connecting any three selected points on the model and provides measurements of both the diameter and circumference of the created circle. The Angle tool provides the angle between any three selected points, with the second selected point acting as the angle origin.
The Cross Section tool allows users to bisect the model to see the interior geometry. Cross sections can be cut along the X, Y, and Z axes, or at any angle of the user’s choice. The Offset slider is used to adjust the position of the cut along the selected axis. Adjustments can be made to the colouring of the cut section and screenshots can be easily taken when the cut is positioned where the user desires. The area and perimeter of the cut will be provided.
Sharing models with Pedestal 3D
Models hosted on Pedestal 3D can be discovered by browsing the collections, searching for keywords with the search bar, or simply shared using the associated URL or a QR code generated from that URL. Some models may be downloaded by any users from the viewport page: if this option is available, it will be listed in the Details section of the Information module.
Embedding Pedestal 3D in the LMS
It is also possible to embed a Pedestal 3D hosted model or Pedestal 3D collection onto an LMS page to make the model easier to access for students. Embedding a 3D model requires an embed code, which is accessible only to Pedestal 3D authors or administrators with registered accounts. To embed a 3D model into Canvas, follow these steps:
Finding embed codes
- Log in to Pedestal 3D via the University of Melbourne Pedestal 3D page.
- Navigate to the item you wish to embed.
- This can be accomplished from the Items page by using the search bar to search for the title of the model or associated key terms, or by simply browsing the models. If you are browsing the models, it is recommended to filter by collection to reduce the selection to those models of direct interest.
- Select the Update Item button on your chosen object.
- This button, on the far-right side of the object listing, is blue and features a pencil icon
- Navigate to the Views tab of the object.
- Select the yellow Embed button indicated by the </> icon.
- On this page you will have the option to create multiple ‘views’ of the object. This is useful if you wish to have the same 3D model embedded in different places and under different conditions. Perhaps you may want to embed a model on a webpage for a limited time but also have it available on a subject Canvas page indefinitely. Perhaps you would like each of these embeds display the object with different lighting, or make one available to download but not the other. This is accomplished by creating multiple views, each of which would have a unique embed code. Once you have created a new view, or if creating a variety of different views is not necessary for you, proceed to step 6.
- Identify the View you wish to embed and select the yellow Embed button indicated by the </> icon. A pop-up window will appear with display options for you to choose between.
Changing the embed code
Select the Legacy option for Responsive Mode. Adjust the display options to your preference: you can either select an aspect ratio from the top or set the Aspect Ratio to None and manually enter the height and width of the iFrame as pixel values (px).
At the bottom of the pop-up window, there is a Preview button if you wish to test these options. It is worth adjusting the Embed Size options to your preference, while the remaining options can generally be left on default settings. Some of the more useful options available are:
Aspect ratio
The relative height/width of the window. Set to None if you wish to enter custom height/width values.
Custom height/width values
At present only pixel values are supported by Canvas. Change the dropdown option from % to px.
Set the height to 600px for the window to appear full-sized in Canvas.
Sidebar
Depending on how you want your students to interact with the model, and how you would like the model to appear in the Canvas window, you may choose to have the sidebar closed or hidden. This will allow users interacting through the Canvas window to interact with the model, but not use any of the tools or adjust the settings.
Embed into Canvas
- Once you have determined your desired settings, scroll to the bottom of the pop-up window and copy the embed code.
- Open the Canvas page where you wish to embed the 3D model and enter edit view by selecting the Edit button at the top right of the page.
- Using your mouse, find where you would like the Pedestal 3D model embedded in to Canvas and click to place your cursor in the desired position.
- From the row of tools above the editing window, find the embed tool (cloud icon). If the tools is not immediately visible, select the three dots [more] at the very right of the row to find the correct tool.
- Paste the embed code copied from Pedestal and click submit. Settings can also be adjusted manually using the HTML editor.
This guide was last updated 27 Feb 2024.
Please report any errors or omissions in this guide by submitting an LMS support request.