Kaltura – MediaSpace
MediaSpace is a media hosting and sharing platform internal to the University that enables staff to upload, create/curate media content. Collaborate with colleagues, create playlists, share and distribute your media across the entire University.
With assistance from Learning Environments, you can set up Faculty wide collections and enable privacy settings for a wider reach.
Kaltura is integrated with our Canvas LMS, media content stored in MediaSpace can also be accessed, managed and embedded in subjects. Relevant information and instructions related to Kaltura links in Canvas can be found here:
This guide provides an overview of how to:
- Login to MediaSpace
- Access My Media on MediaSpace
- Add media content to My Media
- Kaltura Support Guides for add media options
- Change media owners and add collaborators
- Access My Channels on MediaSpace
- Create private channels via My Channels
- Overview of privacy setting options for channels
- Create channel playlist
- Add users to a channel and manage media collaboration settings
- Set up Faculty Collections
Login to MediaSpace
Go to MediaSpace (mediaspace.unimelb.edu.au) and login with your University of Melbourne credentials (SSO).
- Click Guest on the top right and select Login from the drop-down menu.
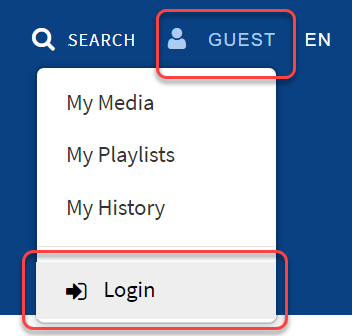
- Select Single Sign On (SSO) option and enter your Username and Password.
- Click Login.
Access My Media on MediaSpace
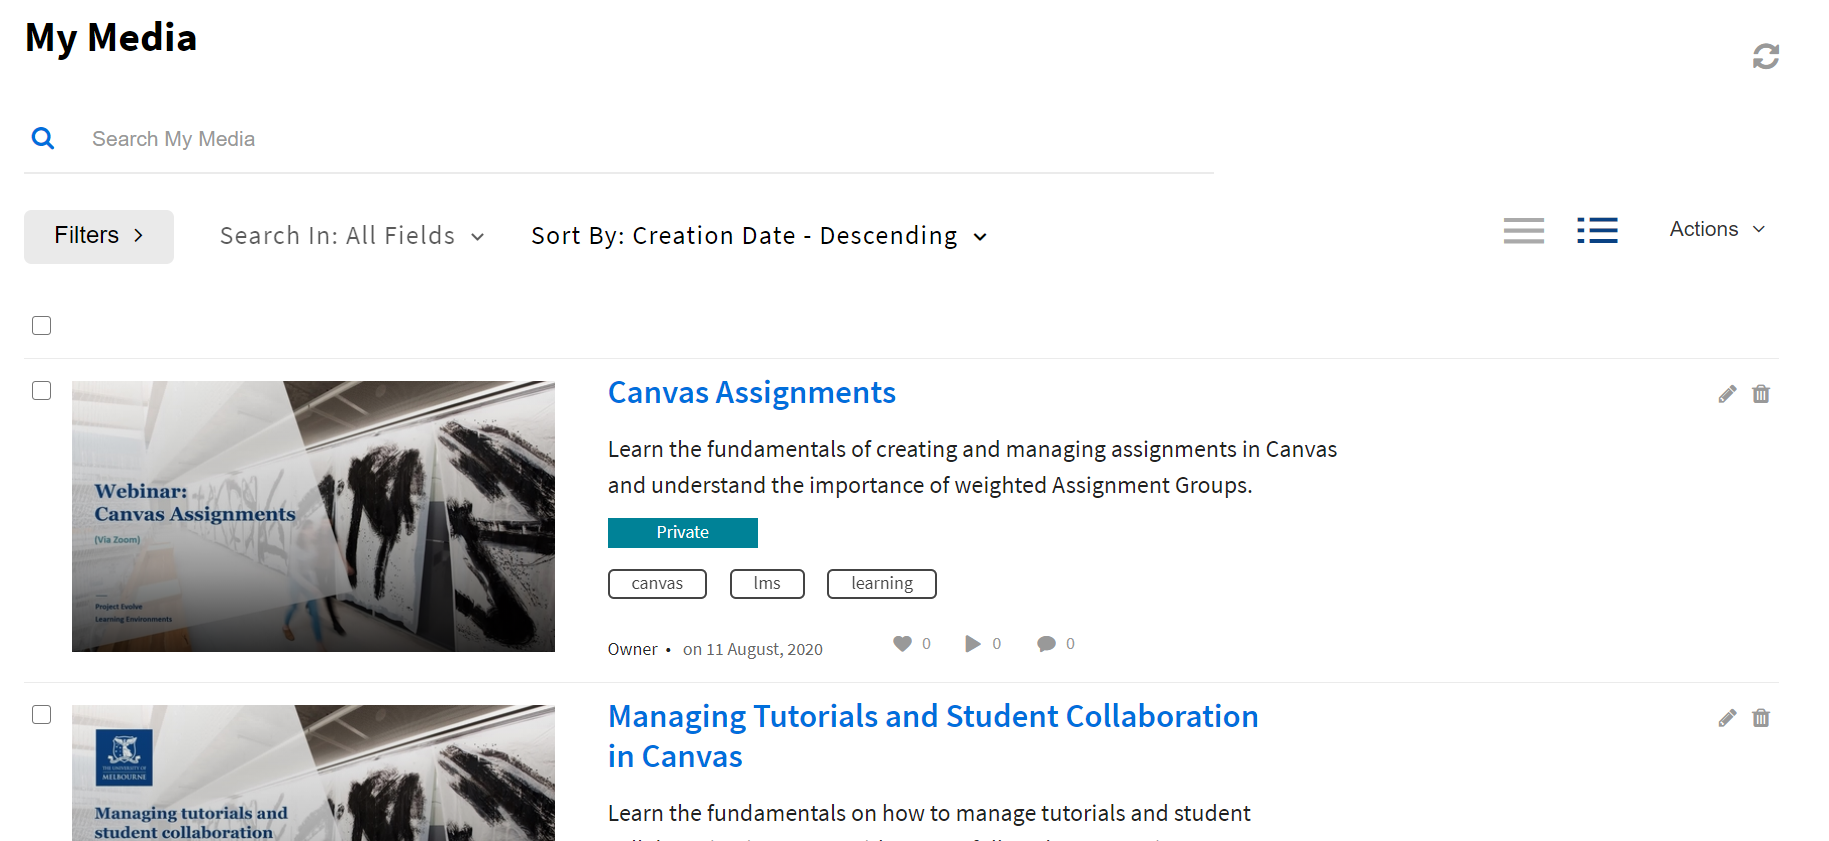
My Media is the area in which you can build and manage your media content repository in MediaSpace. From here you can:
- View media
- Edit, delete and share media
- Request Captions (Kaltura – Captions and Transcripts for media)
- Publish media
- Create your personal and ‘watch later’ playlists
- Click your User Name in MediaSpace and select My Media from the drop-down menu.
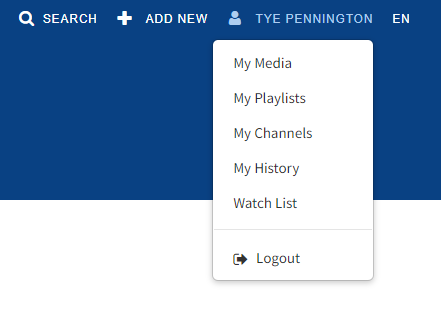
- My Media page displays. If you have uploaded media, or if you have been added as a collaborator on media, media shows on this page. If you have not uploaded any media, go to Add media content to My Media.
Add media content to My Media
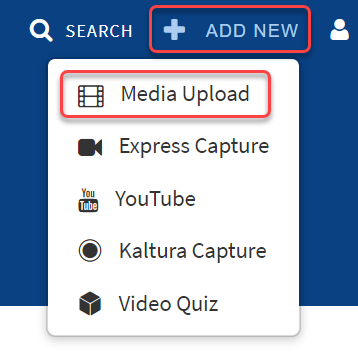
Add new media to My Media via Media Upload, Express Capture, YouTube, Kaltura Capture and Video Quiz. There are several ways to upload media into My Media, including the upload from your desktop which is outlined in this guide. For other upload options, please refer to the relevant Kaltura support guides for add media options below.
- Click +ADD NEW on the top right in MediaSpace. Select Media Upload if you wish to upload media files from your desktop. For other upload option please refer to the relevant Kaltura Support Guides.
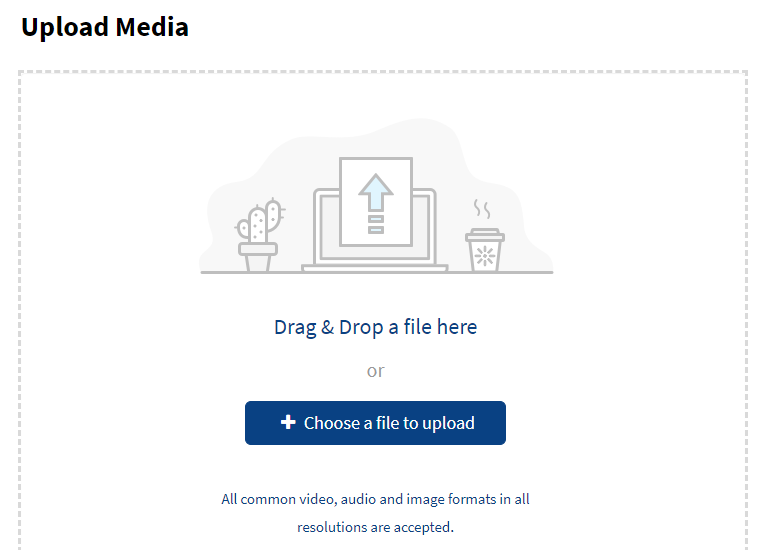
- Either Drag & Drop a file or click +Choose a file to upload. Follow the prompts. The upload commences immediately once the desired file is dropped or selected. The upload process may take a few moments, depending on the size of the file.
- Fill out details of the uploaded media. This includes choosing the appropriate copyrights and selecting the checkbox to agree to terms and conditions (a declaration of the Intellectual Property rights). You will notice that each field has a brief description to help you complete the information.
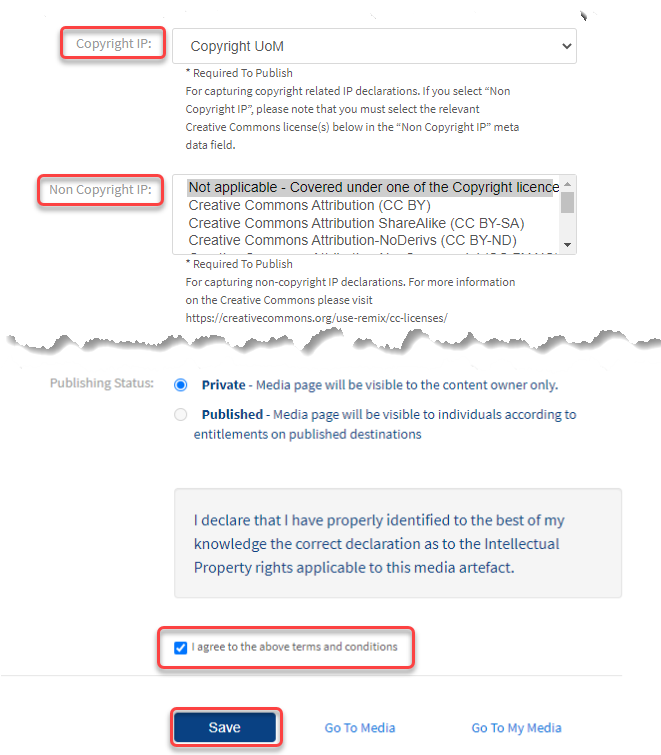
Required fields are indicated as such. Once completed, click Save to secure the entered information.
For copyright information please refer to the University of Melbourne copyright website.
Note: The Publishing Status remains as ‘Private’ until all required fields are completed and saved. The upload process also needs to be completed for the ‘Published’ option to be enabled.
Tip! Although not required, we recommend entering Tags to help identify your media item. Writing a Description can support viewers to make a more informed decision.
- To go to the uploaded media, click Go To Media. To go back to your My Media page, click Go To My Media.
Kaltura Support Guides for add media options
- Media Upload: Upload media from your desktop
- Express Capture: Enable recording content directly from your browser
- YouTube: Add media from YouTube
- Kaltura Capture: Enable easy video creation from your desktop
- Video Quiz: Create Kaltura Video Quiz
Change media owners and add collaborators
As a Media owner, you can change ownership and you may add collaborators. Collaborators can be individual people or groups of subject students, subject staff and faculty staff.
Note: Any media you originally uploaded remains in your ‘My Media’ page, even if you have changed ownership.
The types of collaborators and their permissions are as follows:
| Type | Can do | Can’t do |
|---|---|---|
Co-Editor |
|
|
Co-Publisher |
|
|
Co-Viewer |
|
|
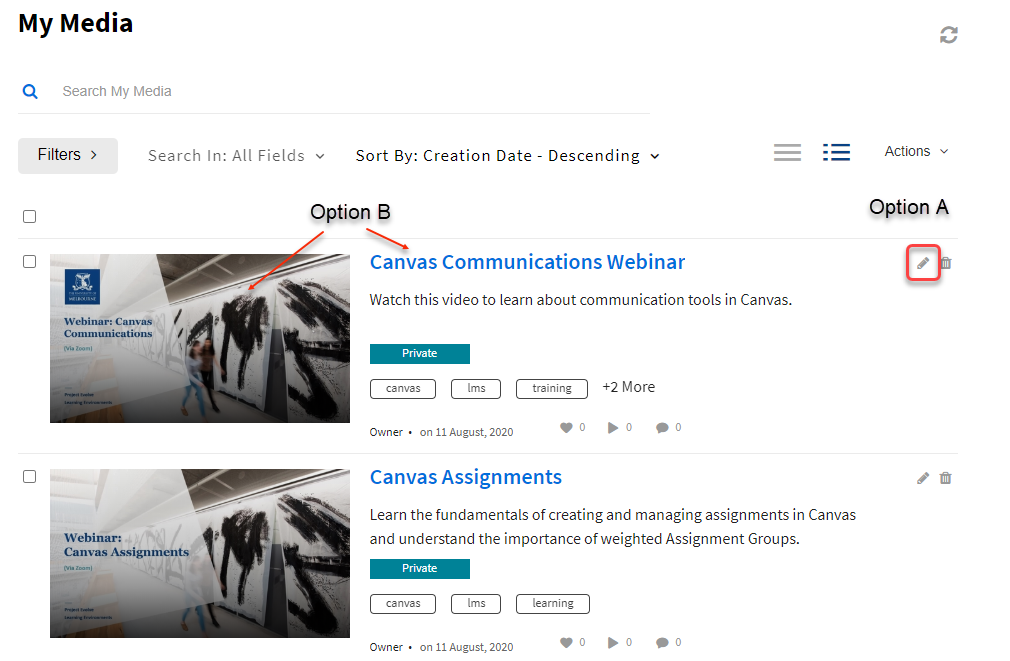
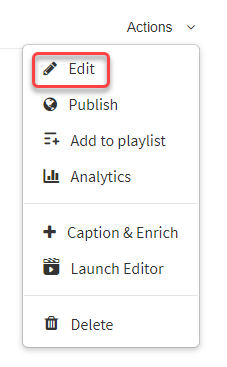
- Go to My Media page. To access Edit Media page, choose one of the following methods:
- Click the pencil icon next to the desired media.
- Click on the thumbnail or title of the desired media, then choose Edit from the Actions drop down menu.
- Click the Collaboration tab on the Edit Media page.
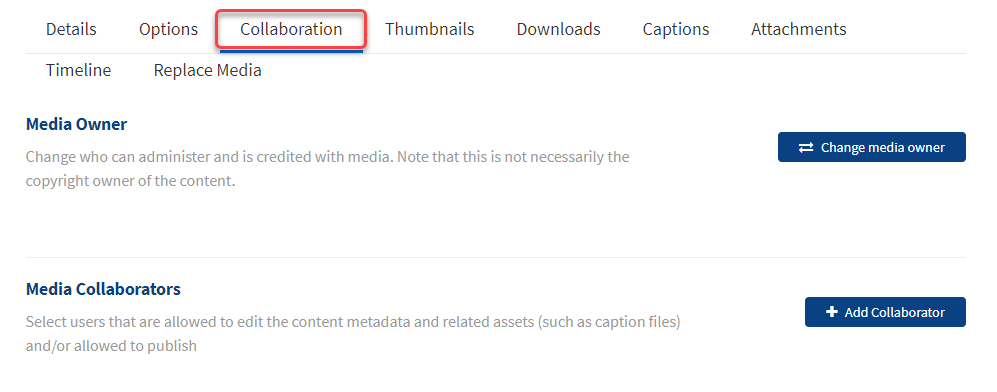
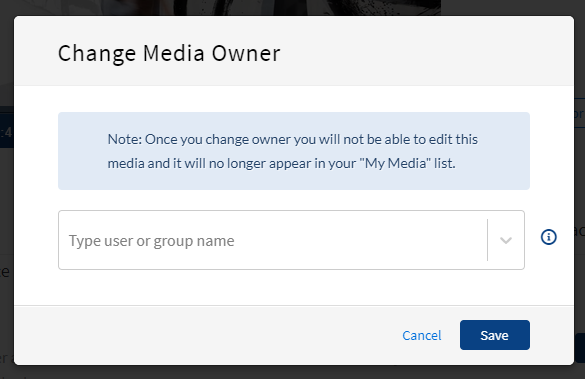
- Click Change media owner. The Change Media Owner window displays.
- Enter the user or group name or ID for the new owner. You can add users/groups that are available on the site and can use the auto-complete function (from the 3rd letter typed onwards).
Note: Groups are pre-created based on subject students, subject staff and faculty staff. Additional groups can be created. Please raise a Service Now request with Learning Environments if you require support with this.
- Click Save.
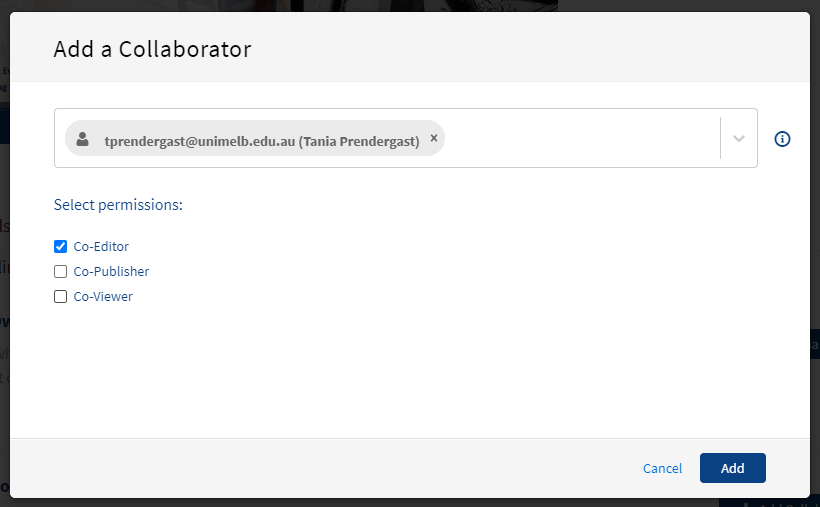
- Click +Add Collaborator. The Add Collaborator window displays.
- Enter the user or group name or ID for the collaborator. You can add users/groups that are available on the site and you can use the auto-complete function (from 3rd letter and on).
- Select the type(s) of permissions for the collaborator you are adding to the media entry.
- Click Add.
- To view the collaborators’ permissions click View all Permissions and select the type of collaborator.
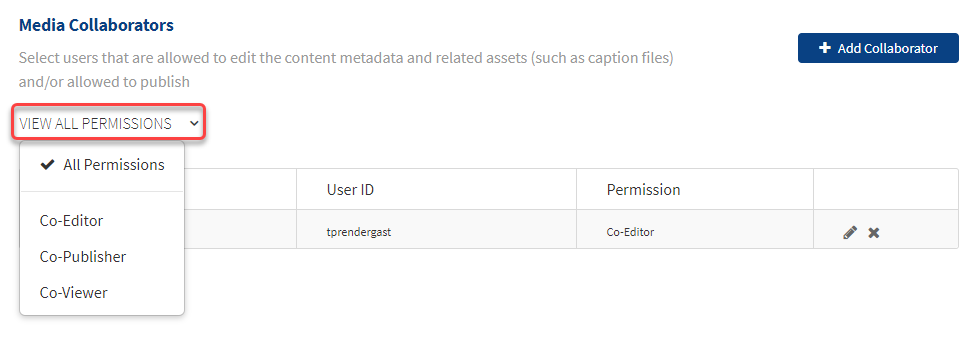
- Click the pencil icon to update permissions or click the cross icon to remove user as Collaborator.
Access My Channels on MediaSpace
My Channels is the area in which you can:
- Create private channels to collect related media content and
- Create channel playlists.
Channels are for the purposes of curating media pertaining to campaigns, projects, processes or thematic areas. Thematic collections rather than organisational collections are preferred, unless that is the specific curatorial purpose of the channel.
By default, channels are ‘Private’, however you have the option to add users to share, collaborate and moderate. Additional settings can be made available. Refer to Overview of Channels.
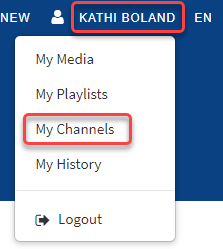
- Click User Name and select My Channels from the drop-down menu.
Create private channels via My Channels
Create channels to collect related media content and set up playlists. By default, channels are ‘Private’, however you have the option to add users to share, collaborate and moderate. Additional settings can be made available. Refer to Overview of Channels.
- Access My Channels.
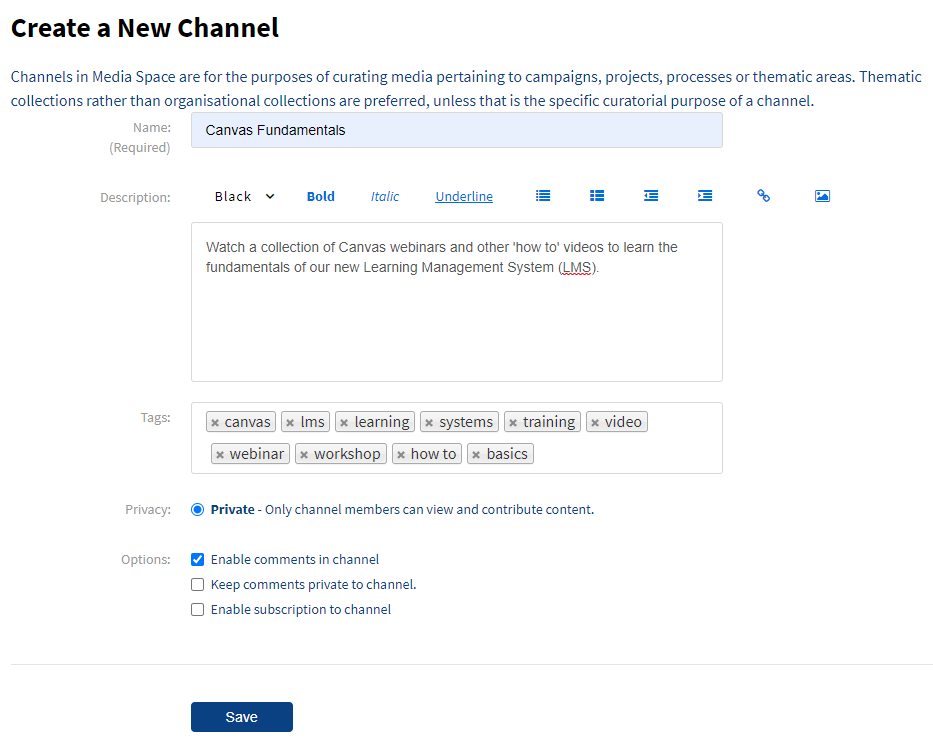
- On the My Channel page, click +Create Channel. The Create a New Channel page displays.
- On the Create a New Channel page, enter details for:
Name: Enter the channel name to display on the Channels page.
Description: Enter a summary of the channel content to display on the My Channels page.
Tags: Enter a descriptive tag to use in searches.
Privacy: Defaults to ‘Private’. If you wish to explore other settings refer to Overview of privacy setting options for channels.
Options: Optional.
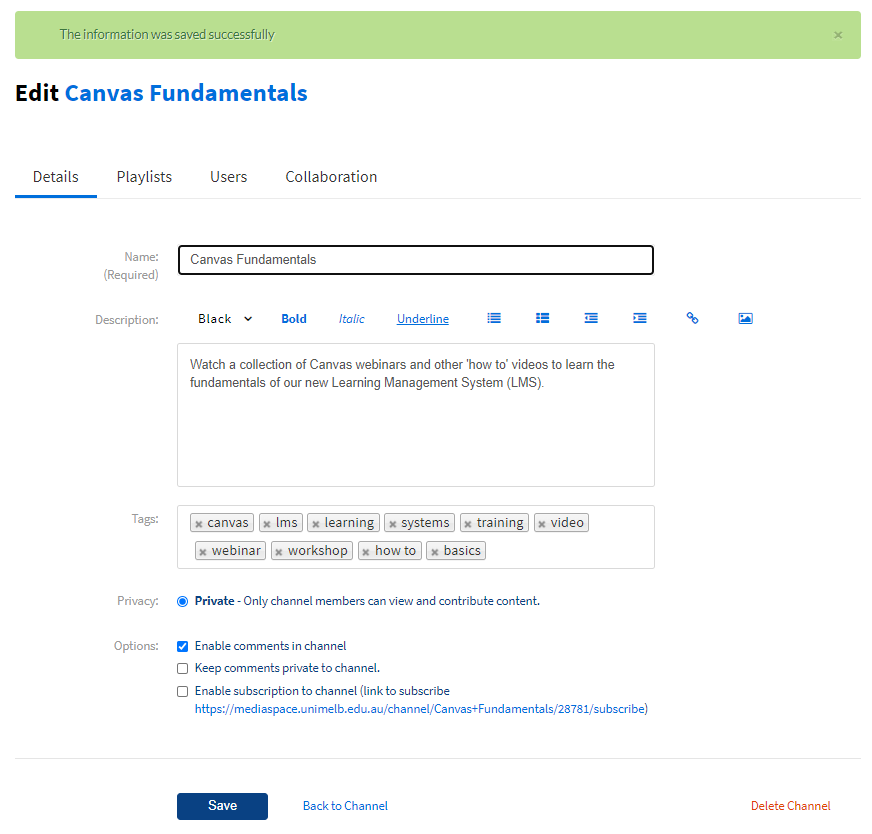
- Click Save. This saves the information entered and the Edit page displays. On the Edit page, you can continue to set up channel playlists and add users by clicking on the relevant tab. Or come back to it later. To return to My Channels, click Back to Channel.
Overview of privacy setting options for channels
By default, the privacy setting for channels is ‘Private’. Members invited to the channel can then view media content and participate. If you wish to enable a different privacy setting to one of the following, please raise a Service Now request with Learning Environments.
| Privacy Setting | Description |
Open | Membership is open, and non-members* can view content and participate. |
Restricted | Non-members* can view content, but users must be invited to participate. |
Shared Repository | Membership is by invitation only. Members can publish content from this channel to any other channel according to their entitlements. |
Public | Anyone can view content (including anonymous not logged-in users). Only channel members can contribute content according to their publishing entitlements. |
*Non-members still require University of Melbourne credentials.
Create channel playlist
When creating a playlist for your channel, please ensure to do so from within the channel.
There are two options to create a playlist.
Option A
- Access My Channels.
- Hover your mouse over the channel thumbnail and click the pencil icon in the bottom right corner. The Edit Channel page displays.
- Click the Playlist tab on the Edit Channel page.
- Click +Create Channel Playlist.
Option B
- Access My Channels.
- Click the channel thumbnail.
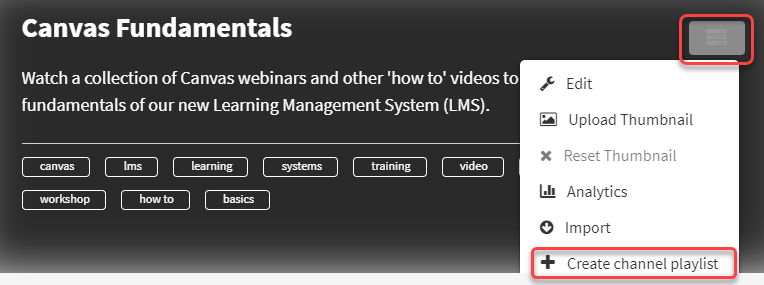
- Click the Channel Actions menu (hamburger icon) on the top right.
- Select +Create channel playlist.
- On the Create Playlist window, enter details for Title (required), Description and Tags.
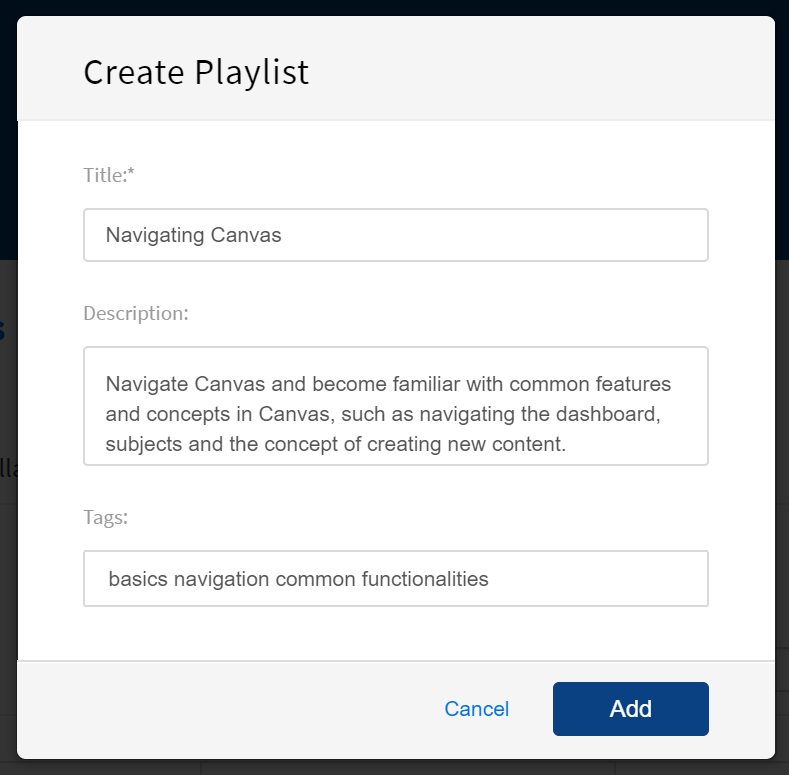
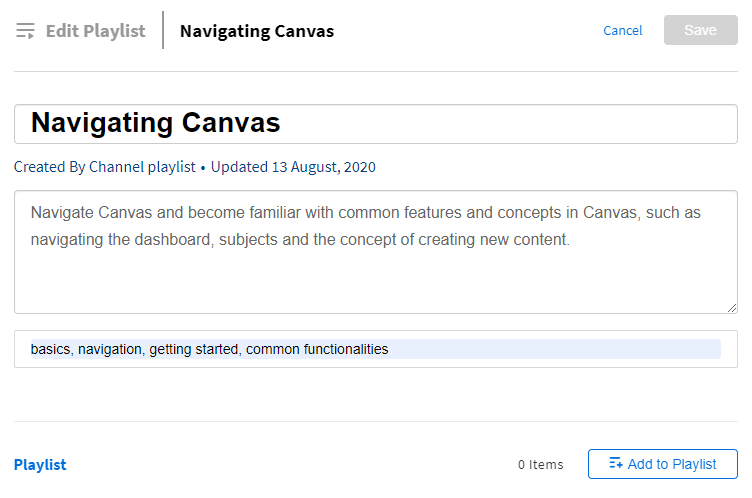
- Click Create. The Edit Playlist page displays. From here you can continue to add media content to your playlist. Or come back to it later. To return back to the Edit Channel page, click Cancel on the top right.
Add media content to an existing playlist
When adding media content to an existing playlist, please ensure to do so from within the channel.
- Access My Channels.
- Hover your mouse over the channel thumbnail and click the pencil icon in the bottom right corner. The Edit Channel page opens.
- Click the Playlist tab on the Edit page.
- Click the pencil icon associated with a playlist.
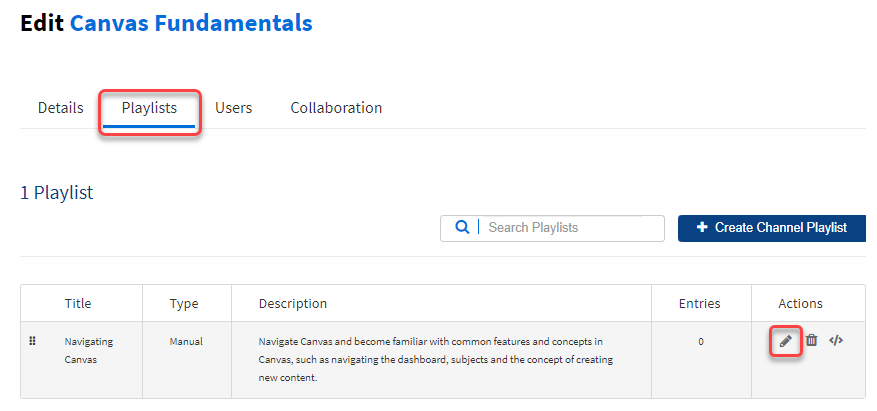
- Click Add to Playlist. The Add Items to Your Playlist column appears, showing media content as stored in My Media.
- Click the + button to add one or multiple media. Selected items appear in the Playlist column. The +button turns into a tick button.
- In the Playlist column, you can drag and drop items to move their position using the double line symbol.
- Click Save in the top right corner of the screen.
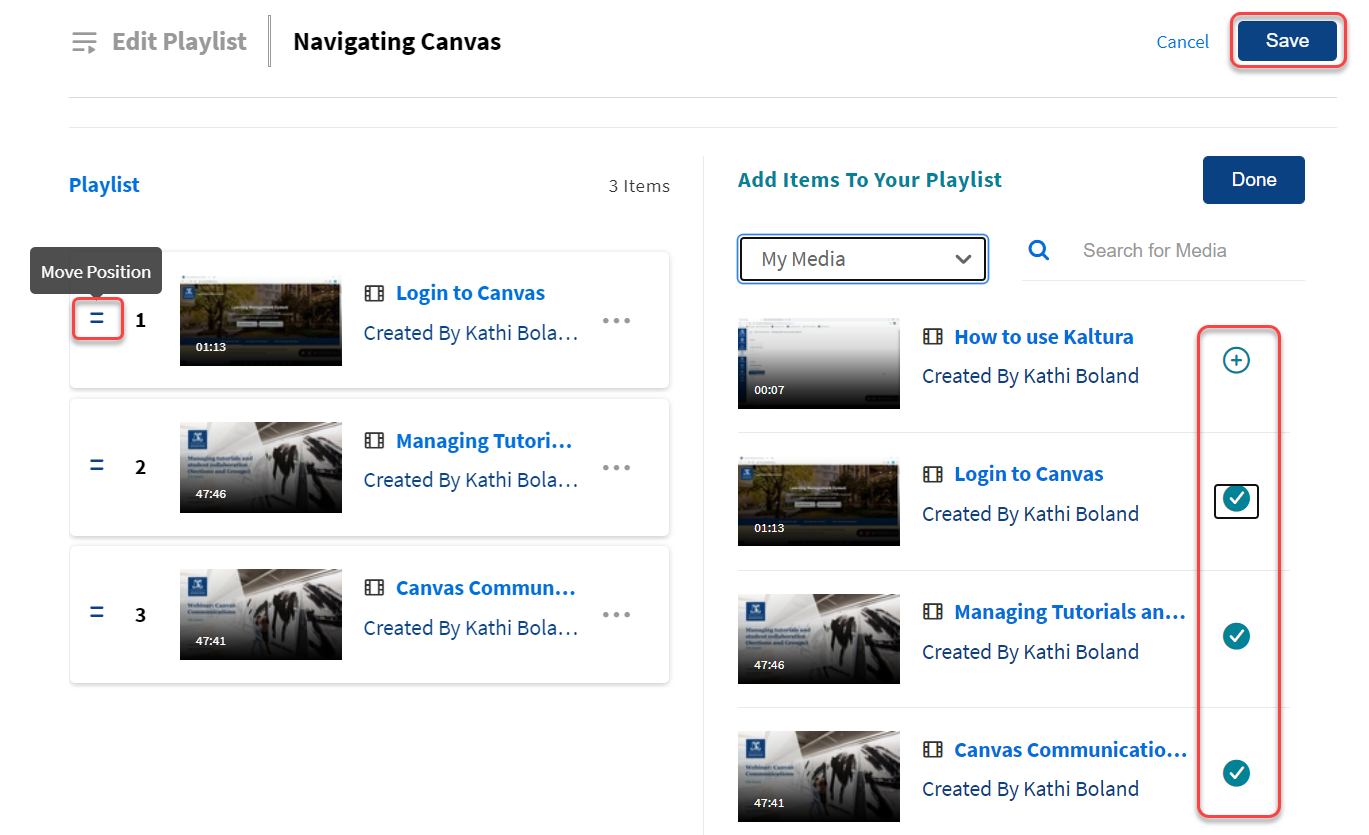
Note: Saving a playlist will auto-generate a channel thumbnail. You can upload a thumbnail of your choice via the Channel Actions menu (hamburger icon).

Add users to a channel and manage media collaboration settings
As media owner, you can add users to an existing channel. Users can be individual people or groups of subject students, subject staff and faculty staff. Channel permission levels are associated with each role, which apply to the media within the channel.
You can manage co-editing and co-publishing permissions for each role via the Collaboration tab. This drives whether a channel user has permission to view, co-edit and/or co-publish channel media content from the users “My Media” area. By default, users added as Manager to the channel, will be able to access channel content from their “My Media” area.
The table below outlines the permission levels associated with each role.
| Channel Role (User tab) | Channel Permission (User tab) | Media Collaboration Permission default (Collaboration tab) |
|---|---|---|
Member |
| Default: Inactive. Means Member cannot view, co-edit and/or co-publish via My Media. |
Contributor |
| Default: Inactive. Means Contributor cannot view, co-edit and/or co-publish via My Media. |
Moderator |
| Default: Inactive. Means Moderator cannot view, co-edit and/or co-publish via My Media. |
Manager |
| Default: Active. Means Manager can view, co-edit and/or co-publish via My Media. |
- Access My Channels.
- Hover your mouse over the channel thumbnail and click the pencil icon in the bottom right corner. The Edit Channel page opens.
- Click the Users tab. You will see the media owner details and if added already, you may see users.
- Click +Add Users to look up users or groups by name or ID.
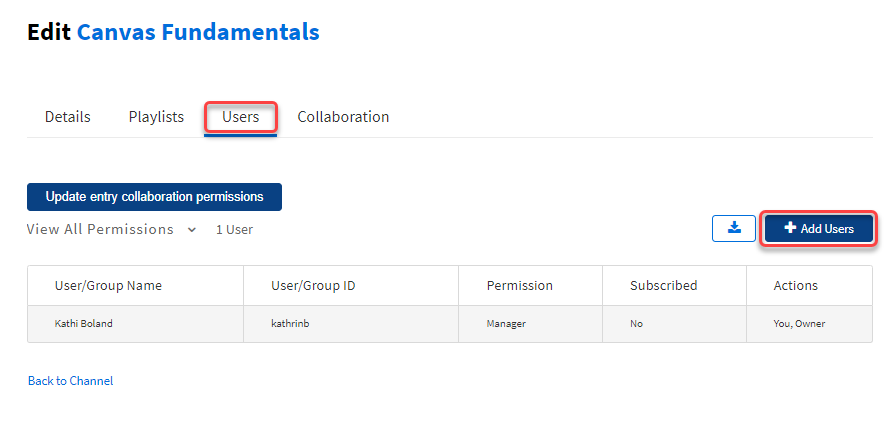
- Enter the user or group name or ID for the user(s). You can add users/groups that are available on the site and you can use the auto-complete function (from the 3rd letter typed onwards).
Note: Groups are pre-created based on subject students, subject staff and faculty staff. Additional groups can be created. Please raise a Service Now request with Learning Environments. - Select the type(s) of permissions for the user(s) you are adding to the media entry.
Note: You can modify channel user’s permissions when needed and download CSV list of channel users. - Click Add. The Edit Channel page displays.
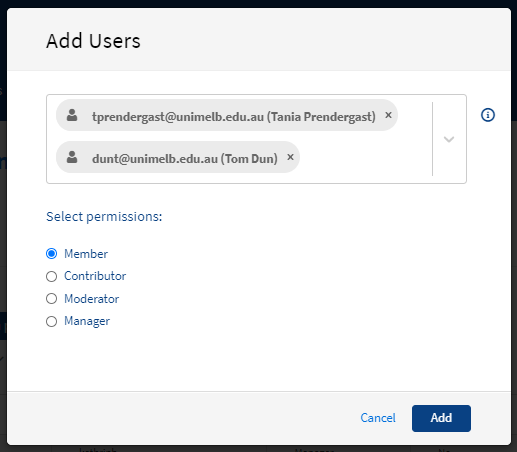
- To view channel user permissions click View all Permissions and select the type of user.
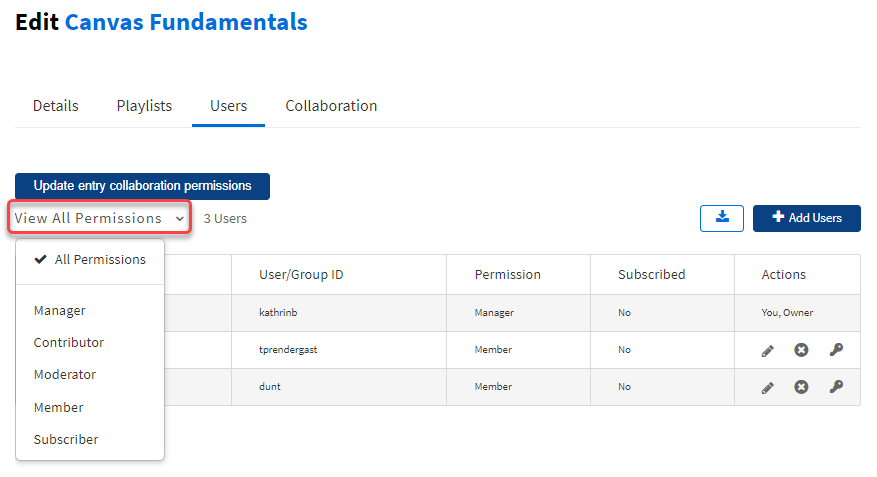
- Click the pencil icon in the Actions column to update permissions or click the cross icon to remove user. The key icon allows you to make a user the owner.
- Click the download icon to export channel user list into CSV file.
- If you wish to review and/or change the collaboration permission for each role, click the Collaboration tab. The global settings will be enabled.
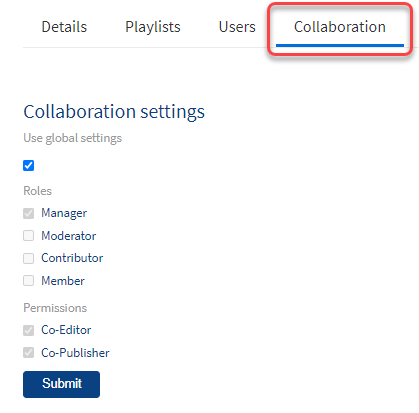
- Uncheck the tick box in User global settings to add or remove Roles and Permissions.
- Click Submit. Collaboration settings will be updated.
Set up Faculty Collections
Faculty Collections are easy to find media collections that are made available from the Media Space homepage through the main menu. Faculty collections are a great way to highlight interesting or useful content from your faculty.
If you wish to set up Faculty Collections, please raise a Service Now request with Learning Environments.
This guide was last updated 25 Jul 2024.
Please report any errors or omissions in this guide by submitting an LMS support request.