Zoom - Getting familiar with the interface
This guide explains the Zoom Meetings interface from a student perspective when using Zoom Meetings from a computer. For students using a smart phone the interface is different.
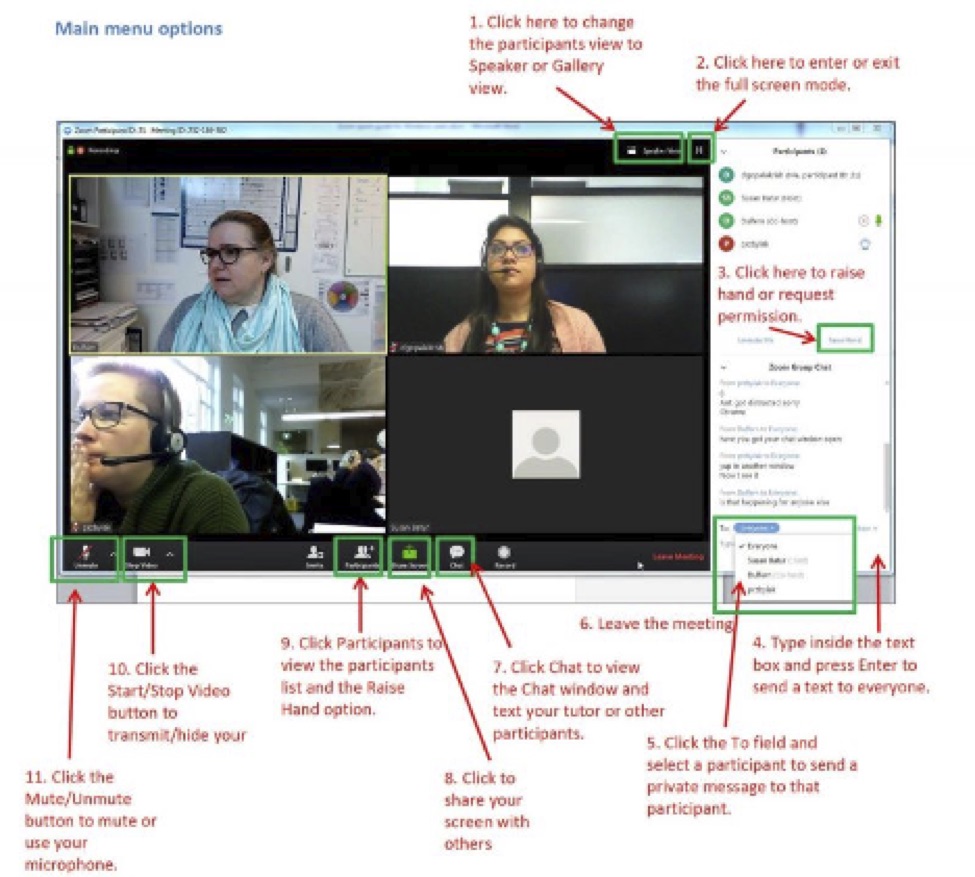
Once you are in your Zoom Meeting session, there are options that allow you to:
- Change the way you view your screen/videos of participants – gallery view or speaker view
- Enter and exit full screen mode (we recommend not using full screen mode, as this means other panels like Chat or Participants will nicely clip to the window rather than float).
- View the participant list
- Raise your virtual hand and use other non-verbal responses
- Send group messages
- Send private text messages (if enabled)
- Share your screen (if enabled)
- Stop/start your video transmission and access video settings
- Mute/unmute your microphone and access audio settings.
Main menu options
See also Attendee controls in a Meeting.
Screen view – gallery view and speaker view
When you enter your Zoom session, you will be able to see other participants who have joined the session. You will see videos for participants who have enabled their videos and blank windows for participants who have disabled their videos or do not have a webcam.
The default view of the room is Gallery view in which you can view all participant windows including yours . As more participants join, you will notice the participant windows re-size to fit into the room area. The Gallery view provides the opportunity for a group learning experience and helps you feel connected but is only suitable for sessions with lower numbers of people. In a Gallery view, the speaker’s window is highlighted in green.
In the Speaker view, the speaker’s window appears expanded at the bottom of the webinar room and the participant windows appear at the top in a horizontal row. This is more suitable for Zoom sessions with larger numbers.
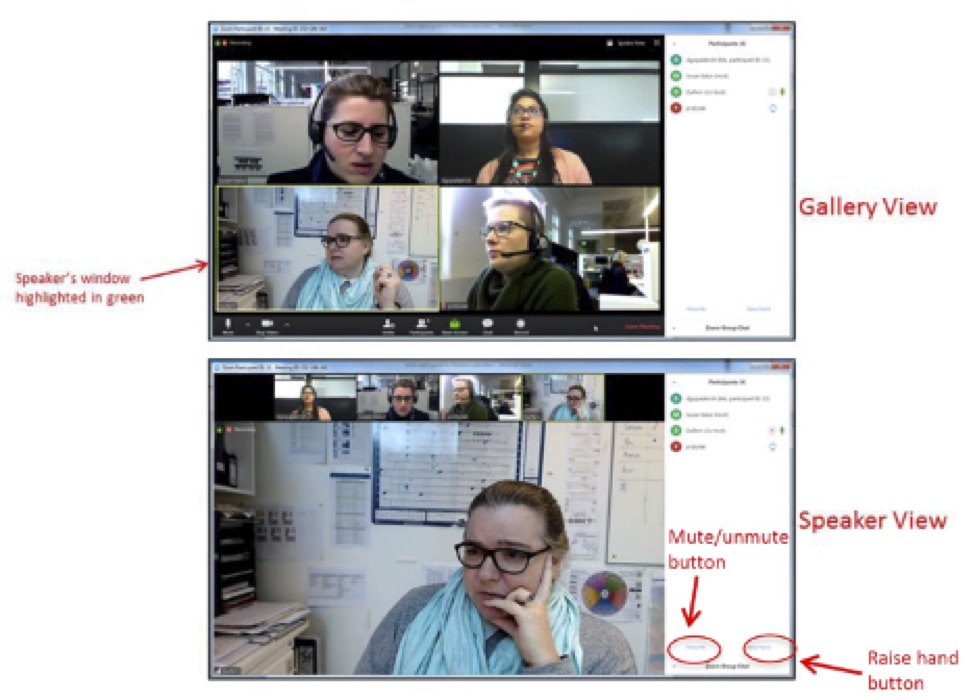
You can toggle between the Speaker and Gallery views by using the option in the top right corner of your webinar room.
See Changing the video layout.
Raise hand tool
Some of your lecturers/tutors may ask you to use the non-verbal feedback tools such as the ‘raise hand tool’
- On the menu at the bottom, click Participants.
This displays the Participants panel to the right of your Zoom main room. - Inside the Participants panel, at the bottom, click Raise Hand icon when you wish to raise your hand.
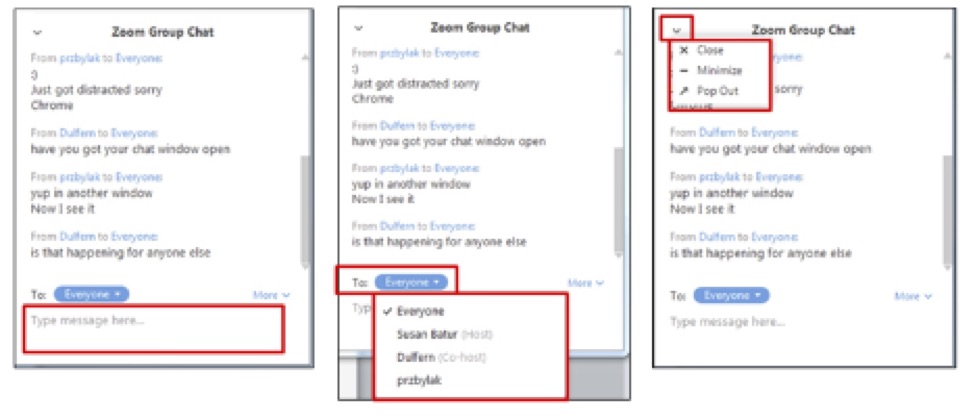
- On the menu at the bottom, click Chat.
This displays the Zoom Group Chat panel to the right of your Zoom main room. If your Participants panel is open, you will be able to view the chat panel at the bottom of the Participants panel as in the image above. - Type your message in the text box at the bottom of the chat panel
- Press Enter
This will send your chat message to all participants (including your instructor) and will be displayed in the chat box.
Zoom Chat
To send a private message to your instructor or another participant
- In the To field, click the down arrow
- From the drop-down list, click the name of your instructor or the participant you want to text
Note: the instructor can disable this option if they wish.
To open and view the chat panel in a separate window
- Click the down arrow in the top-left corner of the chat pane
- From the menu, click Pop Out.
Annotating your screen when requested to by lecturer/tutor
Sometimes your lecturer/tutor may ask you to annotate on the screen (text, drawing, pointing etc).
- Once your lecturer/tutor has shared their screen or whiteboard and asked you to use annotation tools. Hover over the red/green box at the top of your screen to bring up your Zoom menu.
- Click Options > Annotate. The annotate tool bar will appear as a floating menu at the top. You can drag to re-position the menus anywhere on your screen.
- Click the Draw tool to use your mouse freehand draw on the screen

Annotate or Whiteboard tool bar - Use the different options on the Annotate tools menu as follows:
Whiteboard/annotate tools menu Mouse
To unselect a whiteboard/annotate tool and use your mouse at any point during screen sharing, on the menu, click Select/Mouse.
Text
To type text on your shared screen, on the menu, click Text, and then click an area on your screen where you want to include the text. A text box appears in that area. Next, type your text inside the text box.
Draw
To draw a shape or highlight an area on the screen, point to Draw, and then from the drop-down, click a shape that you want to use. Next, click the area where you want to draw the shape or highlight and drag (your mouse) until the shape is of a desired size or highlights the desired area.
To use the check or cross sign, on the menu, point to Draw, from the drop-down, select the check or cross sign, and then click the area on the screen where you want to place the check or cross sign. You could use the check and cross signs for polling purposes or to present a checklist or list of dos and don’ts when presenting.
Arrow
To point to a text, object or area of interest, use the Arrow/Spotlight option. On the menu, click and select the Arrow/Spotlight option as desired. Spotlight resembles the light from a pen pointer or a laser pointer. When you use the Arrow option, the arrow appears with your name on it.
Format
To format your text or shape, on the menu, point to Format, and then from the drop-down, select the format options you want to use. The format options allow you to change the colour, border and width of a shape. In addition, the Font options within Format allow you to bold, italicise, or change the font size of your text.
Clear
Use the Clear options to clear the annotations on your screen. Use Undo to remove your annotations one by one starting with the most recent one.
- Click Save to save your shared screen/whiteboard
- Click Show in Folder to view were your whiteboard or screen is saved.

The whiteboard is saved to the Documents Library on your computer by default. Within the Documents Library, you will find a folder for Zoom. Open the Zoom folder to access your saved whiteboard.
Sharing your screen when requested to by lecturer/tutor
If enabled, you can use the Share Screen option to share your presentation slides, your desktop (computer screen), or the whiteboard. The whiteboard is a blank white screen that you and others can annotate on.
- On the menu at the bottom, click the green Share Screen button
This will display a pop-up that prompts you to select a screen, open file, whiteboard or application to share
- Click on the screen, file, whiteboard or application you want to share
- At the bottom right corner of the pop-up, click Share Screen.
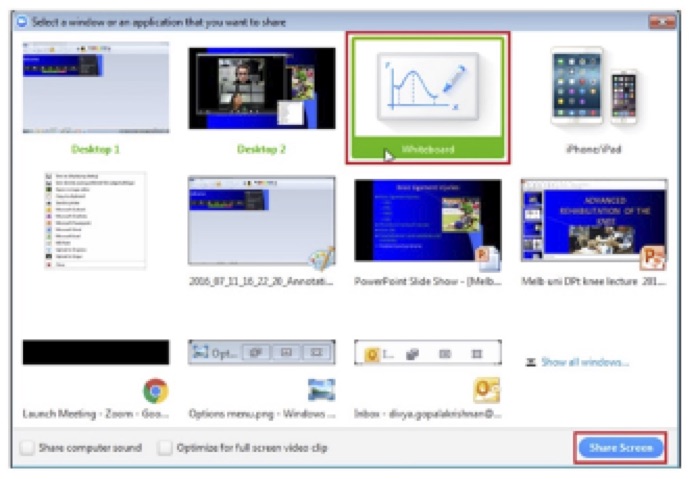
Selecting what to share When you share a screen, whiteboard, file or application with other participants, your screen fills the Zoom room area and the item shared will have a green boarder around it while you are sharing.
- Hover over the green box at the top of the green boarder to bring up your Zoom menu at any time
To stop sharing
- At the top of the green boarder there is a red Stop Share button
- Click Stop Share when you are ready to stop sharing your screen.
Breakout rooms
Breakout rooms provide the opportunity for Zoom participants to work in groups. Your Zoom sessions may include activities that you will be required to complete as a group within the breakout rooms. These could include brainstorming exercises, discussions, presentations and more. Breakout rooms have audio, video, chat and screen share capabilities.
Your instructor will create the breakout rooms for you and assign you to one. A breakout room will remove you from the main room and send you to breakout room with just some of the participants.
- When you instructor assigns you to a breakout room, you will receive a pop-up message on your screen that says, “The host is inviting you to join Breakout Rooms”.
- Click Join

Joining a breakout room Note for smart phone users – if you are doing your session from a smart phone, the screen will temporarily look like you’ve been booted out of your Zoom meeting. Wait a few seconds and you will find that you are in a Breakout room.
- Your breakout room interface is very similar to the Zoom main room. The menu at the bottom includes additional options that allow you to invite and request your instructor for help and leave the breakout room.
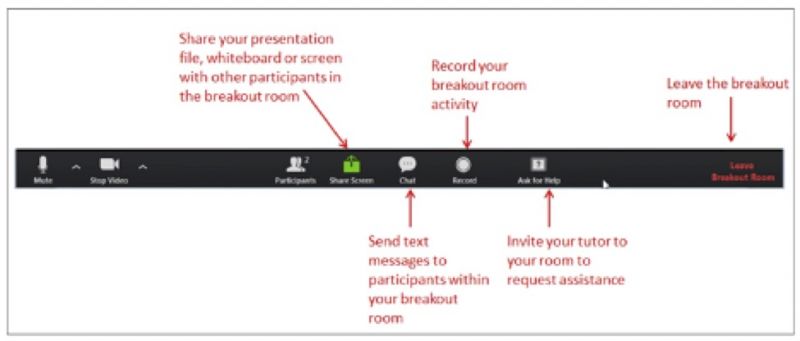
Breakout room Zoom menu - Use the Share Screen, Chat, Mute/Unmute and Start/Stop video options to complete any breakout room activity you have been given.
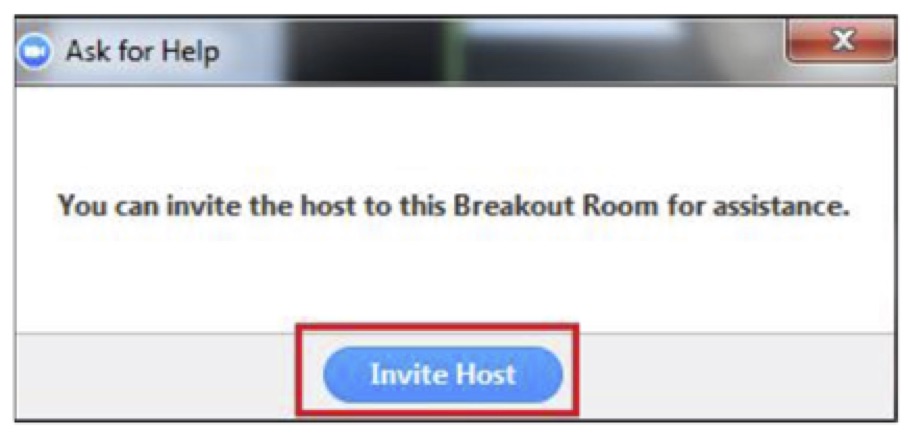
- To invite your instructor to your room, on the menu at the bottom of the screen, click Ask for Help.
In the Ask for Help pop-up box, click Invite Host.
This will notify your instructor to join your room.
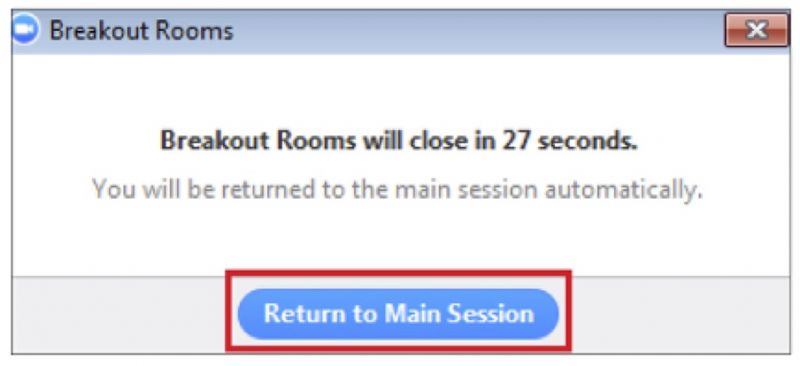
Inviting the host to your breakout room - To leave the breakout room, in the right corner of the menu, click Leave Breakout Room.
- Click Return to Main Session.
Returning to the main session
See also Participating in Breakout rooms.
Zoom support
For support downloading, accessing or using Zoom, please submit a support request.
This guide was last updated 12 Mar 2024.
Please report any errors or omissions in this guide by submitting an LMS support request.