Microsoft Teams in the LMS
An integration is available allowing staff to create Teams meetings in Canvas and share these with students as an alternative to Zoom for one-on-one or small consultations.
Microsoft Teams is a software application that you can use to work with others on a shared project, or to create a shared workspace. It has many features that facilitate communication and collaboration.
One of these features is Microsoft Teams Meetings, a video conferencing function that is similar to Zoom. Meetings can be scheduled and initiated from within the standalone Microsoft Teams app, but you can also create a Microsoft Teams Meeting from within Canvas. Creating a Meeting from within Canvas will generate a link that directs users to the Microsoft Teams app; participants can then choose to join the meeting using the desktop version of the app, or the web-based version.
Tip: Microsoft Teams Meetings is a more simplified video conferencing tool than Zoom, so you might like to use it for one-on-one or small group consultations, rather than for tutorials or other live events that require sophisticated features for managing participants. Microsoft Teams Meetings can also be a good back-up for video conferencing if you are experiencing technical difficulties with Zoom.
For more information on using the features within Microsoft Teams Meetings, please refer to Microsoft’s comprehensive set of guides to Meetings and calls.
Create a Teams Meeting in Canvas
Meeting links can be created within any Announcement, Assignment, Discussion, Page or Quiz – basically, anywhere within Canvas where you can create content using the Rich Content Editor.
- Log in to the LMS and navigate to the required Subject.
- Navigate to the location or content page from where you want to students to be able to join the Meeting.
Tip: You might want to create a new page in an introductory Module or similar with a name such as “Microsoft Teams Meetings” to make it easy for students to find. - Once you have opened the page (or other content type) where you want to create the Meeting link, click the Edit button in the top right of the screen to open the content editor.
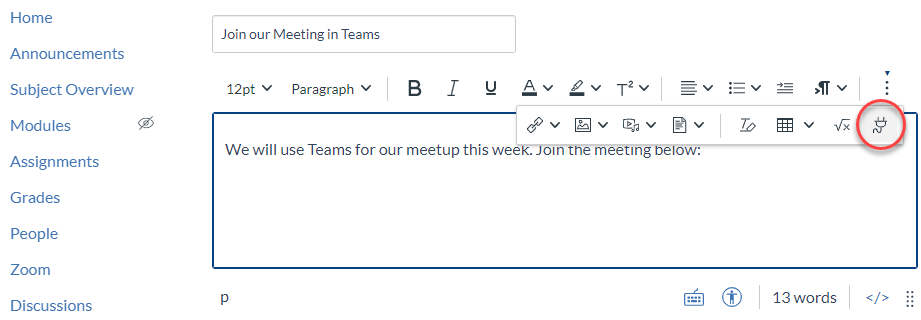
- In the toolbar at the top of the content editor, click on the Apps icon. This is the last icon on the right, and it looks like a plug.
Note: If you can’t see the Apps icon, it’s probably because your browser window is too small. To reveal the icon, either make your browser window wider, or click on the three vertical dots on the right side of the toolbar. This will open a drop-down menu of additional icons, where you will see the Apps icon.

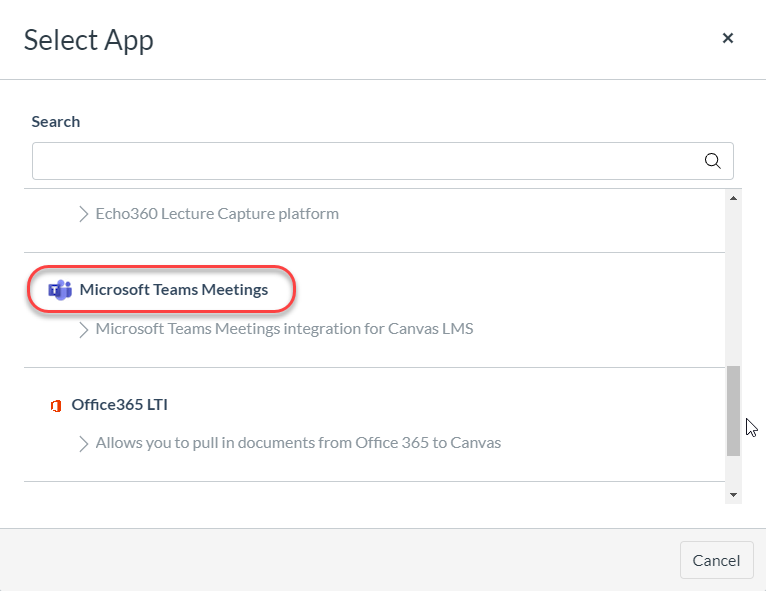
- Clicking on the Apps icon opens a pop-up window with a list of available apps. Scroll down and click on the Microsoft Teams Meetings option.

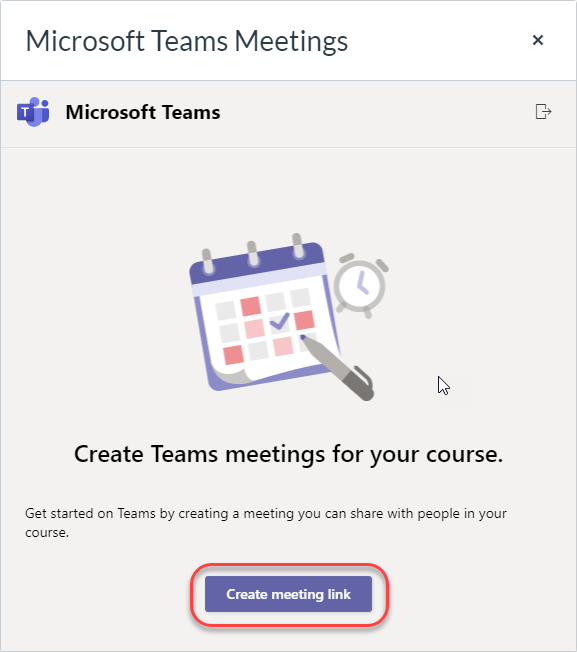
- In the next pop-up window, click on the Create meeting link button at the bottom of the window.
Note that you may first be asked to log in to your Microsoft 365 account using your University credentials.

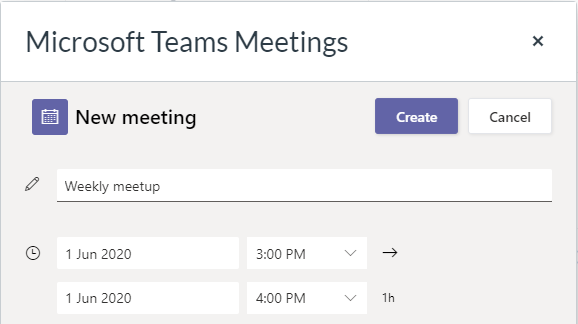
- In the next window, enter a name and time for your meeting, and click the Create button.

- You will now be brought back to the content editor, where a Meeting link will have been generated in the following format: “Join 'name of meeting' (Microsoft Teams Meeting)”.

The Microsoft Teams Meeting link in inserted into the text editor. Anybody who clicks on this link will be prompted to open the Microsoft Teams application from their desktop or browser, and will be able to join your meeting.
Edit the Meeting
If you want to rename the meeting or make any other changes to the link text, click into the existing text and make your desired changes. Then click the Save button below the editing window, or the Save and Publish button if the page is not yet published and you are ready for it to be viewable by students.
Note that while you are able to change the name of a meeting after it has been created, you are not able to change the scheduled time. However, meetings can be joined at any time once they are created, including before and after their scheduled timeframe. The meeting is essentially a persistent meeting space. So it doesn’t really matter what you enter for the start and finish time!
Tip: The persistent nature of Meetings links makes them ideal for recurring events, such as virtual office hours or consultations. You therefore might like to give your Meeting a name that indicates its purpose and your hours of availability.
This guide was last updated 12 Mar 2024.
Please report any errors or omissions in this guide by submitting an LMS support request.