Cadmus (as on-campus digital exams)
This guide is for academic staff or their delegate who have nominated with the Exams Office to have an on-campus digital exam with Cadmus in Canvas LMS as their final assessment.
The Cadmus exam will be created as a Canvas LMS Assignment (also referred to as assignment shell or exam shell in exam communications). Subject Coordinators then link this assignment externally to Cadmus via the assignment settings, and the class list from the LMS will be synced across to Cadmus.
The students complete their Cadmus exam with LockDown Browser in an invigilated exam location using their personal laptop or a loan laptop. They are required to download LockDown Browser for Cadmus well in advance of their exam date and are strongly advised to take a practice exam in the LockDown Browser OEM (Cadmus) Test Community in the LMS. For more information on the recommendations for setting up LockDown Browser, see preparing students for the on-campus digital exam.
Note: If there are students sitting Alternative Exam Arrangements (AEA) in your subject, please refer to the AEA guide for further information and guidance.
Once students have successfully submitted their Cadmus exam, Subject Coordinators will be able to commence exam marking.
To understand more about Cadmus, see features and considerations of Cadmus Assignments as exams.
Checklist
Use the checklist below to help you complete all the necessary steps to prepare for your on-campus digital exam with Cadmus:
If there are questions with this checklist, please contact SASS Exams Support.
Automation if you used the Exams Portal
If you supplied the details of your exam to the Exams Office, for an on-campus written exam an Assignment Group called Semester 2 exams, 2026 with 0% weighting will be created in your subject, and a LMS assignment shell will be created in this group. For more information on when the steps in this process are scheduled to occur, see exam key dates.
After the creation of your exam shell, you are required to follow the steps below to amend the automatically created assignment group and assignment shell for your exam.
You will need to add alternative exam arrangements (AEAs) to the Cadmus assignment as they will not automatically flow through from the LMS Assignment. See setting up alternative exam arrangements (AEA) for instructions on how to do this.
Important: There are several settings that must not be changed.
Step one
Update the Assignment Group Weighting to reflect the correct weighting for the exam. Refer to the how do I weight the final course grade based on assignment groups? guide for further instructions.
Step two
In the LMS assignment shell for your exam, there are settings that have been automatically set by the Exams Office (marked as Review – do not edit in the screenshot below).
Important: Do not change these settings unless there is an identified reason to do so. Contact Exams Support if you have any concerns.

-
- Assignment name: The exam name - format is ‘Exam: exam name in portal (subject code)’. If needed for clarification, append any extra information such as 'Part A'.
- Assignment instructions: Action: Update the assignment instructions with relevant information for your particular exam.
- Points: 100
- Assignment Group: Semester 2 exams, 2026
- Display Grades as: Points
- Submission Type: Action: Change to External Tool, click Find and select Cadmus Assignment from the list and click Select. Do not select the checkbox Load This Tool In A New Tab.
- Submission Attempts: Unlimited. This setting can be left as is, as this setting does not have any impact on external tools such as Cadmus.
- Assign to: Everyone.
Note: This may say Everyone else if some students have exam exceptions. These exceptions will be listed in additional Assign To settings. - Due date: populated with the scheduled finish date and time for the exam
- Available from date: populated with the date and time from which the student can access the exam
- Available until date: populated with the due date plus 30 minutes technical buffer
- Click Save & Publish.
Note: Students will only see the published assignment shell until after the Available from date and time have passed.
Setting up your Cadmus exam in Cadmus
Once you have set up your exam in the LMS as per the instructions above, you will also have to set up the exam in Cadmus.
Step one
Click the Create new instructions button to enter Cadmus.
Step two
Click +New Instructions at the bottom left of the template options pop-up.
Step three
Click Set requirements, grading and options and settings to start configuring the exam settings.Follow the Cadmus guides or refer to the steps below for the set-up process:
- Set Assessment type to Exam.
- Set Exam type to Final Exam. This is simply for labelling analytics, and will not impact assessment settings.
- Exam Timing should be set to Together at the same time for on-campus digital exams.
- The Exam start time will automatically be populated with the Available from time in the LMS assignment. Make sure that they match.
- If you would like to use the Reading time feature, input the reading time allocated to the exam (15 or 30 mins). Students will have access to read the instructions but unable to start work during this time.
- Writing time should then be populated by the total minutes minus reading time. For example, if the total time is 120 minutes and Reading time is 15 minutes, Writing time will be 105 minutes.
- If you prefer not to use the Reading time feature, input the total number of minutes directly into Writing time.
- Select your preferred options for Word limit, Referencing, and Spell Check. If these features are turned on, the expected word count and/or referencing style will be displayed for students and they will also receive alerts for incorrect spelling.
- Select Auto submission to Off, and ensure there is 30 additional minutes allowed after the end of the exam. Submission will be managed in the exam room.
- Allow re-submissions is On.
- PDF copy of student submission is Off.
- Click Advanced Exam settings and select Students must use LockDown Browser to complete the exam.
- Select your preferred Marking Tool – Cadmus Marker, Turnitin Feedback Studio or Canvas SpeedGrader. Student submissions will be run through Turnitin, regardless of which marking tool you select. However, only staff can access the similarity reports in a Cadmus exam.
Note: We recommend the use of Turnitin Feedback Studio, as there is an outstanding known issue with using Canvas SpeedGrader to mark Cadmus exams: students can download a PDF of their responses when Speedgrader is selected as the marking tool for Cadmus - If using Feedback Studio, Total points should match the LMS Assignment.
- Weighting is an optional feature that displays how much the exam is worth to students.
- Anonymous marking is optional, but note that this setting cannot be changed once students have submitted.
- Advanced Turnitin settings should be kept on its default settings.
- Written feedback return is Off.
- Click Confirm Changes.
- Under Task, write your instructions to your students on how they complete their exam.
- Click Release, then Release Instructions.
Setting up Alternative Exam Arrangements (AEA)
Extensions or AEAs for students who are granted exceptions will not automatically flow through to Cadmus, but you will be able to sync them from the LMS in the Cadmus interface. Reading time for these students will default to what was set for the main cohort, and any extra time the student has been given will be added to writing time. If the student has been given additional reading time, this will need to be manually adjusted in Cadmus.
You will only be able to add AEAs in Cadmus after the assignment has been released to students. Even if you release your Cadmus assignment to students, they will not be able to view the exam until the LMS Assignment Available from date and time passes.
- Go to the Progress tab in the top row of the Cadmus homepage.
- Click the Sync LMS or Sync Class List button.
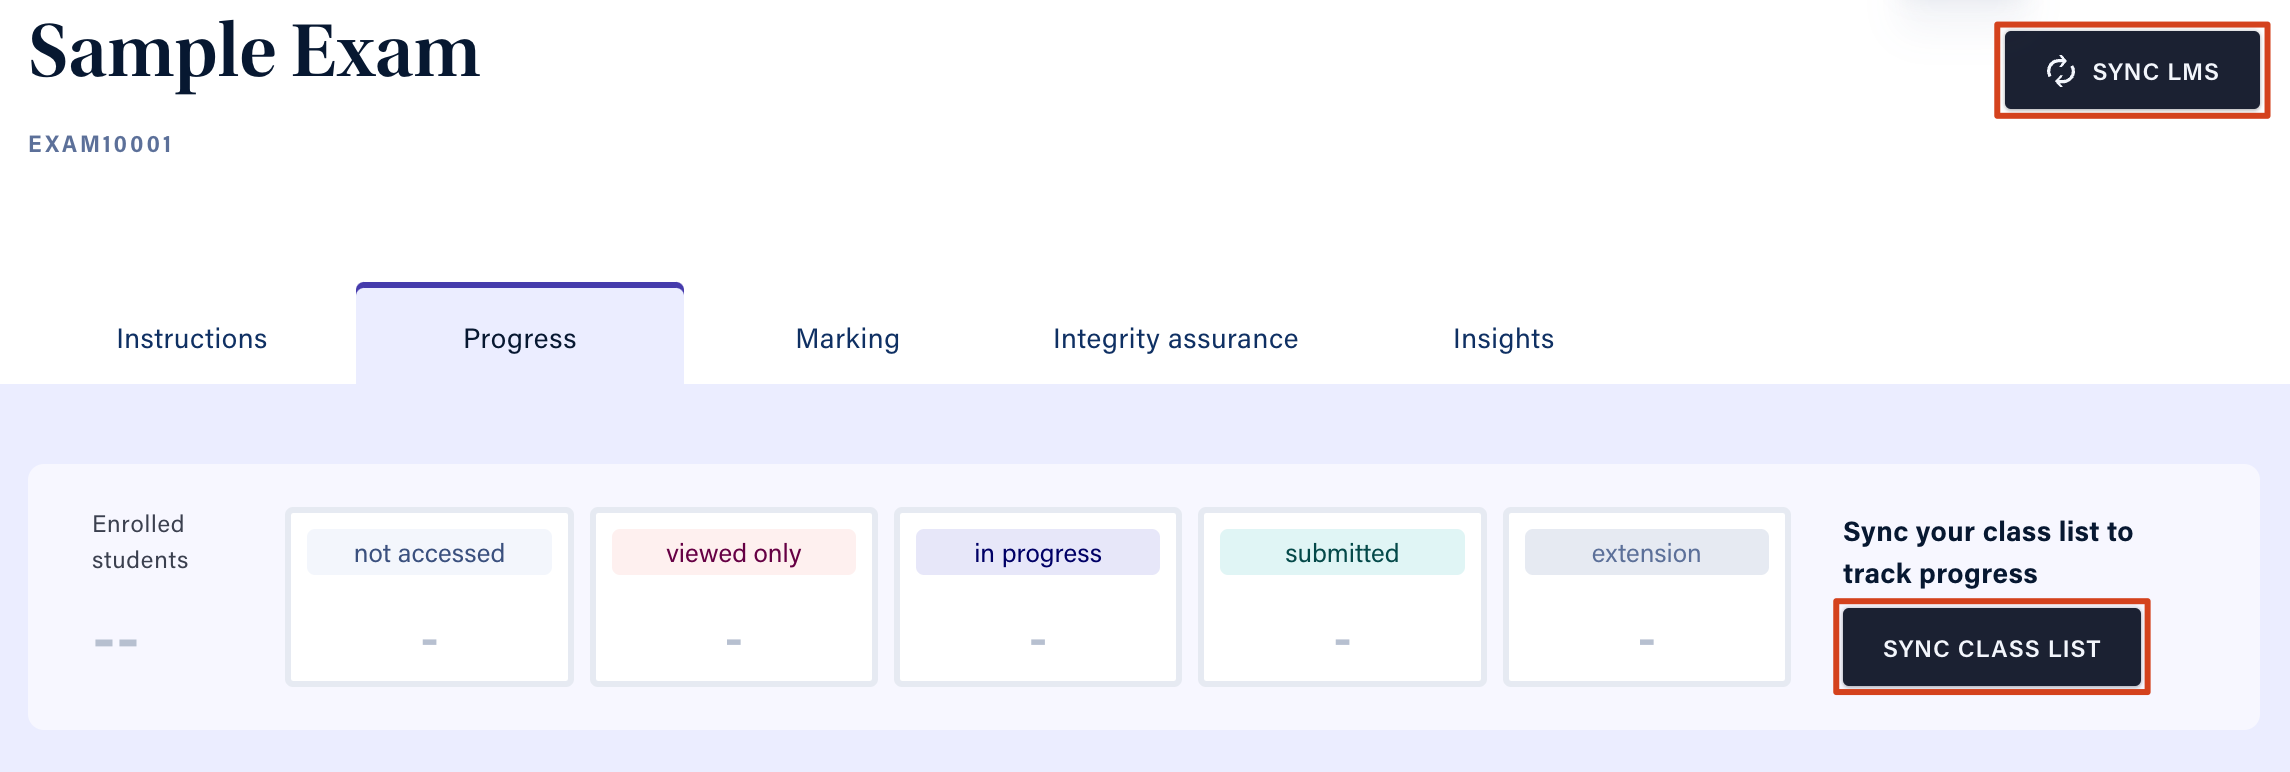
- Once the class list has been synced, there will be a Special Considerations box. Click the Sync from LMS button. If there are duplicate entries for a student, you will be given an option to Sync Without Replacing or Override & Replace.
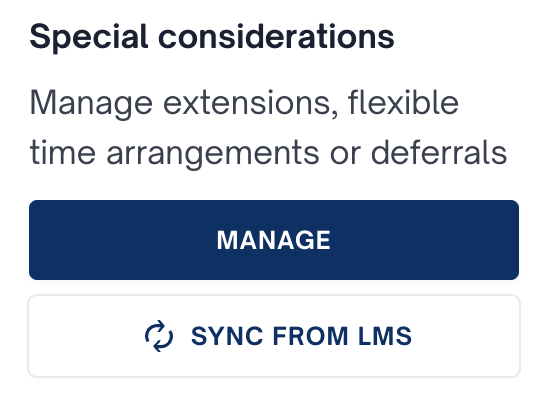
- When the sync is complete, click Manage to see all of the Special Considerations in the cohort. You can add special consideration to individual or groups of students by searching for their name(s), or using the file upload option.
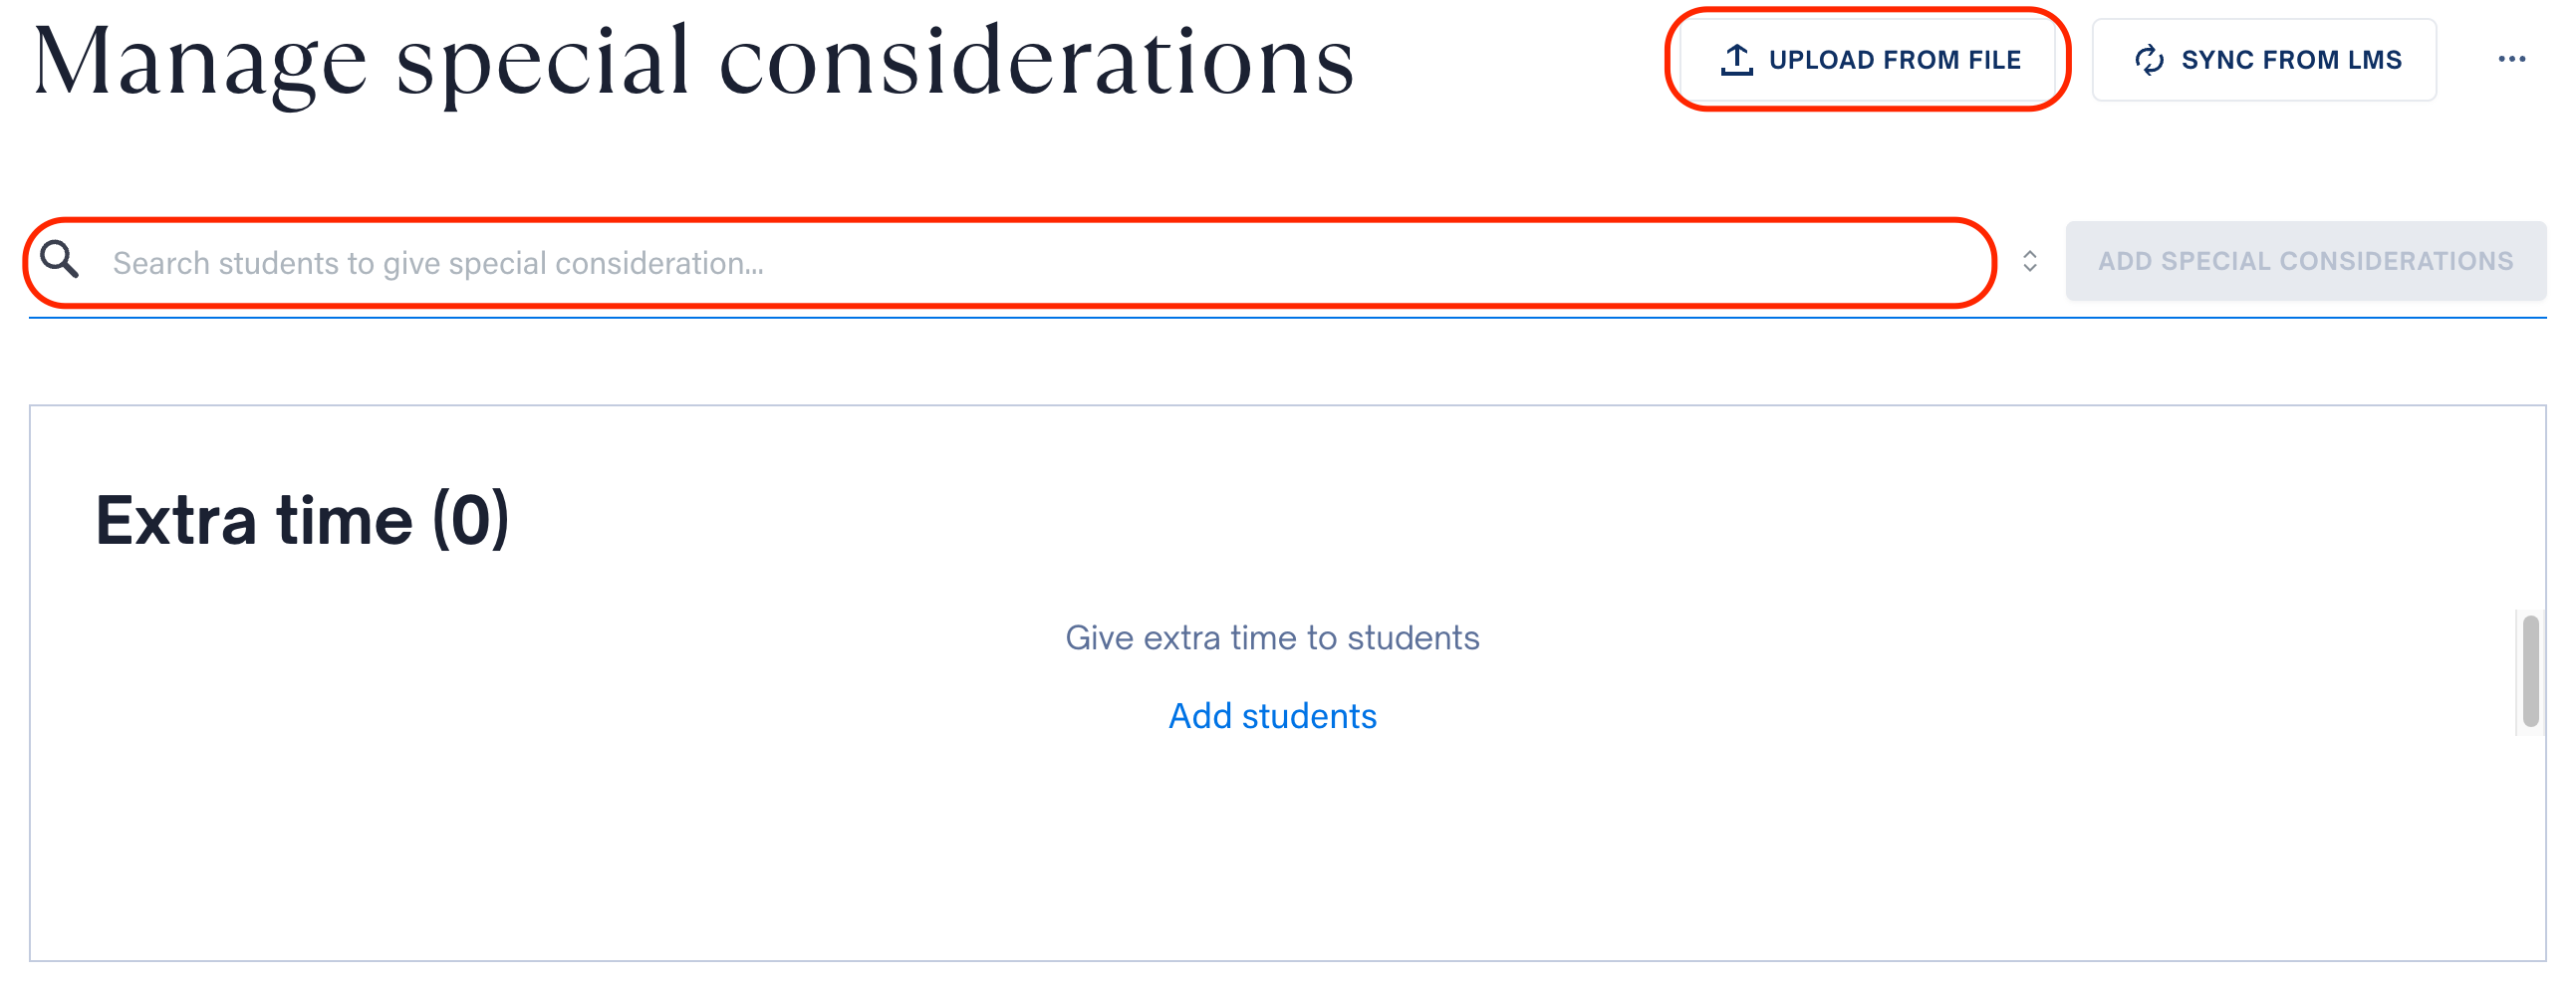
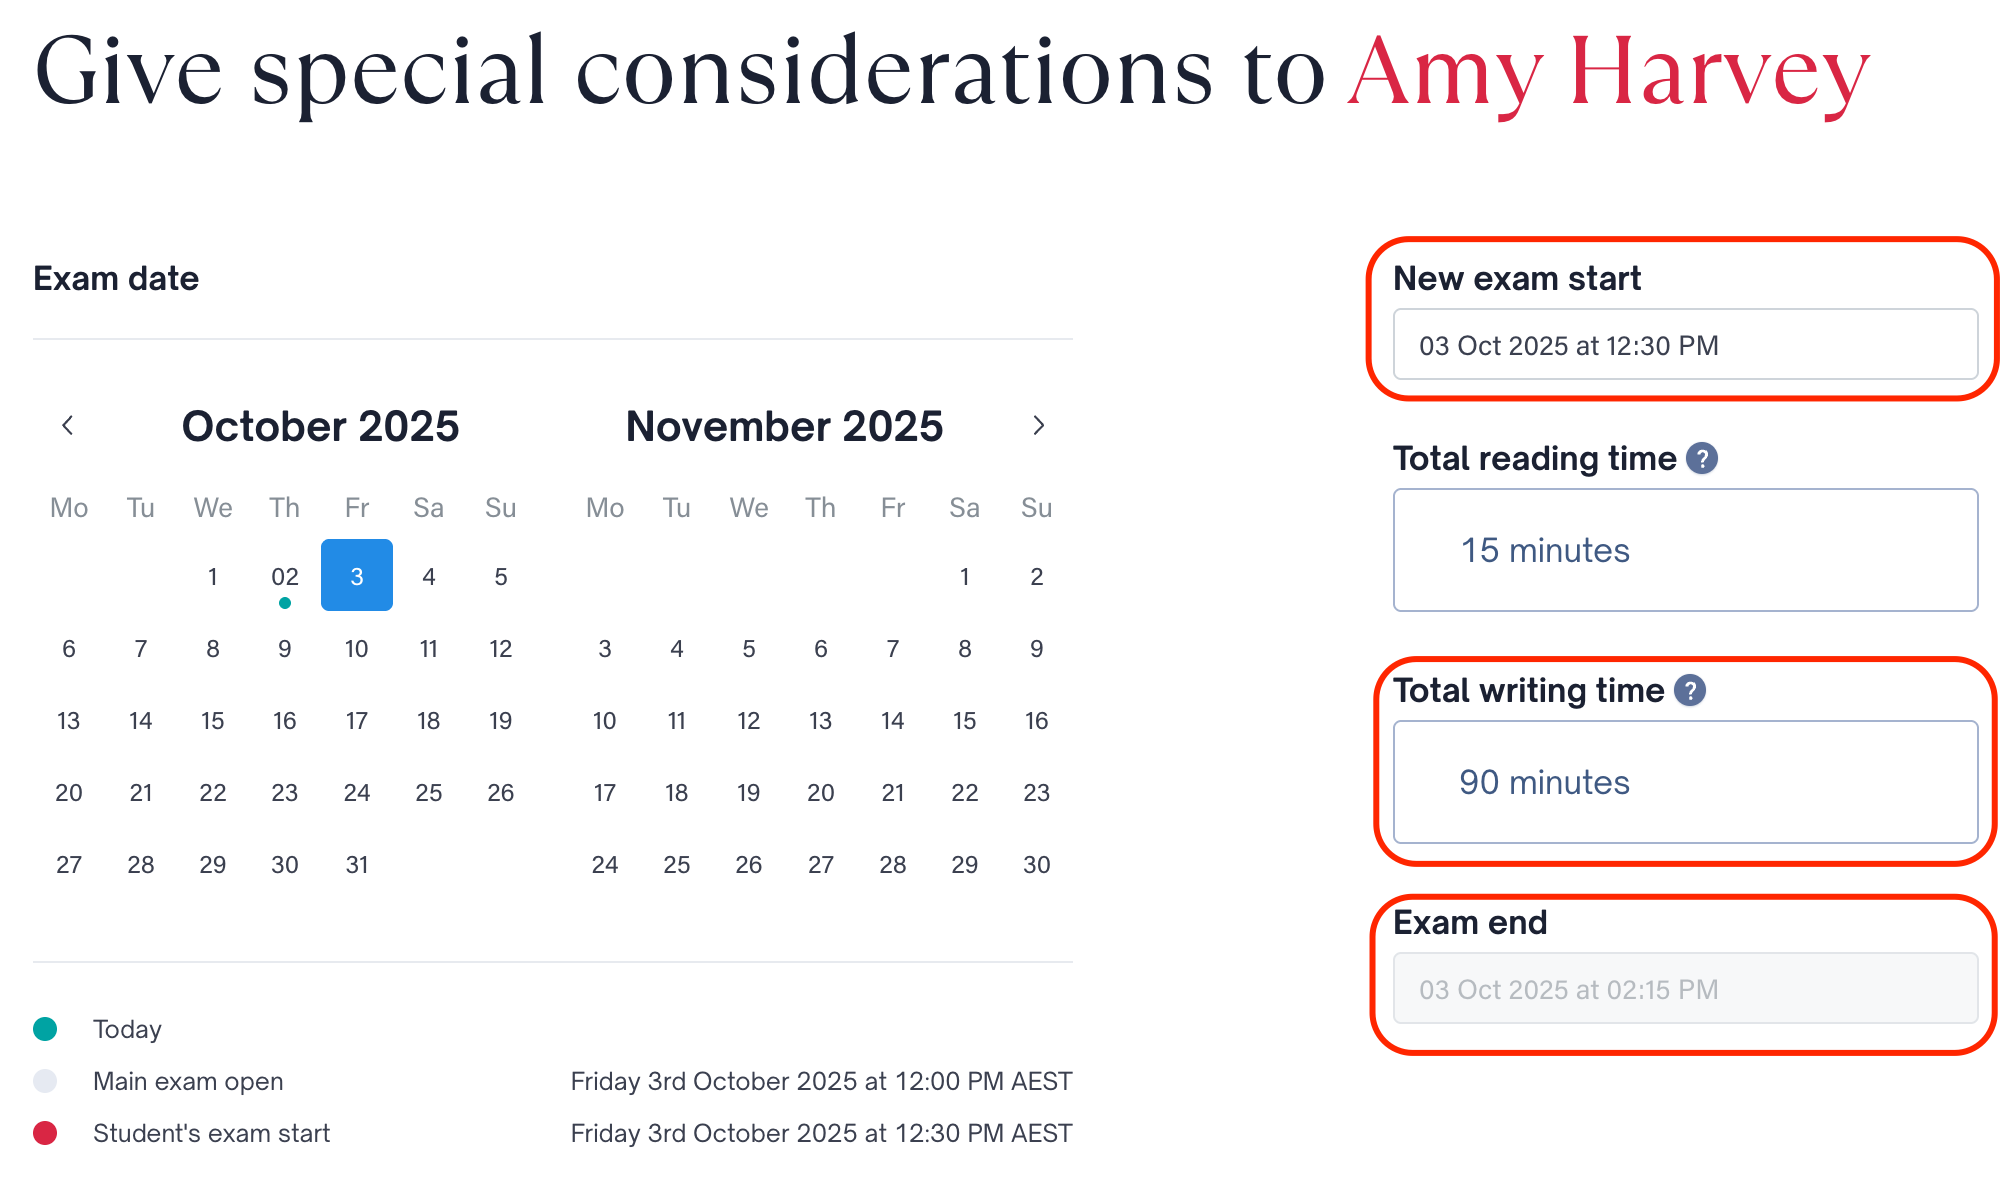
- If the student is taking the exam on a different date to the main cohort, the updated date and time should appear in the New exam start box. If the student has been given extra reading time, add the extra time to their Total reading time, and adjust the Total writing time to make sure that the date and time in the Exam end box still matches the student’s Due Date in the LMS Assignment. Click Confirm.
We recommend that you discuss complex AEAs in your Cadmus assignment with your local academic support officers or lodge a support request with Exams Support if you need further support.
Preparing students for the on-campus digital exam
We strongly recommend that you conduct a practice Cadmus exam for your students prior to the exam period. This will enable students to become familiar with the process and the LockDown Browser, giving them the opportunity to iron out any technical difficulties. It will also give students exposure to the type of exam questions that are asked in the exam. The setting up practice digital exams guide provides you with further instructions and things to consider.
LockDown Browser for Cadmus must be downloaded and installed by students prior to the exam day. During the exam, students will be locked into the Cadmus exam until they submit, as LockDown Browser prevents them from opening and using other web browsers, or opening additional applications on their laptop. LockDown Browser for Cadmus is compatible with both Windows and Mac computers.
It is highly advisable to have students self-enrol in the LockDown Browser OEM (Cadmus) Test Community in the LMS. Once enrolled, students can then take the practice Cadmus exam with LockDown Browser installed on their laptop. If students have a laptop that is incompatible with LockDown Browser, they can request a loan laptop. The request form will be opened 2-3 weeks before exams start.
Invigilation of Cadmus exams
Cadmus has several measures in place to flag unauthorised activities that may have occurred during online exams. Cadmus combines information such as Turnitin Similarity Score, Accessed Locations, Process, and Engagement to generate an Assurance Level (also called Integrity assurance indicator) for each student, and this can be accessed through the Integrity Assurance page within Cadmus. Refer to the intro to the Integrity Assurance Analytics page guide for further information.
Note: The assurance levels do not automatically indicate whether the student has engaged in academic misconduct. When investigating cases of misconduct, staff should review the student’s Assessment Report in detail and contact SASS Exams Support if further assistance is required.
In terms of in-venue invigilation, at the start of each Cadmus exam, students will be directed to close anything else that is open on their laptop before the commencement of the exam. The exam invigilators will be briefed on what to look for on the student’s screen. If the screen is not showing their Cadmus exam with LockDown Browser, an incident report will be created, and subsequent processes will be followed.
Staff resources
- Digital exams: Frequently asked questions
- University of Melbourne Cadmus resources
- Cadmus teacher resources
- Cadmus guide - Cadmus + Respondus LockDown Browser Exams
- Cadmus guide - sync the LMS roster
- Cadmus guide - using Turnitin rubrics and grading forms
- Guide to check when students can see their marks and feedback is configured as desired
- Available workshops on LMS Assignments and Cadmus offered by Teaching and Learning Innovation.
If you have any questions about Cadmus exam, please contact SASS Exams Support.
This guide was last updated 01 Apr 2026.
Submit an LMS support request for further assistance or to report any errors or omissions in this guide.