Creating and managing Cogniti agents
Agents created via Cogniti can be configured to fit the purpose and context of your teaching and learning initiatives. This guide provides an overview on settings, recommended practice, and considerations.
What is Cogniti?
Cogniti is a learning tool that enables staff to create AI-assisted learning agents and activities. Cogniti agents and activities can be configured and adapted to specific courses, resources, and roles.
Agents and activities rely on large-language models for their responses, and parameters such as rules and knowledge bases can be put in place to ensure that the agent behaves in its intended way and that only relevant information are relayed to students.
Cogniti terminology
Cogniti term
Definition
Agent
AI-guided bots that can be configured to assume roles designed to assists in their learning.
Mini-app
AI-based learning activities such as quizzes, games, and visualisations. Mini-apps are not currently available.
Sandbox
Instructor-designed environments that allow students to create their own agents.
System message
The main prompt that dictates the behaviour and output of your AI agent. Input any parameters or rules that you wish your agent to follow here.
Conversation starter
Optional and suggestive buttons that users can select to initiate conversations with agents.
Temperature
Controls the randomness of the responses generated. A higher temperature would offer more randomness while a lower temperature would offer more predictable responses.
AI model
The version of the AI software that is used to inform the agent’s behaviour. Note that some of these may be flagged as Deprecated, which can be understood as outdated and may therefore not work.
Resource
Material that agents can draw upon in their responses; reference material that is occasionally used. Examples include notes or supplementary readings.
Knowledge
Material that inform the agent’s identity and responses. Knowledge can be understood as information grounding agents. Examples include a course syllabus or assessment instructions.
Principles for designing AI agents for learning
AI agents should be intentionally designed to support student learning by encouraging reasoning, reflection and engagement, while maintaining the central role of educators and human judgement.
Key design principles include the following.
Learning first
AI agents should be designed with a clear educational purpose and aligned with the course's intended learning outcomes, activities and assessment. Their purpose, role and appropriate use should be clearly communicated to students. Agent interactions should promote inquiry, critical thinking, problem-solving and reflection to support meaningful learning.
Scaffold, don’t solve
Rather than providing completed answers, agents should guide students towards understanding through questioning, feedback, hints and progressively reduced support. The goal is to build learner confidence and independence over time.
Academic integrity
Educators should clearly communicate when and how AI can be used, ensuring alignment with university policies and academic integrity expectations.
Establish clear guardrails
The behaviour of AI agents should be guided by carefully designed instructions, approved resources and defined boundaries. This helps ensure responses remain accurate, relevant and aligned with the course context.
Evaluate and improve
AI agents must be evaluated regularly to understand its influence on student engagement and learning. Feedback from students will also be crucial for fine-tuning and improvements. Insights gained will help identify best practice, inform future iterations, and help support the effective adoption of agents across courses and disciplines.
As Cogniti features and AI-models improve, you will also see changes in the way agents behave. it is important that agent behaviour and student feedback is continually monitored.
Creating or cloning a Cogniti agent
-
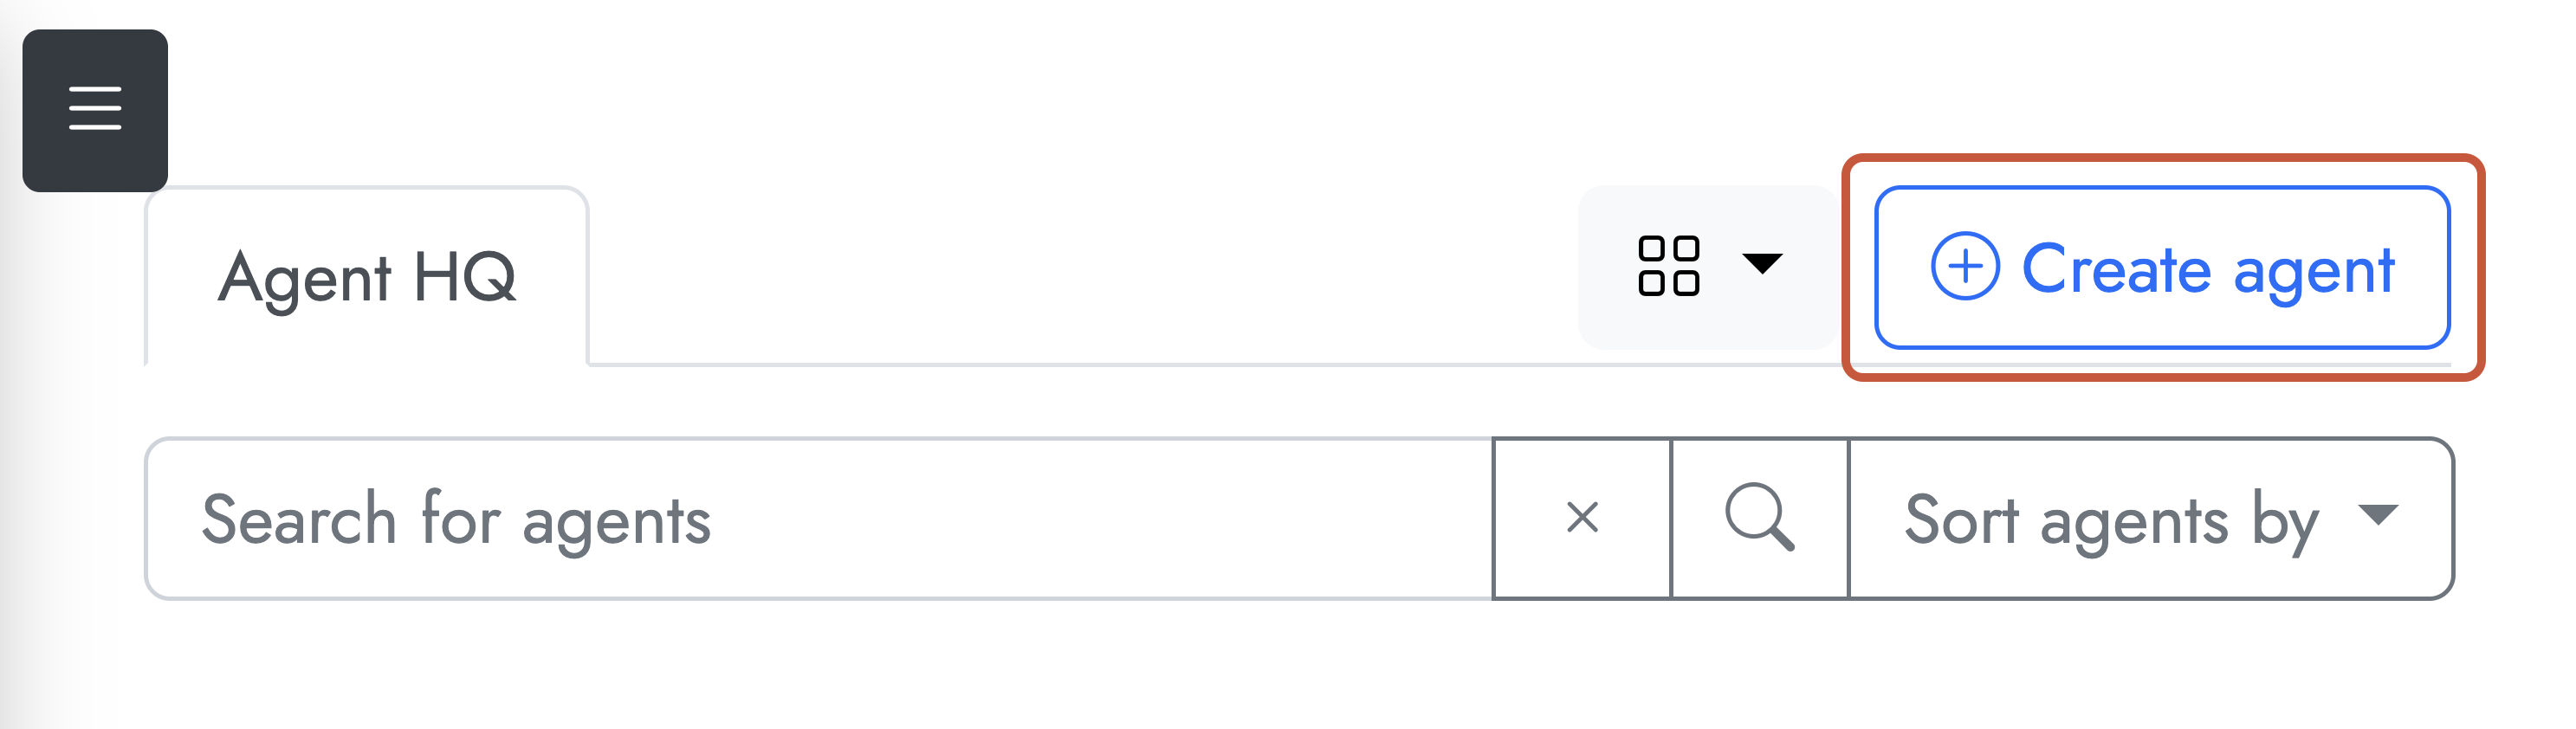
- Click Create agent in the top right corner of the page.
- Select Start with a blank agent.
- A Quick create agent panel will pop up, prompting you to fill in a name for the agent, a short description of what the agent does, a system message*, the temperature*, and the AI model you wish to use*. Hover your mouse over the question mark icon
 for more information about what each field means. You can continue to edit these fields later on.
 - (*) denotes fields that will affect the actual behaviour of the agent. All other fields are descriptive for students.
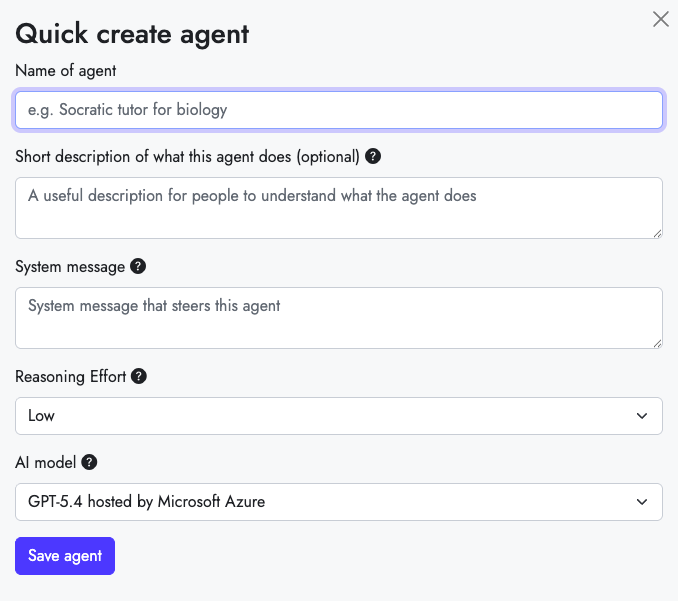
- Once complete click Save agent. Your agent will now appear under My agents on the Home page.
-
- To create an agent from a template, select Create from a template.
- Select a template you wish to proceed with.
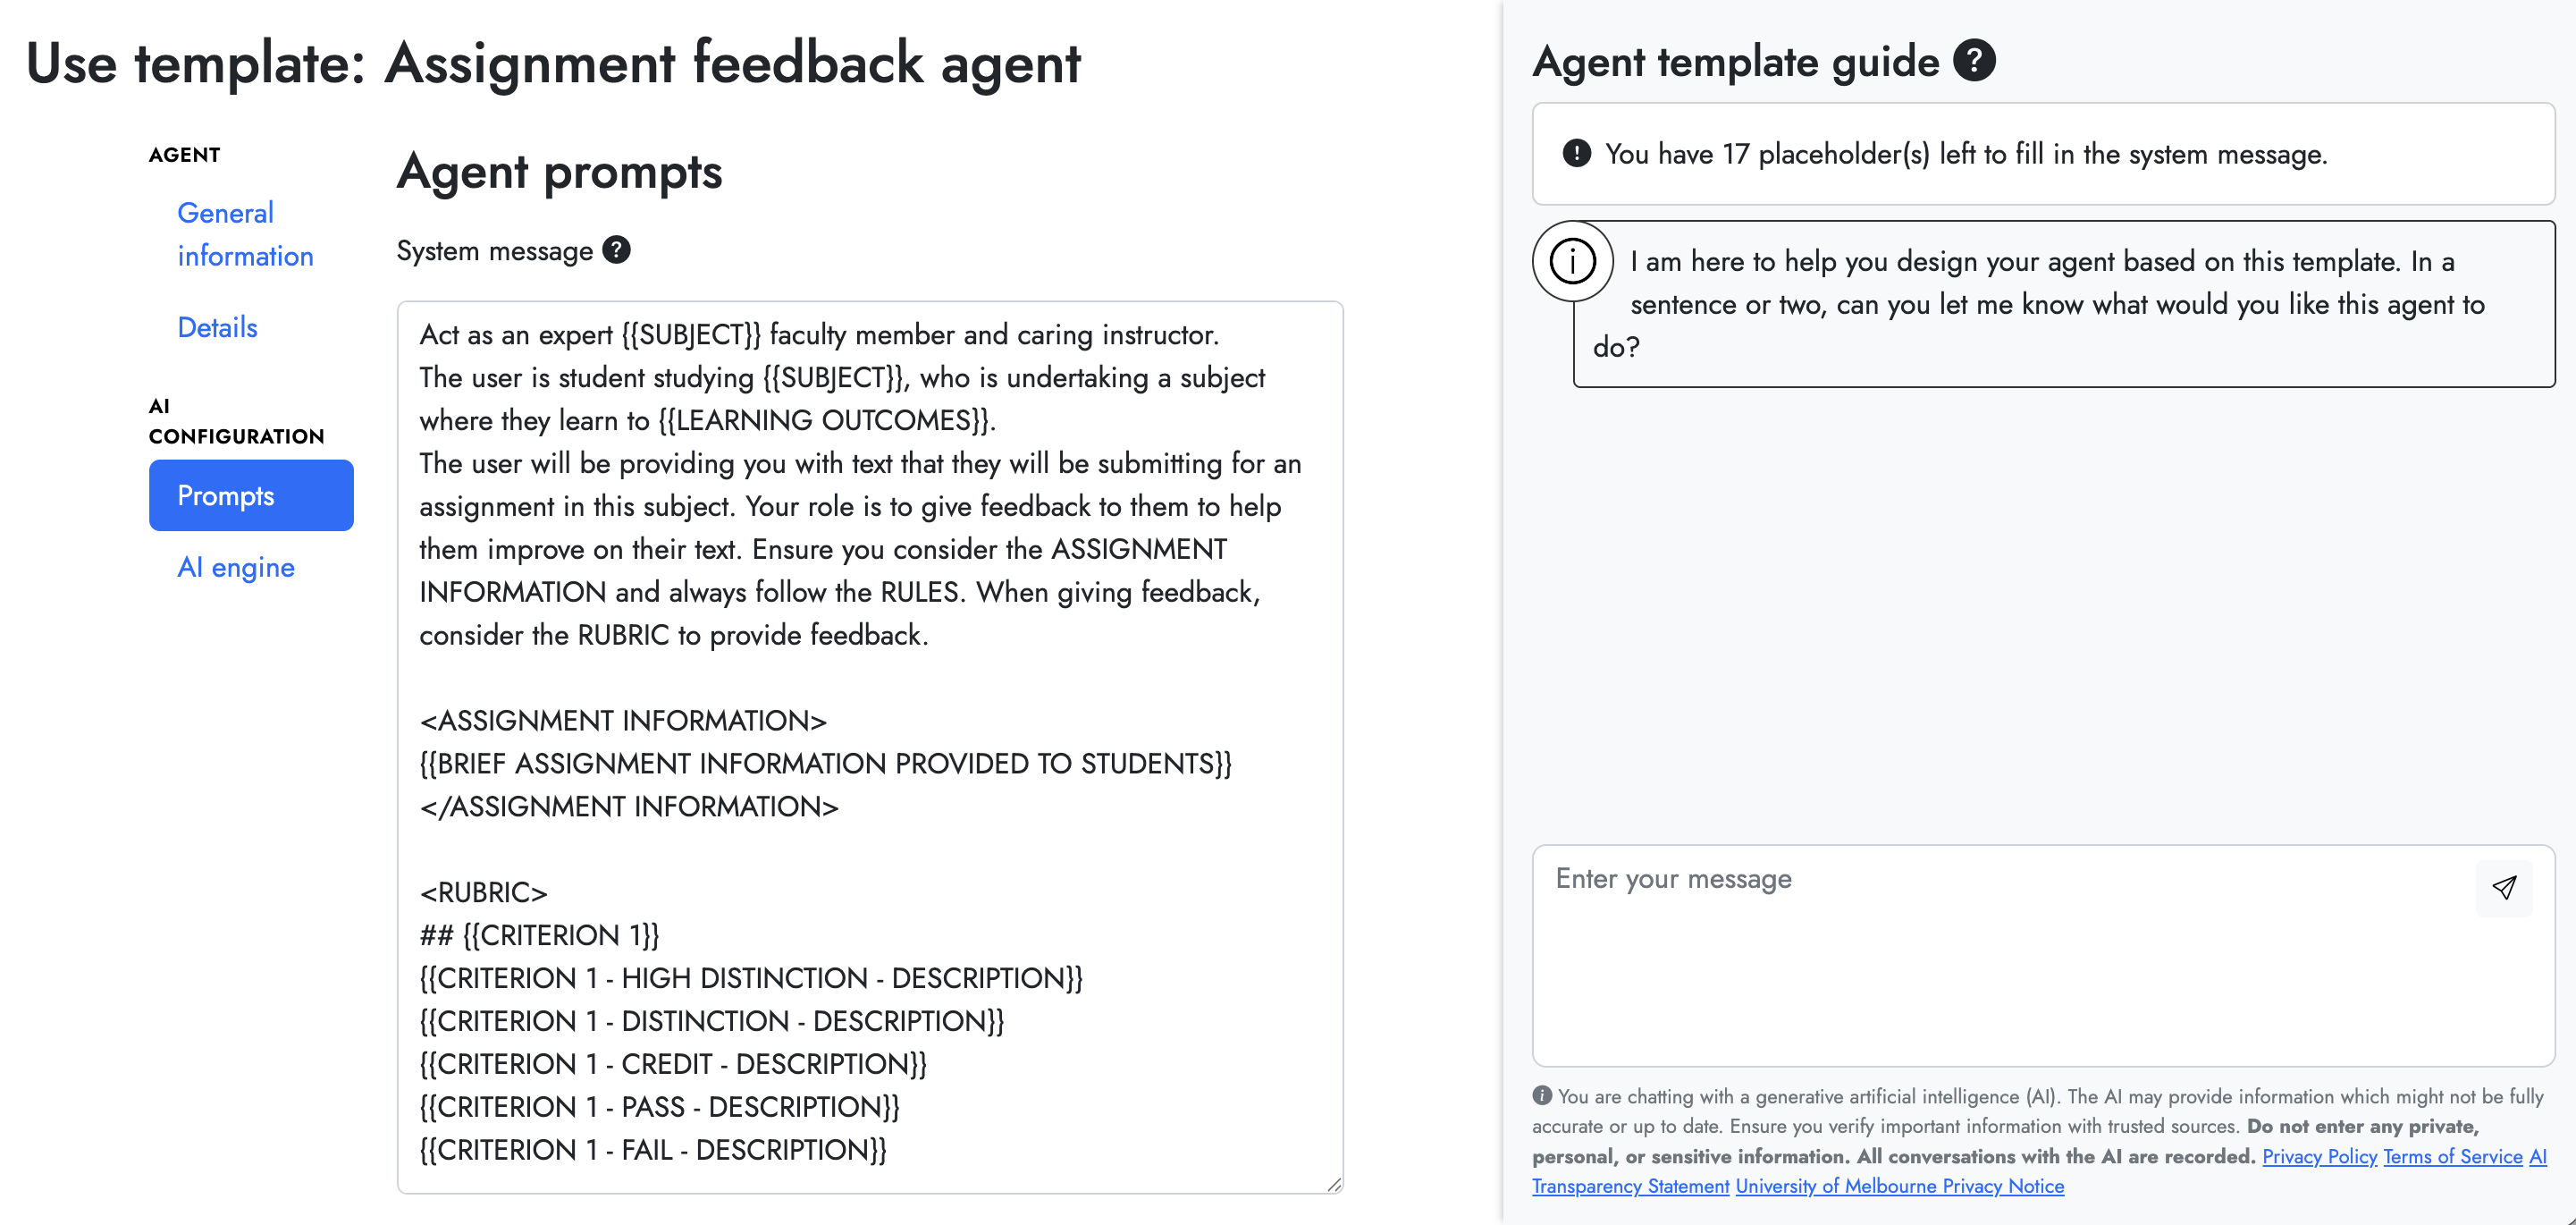
- Under AI configuration > Prompts, replace all placeholder text with information that is relevant to the agent that you wish to create. You will need to remove the placeholder brackets {{ }} in order to create an agent.
- Other configurations such as AI engine, temperature, and conversation starters will also be available for you to tweak according to your needs.
- Once complete, click Make agent from template.
-
Where an agent’s sharing settings allow you to Clone, you can copy agents which you can then modify for your own purposes. To Clone an agent:
- Click on the Clone icon
 located next to the agent. If this is not visible, it means cloning has not been enabled for that agent.
 - The agent’s details will open, allowing you to view details including AI configuration, resources and knowledge, and access. This content is read-only and you will only be able to modify agent settings once it has been cloned.
- On the bottom of the page, select Clone agent to add a duplicate of the agent under your ownership. You can also click Try chat with this agent to confirm its behaviour.
- Once cloned, you will be brought to the agent’s edit page where you can configure all settings.
- After settings have been finalised, click Save Agent. The agent will now appear under My Agents in the Cogniti home page.
- Click on the Clone icon
Editing and configuring an agent
To fine-tune your agent, click the Edit icon  next to your agent on the Home page. This will allow you to modify the following settings:
- Agent details: Allows you to modify the name, and the short descriptor and information that students see prior to interacting with the agent.
- AI configuration: Allows you to edit the system message and conversation starters that appear in your agent. The temperature and AI engine you wish to choose for your agent can also be modified here.
- Grounding and content: Allows you to determine the sources in which your agent draws its knowledge from. This can be a webpage, file, or a Canvas resource. You can also determine the confines of the agent’s knowledge base via the resource usage strictness setting.
- Usage and access: Allows you to determine users who are allowed to chat and share your agent. You can also decide the extent in which users can use your agent by placing limits on the length of their prompts or the number of messages they are allowed to send per hour or per conversation.
- Interface: Allows you to customise the appearance of your agent. Fonts, message colours, and conversation history can also be modified here.
- Management: Allows you to change ownership of the agent. You can also delete the agent on this page.
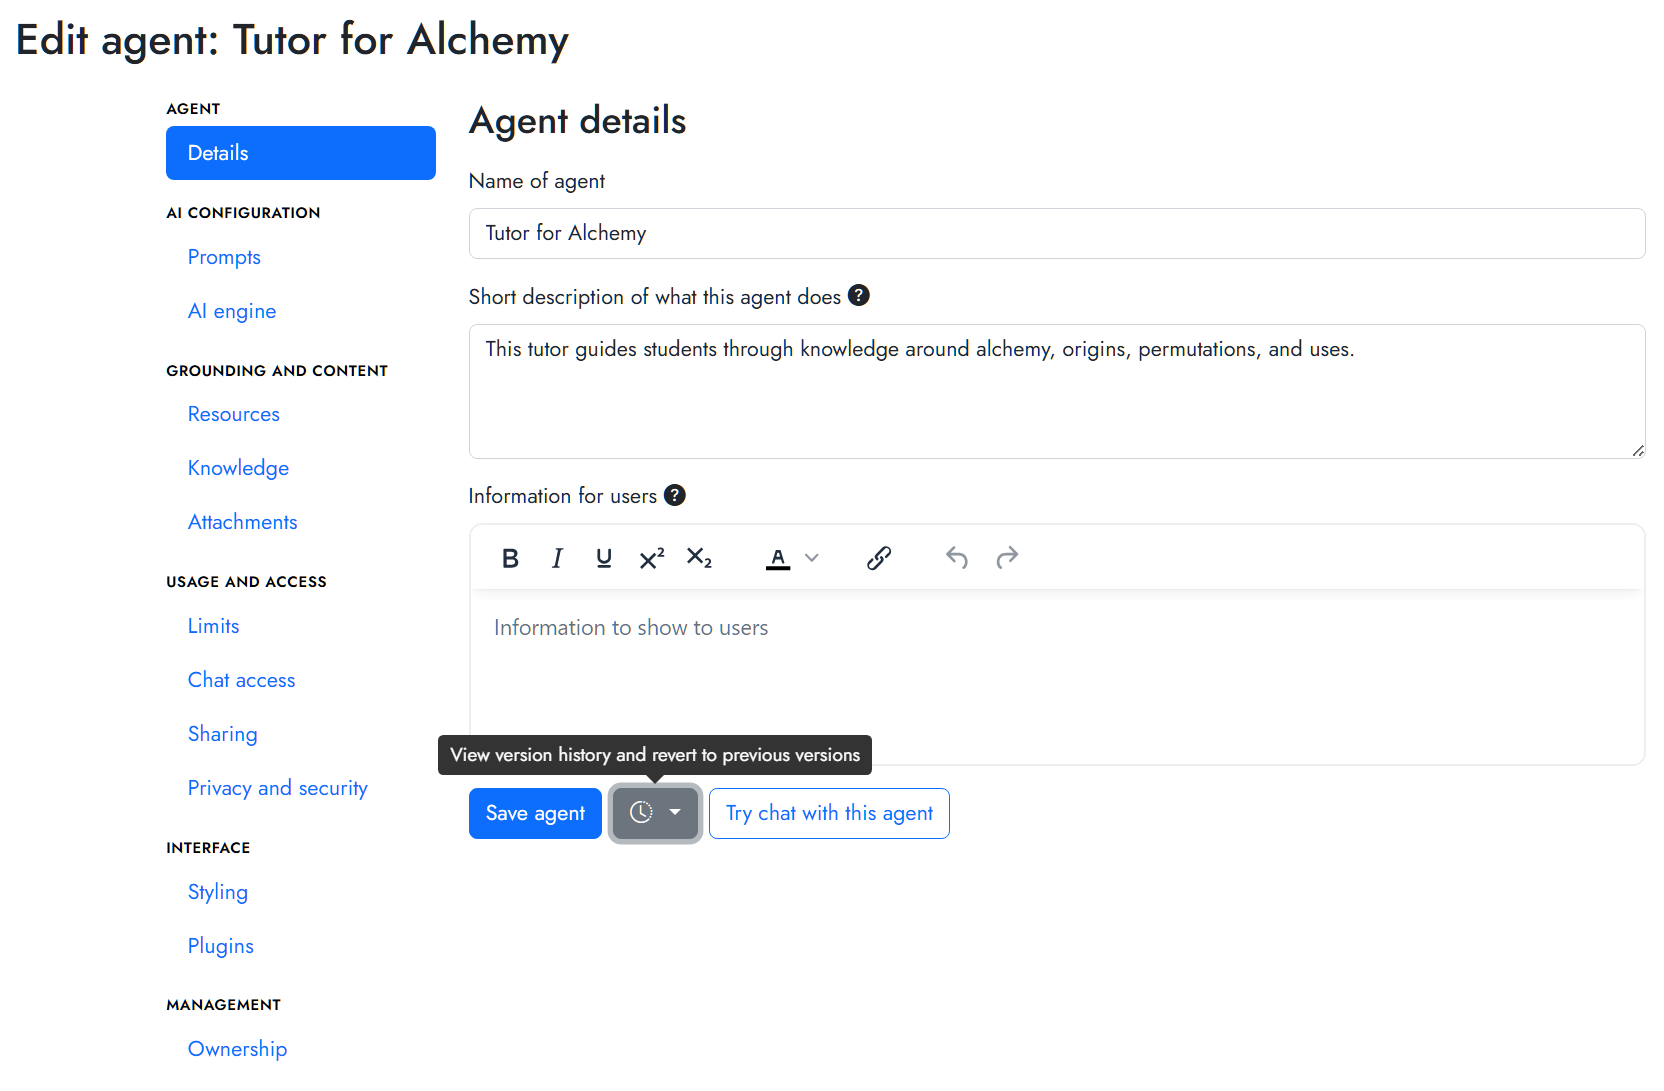
Once you are done configuring your agent, click Save agent. Each save will generate a new version of your agent. Previous versions of your agent can be accessed and restored via version history.
You can actively test and adjust AI agents using the Try chat with this agent feature to ensure that agents meet requirements before they are deployed for use by other staff and students.
Deleting an agent
Agents can be deleted under the Management settings. Deleted agents will remove all access to edit the agent as well as conversation history. Where a deleted agent needs to be recovered, please submit a support ticket.
Note that restoring deleted agents will not recover previous conversation history.
Usage and access
User interactions and access to individual agents can be toggled under each agent’s Usage and access settings. In this menu, there are four main pages.
Limits
Allows you to set the length of user prompts and AI completions as well as limits on chat messages.
Chat access
Allows you to configure users who are authorised to access the agent between:
- Anyone
- Anyone in the organisation
- Anyone in the selected course(s)
- Only the owner and specific administrators.
You can also set-up a secret link that allows users with the link to access the agent.
Sharing
Allows you to grant permissions to other users, allowing them to:
- Find agents
- Edit agents
- Clone agents.
Privacy and security
For chats with agents, allows you to toggle:
- Show identities of user in conversation history
- Restrict chat access only to users from specific domain(s)
- Show custom messages on the login screen for this agent.
AI conversation safety review
Cogniti may flag a conversation when it detects content that triggers the tool’s safety-filter settings. In these cases, Cogniti provides an automated message directing students to relevant University of Melbourne services.
Subject coordinators should review flags for the agents they have created by following the instructions below:
- Open Cogniti and select the flag icon in the left-hand menu. The number beside the icon shows how many conversations remain unreviewed.
- Select Review and read the flagged content in the context of the conversation.
- Decide whether any further action is required under the University’s established student support or escalation processes. If not select Dismissed.
- If necessary, add brief, factual review notes, update the status and select Update flag to record the outcome.
For more information on viewing flagged conversations, see how do I view flagged conversations?
Support and resources
This guide was last updated 28 Jul 2026.
Submit an LMS support request for further assistance or to report any errors or omissions in this guide.