Sections
Sections are used to segment the student cohort for administrative purposes, typically based on lectures, workshops or tutorial groups.
Sections allow for the segmentation of a subject's student cohort, providing a range of administrative options to staff that can't be achieved with Groups.
Sections has been developed to automatically feed timetable enrolment information from the University's class registration system, Allocate+. This data is generated automatically and can be utilised straight away, such as in the examples below.
As a staff member, you can use Sections to:
- Differentiate due dates or availability dates for assignments, quizzes or graded discussions.
- Example: Monday’s tutorial can be given a different due date.
- Send announcements to a set of students in a subject.
- Example: Send an announcement to just the "Tuesday’s tutorial" Section to let them know a room has changed.
- Filter the Gradebook by Section.
- Example: A Tutor wants to view only the students in a particular tutorial.
- Filter the SpeedGrader by Section when marking student work.
- Example: A Tutor wants to view only the students in their own tutorial in SpeedGrader for marking.
If you need to customise Sections based on other criteria, you may create new sections manually. It is important to be aware that Section names are visible to students.
Note: Only staff members with the role of Subject Coordinator, Instructor or a Sub-Account Admin will have access to use the Sections Tool.
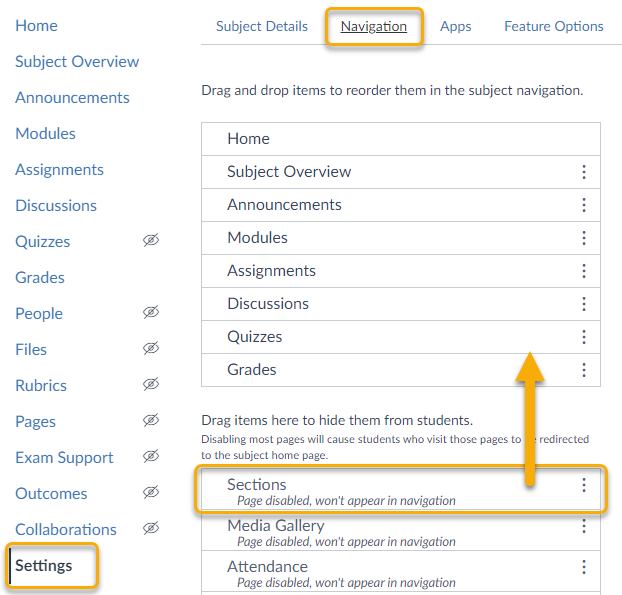
Enable Sections
If the Sections link is not visible in your subject navigation menu, you can enable it any time in the Navigation settings.
- Click on Settings from your subject navigation menu, then select the Navigation tab
- Locate Sections from the bottom list (indicates items are hidden from students) and drag it from the bottom list to the top list
- Scroll to the bottom of the page and click Save
Sections is now enabled in your subject and added to your subject navigation menu.
Note: Students will not see the tool in the menu. You can check with Student View.
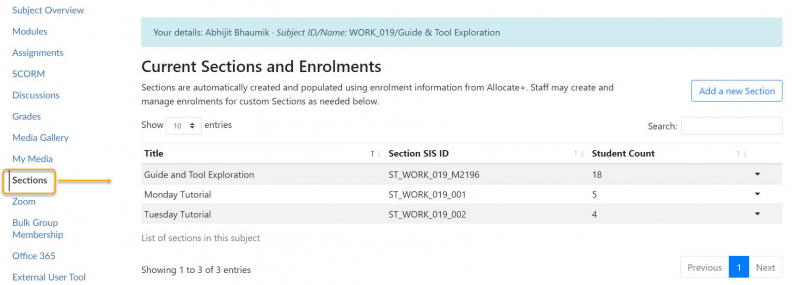
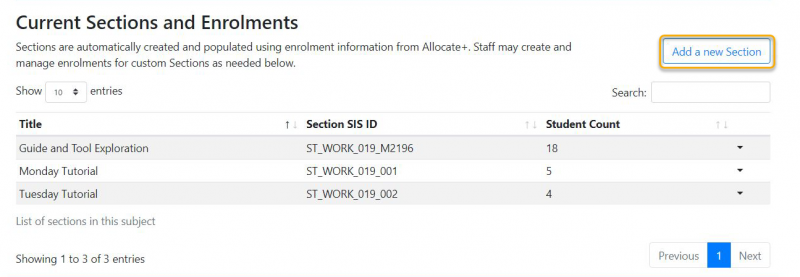
View the current Sections and enrolments
All subjects have a feed from the new class registration system, Allocate+, using Sections. This means that associated activities for timetabled subjects are automatically fed into Canvas.
Note: Sections are no longer found in the Settings area of your subject.
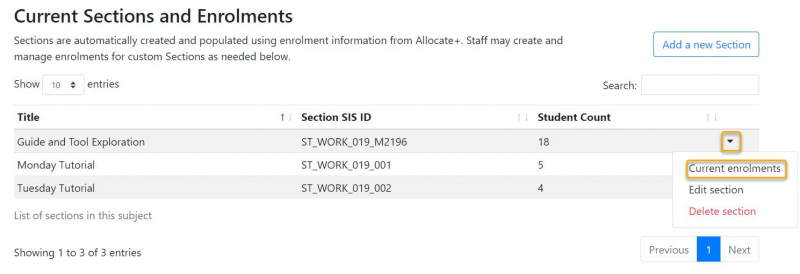
- To view all Sections in your subject, click on Sections in the subject navigation menu.
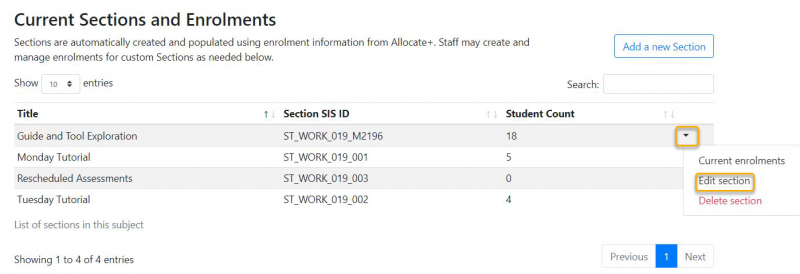
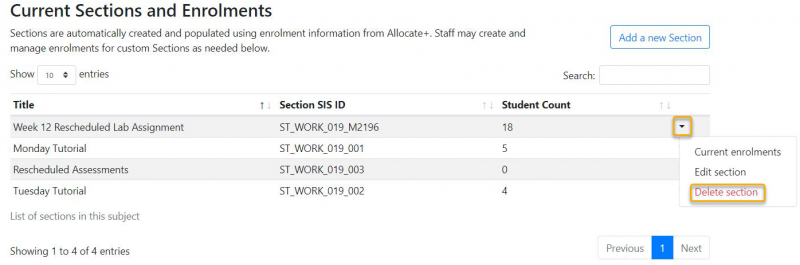
- The Current Sections and Enrolments area displays a summary of all Sections in your subject that have been created both automatically and manually.
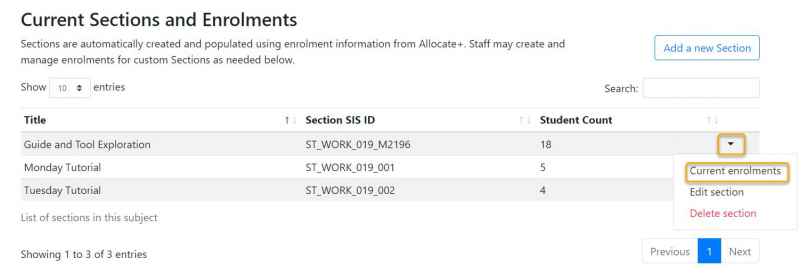
- To view the enrolments in each Section, click the down-arrow from the Actions column and select Current enrolments.
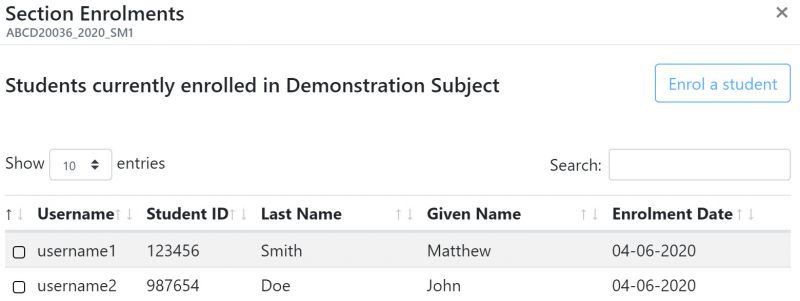
A new window opens displaying all students enrolled in the selected Section.
Differences between automatically and manually created Sections
| Automatically created Sections | Manually created Sections |
|---|---|
|
|
|
|
|
|
|
|
|
|
*Section names are visible to students and should not include sensitive information.
Create a new Section
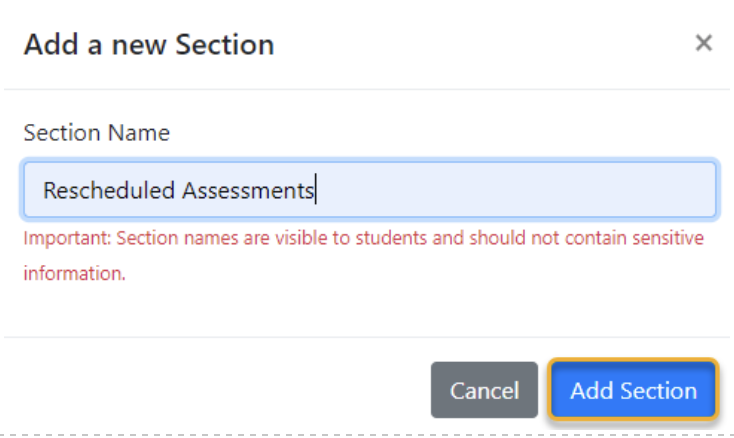
- Click on Sections in the subject navigation menu, and then click the Add a New Section button.
- Enter an appropriate name and click Add Section.
Note: Section names are visible to students so should not include sensitive information.
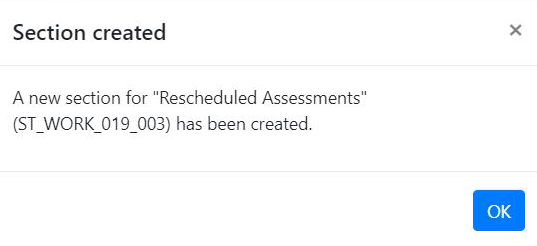
- A Section created message displays (‘ST’ followed by the subject code and Section number). Click the OK button to complete the action.
Please note that you may need to refresh the Sections Tool page to view the latest changes.
Rename a Section
Both automatically and manually created Sections can be renamed. For example, you may wish to rename the automatically created Section titled “ABCD10005_2020_SM1_L01_01” to “Monday 11am Lecture”.
Important: Section names are visible to students so should not include sensitive information such as special consideration status or other personal circumstances.
- While in Sections, identify the Section to be renamed and click the drop-down arrow and select Edit Section.
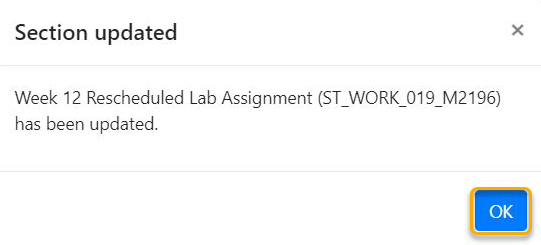
- Enter the desired new name for the Section and click Save changes.
Note: Section names are visible to students so should not include sensitive information.

- A successful message will then display when processed by the system. Click OK to complete the action.
Please note that you may need to refresh the Sections Tool page to view the latest changes.
Delete a Section
Sections that have been created automatically cannot be deleted.
Any Sections created manually by staff can be deleted, but only once all enrolments from the Section have been removed; see Remove students from a Section.
- Identify the Section you would like to delete by clicking the drop-down arrow and select Delete Section.
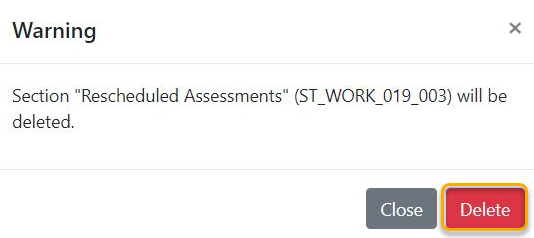
- Ensure the chosen Section is correct and click Delete to confirm.
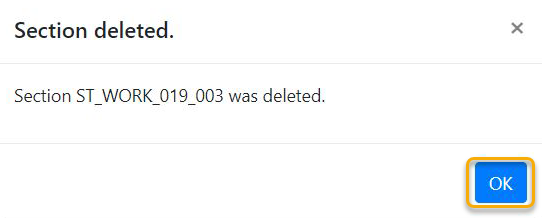
- Once processed, a “Section deleted” message displays. Click OK to return to Sections.
Please note that you may need to refresh the Sections Tool page to view the latest changes.
Enrol students into a Section
Sections allow for management of student enrolments in manually created Sections. Enrolments cannot be changed for the automatically created Sections, as these are controlled by the feed from Allocate+.
Note: Staff can also be added or removed from Sections; this can be useful for tutors, for example, so as to restrict their view of the Gradebook. To manage staff enrolments in Sections, use the Staff Roles area.
To enrol a student in a Section:
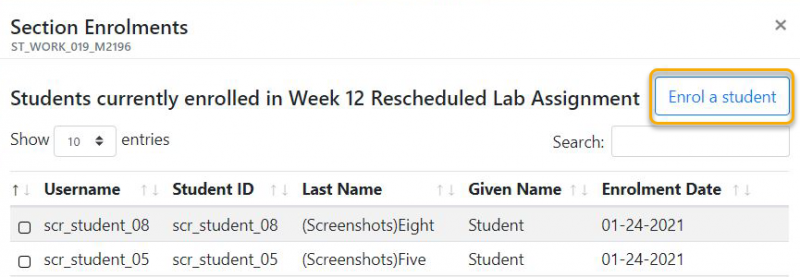
- Identify the Section you would like to add students to by clicking the drop-down arrow and select Current enrolments.
- The Section Enrolments screen opens. Click on the Enrol a student button in the top right.
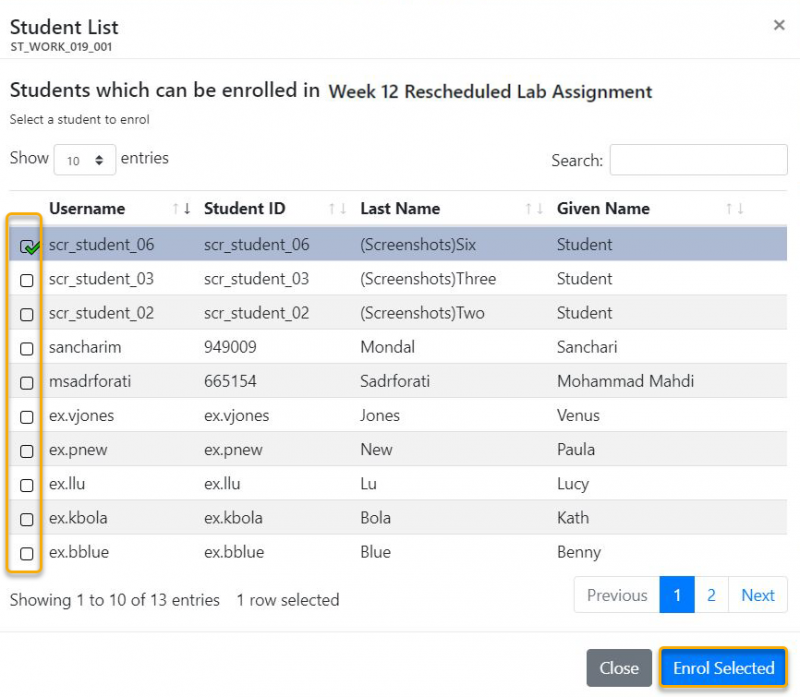
- All students currently enrolled in the Subject appear in the Student List. Use the checkbox to the left of the Username column to select individual students from the available list. Alternatively, use the search field to narrow your results. When ready, click the Enrol Selected button.
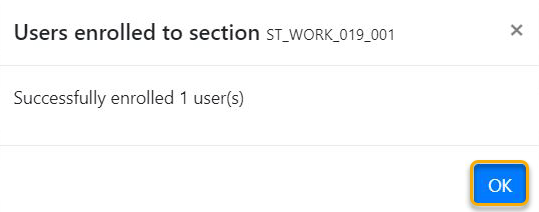
- Once processed, a success message will be displayed with the number of users enrolled into the relevant Section. Click OK to complete the action.
Please note that you may need to refresh the Sections Tool page to view the latest changes.
Remove students from a Section
- Identify the Section you would like to remove students from, by clicking the drop-down arrow and select Current enrolments.
- From the list of enrolments in the relevant Section, select the checkbox to the left of the Username column for relevant students who need to be removed and click on the Unenrol selected button.
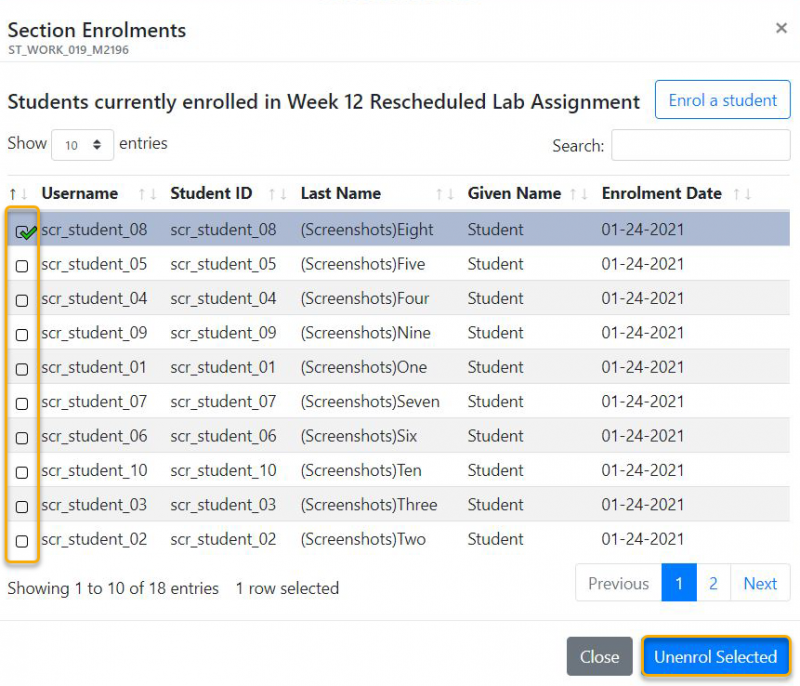
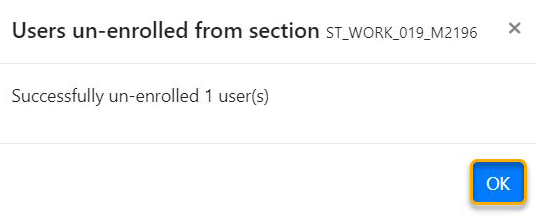
- Once processed, a successful message will be displayed with the number of users removed from the relevant Section. Click OK to complete the action.
Please note that you may need to refresh the Sections Tool page to view the latest changes.
Examples of using Sections in Canvas
Sections are useful in scenarios where you may need to communicate with a subset of your cohort based on a timetable enrolments (e.g. tutorials). It is also possible to setup specific teaching and learning activities in your subject (e.g. Assignments and Discussions) to only be displayed to a certain Section.
Example 1 – Send announcement to a Section of students
Common usage of Sections would be to segment your cohort based on the activity they belong to but not limited in the following cases (examples used are for illustrative purposes only):
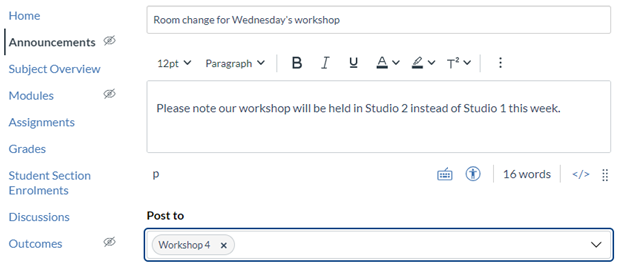
- From the Subject Navigation menu, click the Announcements link, then click +Announcement to create a new announcement
- Enter a relevant title in the heading field and a description in the editor
- Under the Post To field, specify the Section you intend to communicate with (e.g. Workshop 1)
- Review the announcement options and click Save to post the announcement
Note: Students will receive announcements based on their personal notification preferences. This cannot be overridden in any way.
Example 2 – Create an assignment for a Section of students
- From the Subject Navigation menu, click the Assignments link and click +Assignment to create a new assignment
- Enter desired Assignment Name with instructions (if applicable) and choose appropriate assignment settings
- Under the Assign To, type the relevant activity to choose from a list of relevant activities (e.g. tutorial).
- Choose a desired due date and click Save

Bulk manage Sections
Swiftly create multiple manual sections and/or manage changes in bulk by downloading the current section enrolments into Excel. Within the Excel file, choose one of three methods (tabs) to modify, to enrol or un-enrol users or add new sections, then upload the updated file into Canvas.
.XLSX file extensions to be used only.
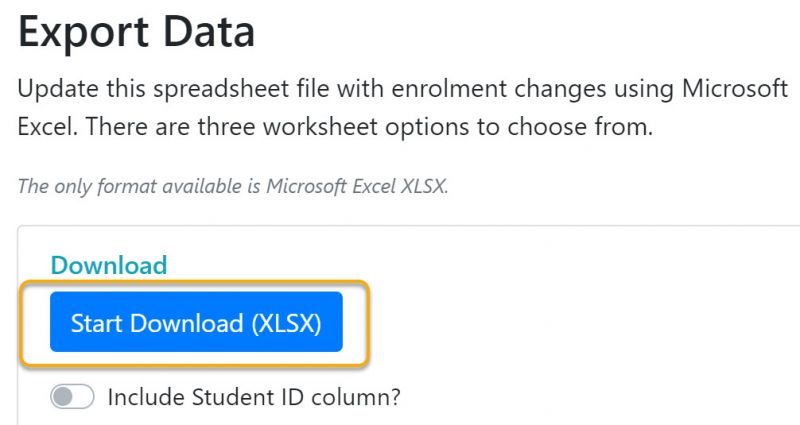
Download current Section enrolments (export data)
- Click Sections from the subject menu.
- Scroll to Bulk Manage Sections.
- Under the Export Data area, click Start Download.
Tip: If you would like the student ID column to be included in the export, toggle it on.
Update the spreadsheet
The Excel file will have three separate tabs (also referred to as worksheets). These tabs are provided to cater to different approaches to populating Sections. In the initial download, the same data will appear in all the three tabs and only the student roles will be downloaded. You will only need to edit one of these tabs.
| Tab | Option | Short description | When to use |
|---|---|---|---|
| 1 | Option 1 - Matrix | A format where you can view and action the enrolments across all Sections in one view. | Suitable for creating multiple sections and managing multiple section enrolment changes. |
| 2 | Option 2 - Single dropdown | A format where you can view and action the enrolments across all Sections using a dropdown. | Suitable for altering student enrolments from one section to another (single section changes). |
| 3 | Option 3 – Multiple dropdowns | A format where you can view and action the enrolments across all Sections using a dropdown. | Suitable for altering student enrolment across all available sections (multiple section changes). |
Create multiple sections and manage multiple enrolments
Use Option 1 - Matrix tab, when you wish to create multiple sections as well as managing multiple section enrolment changes.
After completing the download of the Section enrolments into Excel file from the Export Data area:
- Open the downloaded Excel file and select the Option 1 – Matrix
- Enter the desired section name in the next available column of the spreadsheet and type ‘Add’ for relevant students you would like enrolled to these sections.
- Repeat steps 1 & 2 for all new sections and their associated enrolments.
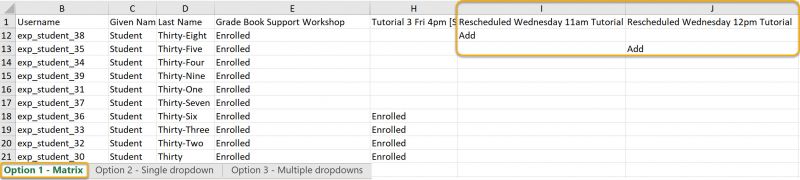
- Click File >> Save.
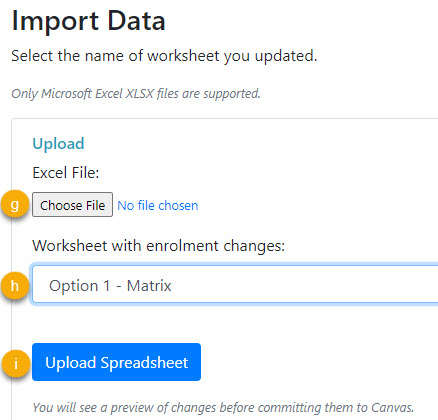
Upload the updated file (Import Data)
- Click Sections from the subject menu.
- Scroll to Bulk Manage Sections.
- Under the Import Data area, click the Choose File button and select the file you wish to upload [file saved in step 4 above].
Note: only .XLSX file formats are permitted. - Ensure Option 1 – Matrix is selected from the Worksheet with enrolment changes item.
- Click Upload Spreadsheet.
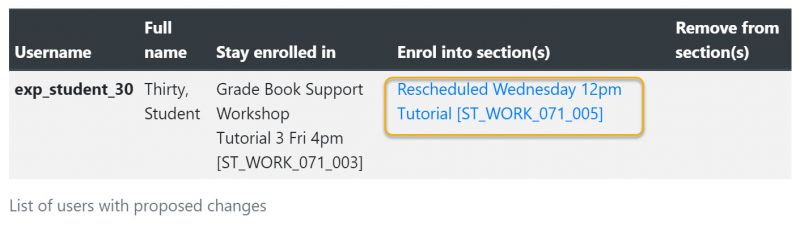
- A summary page with the proposed changes from your upload will appear in Blue for your review. Under Proceed with Changes, click Save Changes if the changes are correct. Alternatively, you have the option to Upload again if the data needs adjusting.
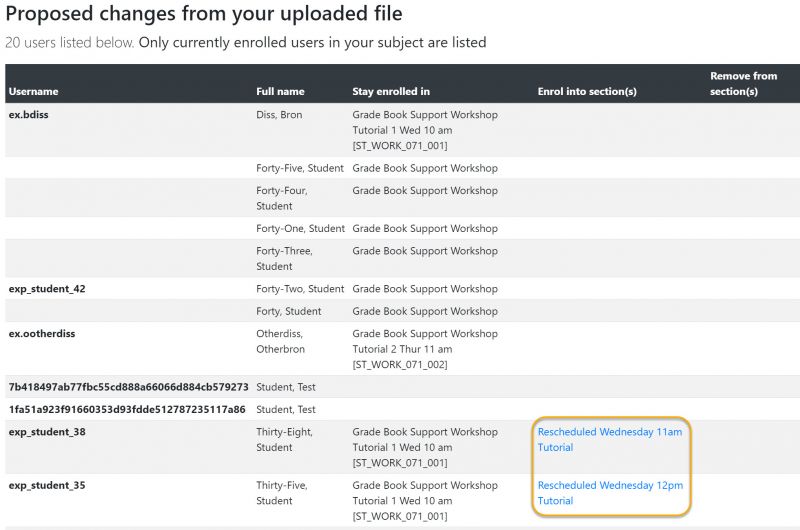
- To proceed, scroll to the bottom and click Save Changes.
- Once processed, a successful message will appear at the top of the screen.

Altering enrolment changes – single Section change
Use Option 2 – Single dropdown tab, when you wish to alter altering student enrolments from one section to another.
After completing the download of the Section enrolments into Excel file from the Export Data area:
- Open the downloaded Excel file and select the Option 2 – Single dropdown.
- Identify the student whose section enrolment requires altering and select the desired section by clicking the dropdown arrow from the Enrol into Section To remove a student from a desired section, select “blank” from the dropdown.

- Click File >> Save.
Upload the updated file (Import Data)
- Click Sections from the subject menu.
- Scroll to Bulk Manage Sections.
- Under the Import Data area, click the Choose File button and select the file you wish to upload [file saved in step 3 above].
Note: only .XLSX file formats are permitted. - Ensure Option 2 – Single dropdown is selected from the Worksheet with enrolment changes item.
- Click Upload Spreadsheet.

- A summary page with the proposed changes from your upload will appear in Blue for your review. Under Proceed with Changes, click Save Changes if the changes are correct. Alternatively, you have the option to Upload again if the data needs adjusting.

- To proceed, scroll to the bottom and click Save Changes.
- Once processed, a successful message will appear at the top of the screen.
Altering enrolment changes – multiple Section change
Use Option 3 – Multiple dropdown when you wish to alter student enrolments across all available sections.
After completing the download of the Section enrolments into Excel file from the Export Data area:
- Open the downloaded Excel file and select the Option 3 – Multiple dropdowns.
- This view displays the number and section names students are currently associated with.
- To add a student to multiple sections, select a section via the dropdown arrow of the next available Enrol into Section Repeat these steps for each additional section that a student should be added to.
- To remove a student from a section – click the respective cell and select “blank” from the dropdown.

- Click File >> Save.
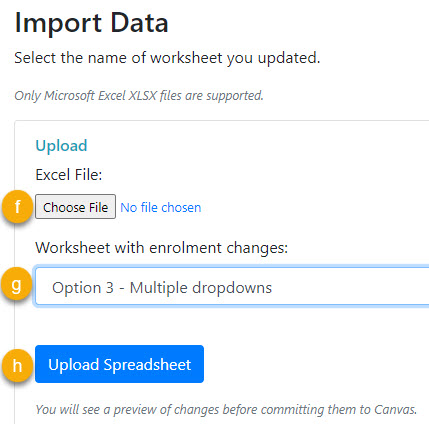
Upload the updated file (Import Data)
- Click Sections from the subject navigation menu.
- Scroll to Bulk Manage Sections.
- Under the Import Data area, click the Choose File button and select the file you wish to upload
[file saved in step 3].
Note: only .XLSX file formats are permitted. - Ensure Option 3 – Multiple dropdowns is selected from the Worksheet with enrolment changes
- Click Upload Spreadsheet.
- A summary page with the proposed changes from your upload will appear in Blue for your review. Under Proceed with Changes, click Save Changes if the changes are correct. Alternatively, you have the option to Upload again if the data needs adjusting.
- To proceed, scroll to the bottom of the page and click Save Changes.
- Once processed, a successful message will appear at the top of the screen.
This guide was last updated 12 Mar 2024.
Please report any errors or omissions in this guide by submitting an LMS support request.