Universal Capture for students
Universal Capture is a software that can be used to record and edit video content from your computer. It will automatically publish the captured content onto the Echo360 Lecture Capture system. As a student you can submit any Echo360 captures you create to a Canvas assignment or share in a Canvas discussion.
Install Universal Capture – personal device
You can install Universal Capture onto your personal computer directly from the Echo360 website.
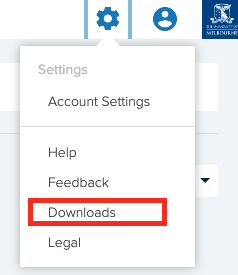
- Log in to the Echo360 Lecture Capture system.
- Click on the Setting cog icon in the top-right corner of the Lecture Capture interface and select Downloads.
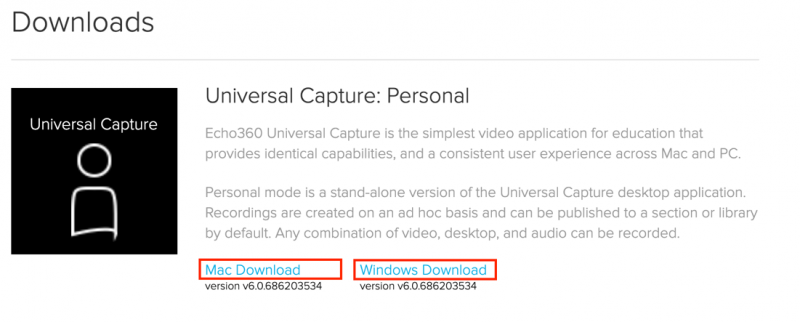
- Click on Mac Download or Windows Download under the Universal Capture: Personal heading.
- Open the installation package and complete the steps as prompted.
Contact Student IT for assistance with the installation of Universal Capture onto a personal device.
Install Universal Capture – University of Melbourne device
If you are using a University-owned computer, look for Echo360 Universal Capture via the Self-Service (Mac) software portal or Software Centre (Windows).
Contact the Service Centre (+61 3 8344 0888) for assistance with the installation of Universal Capture onto a University-owned device.
Log in and out of Universal Capture
When you first open the Echo360 Universal Capture application you will be prompted to log in to the application.
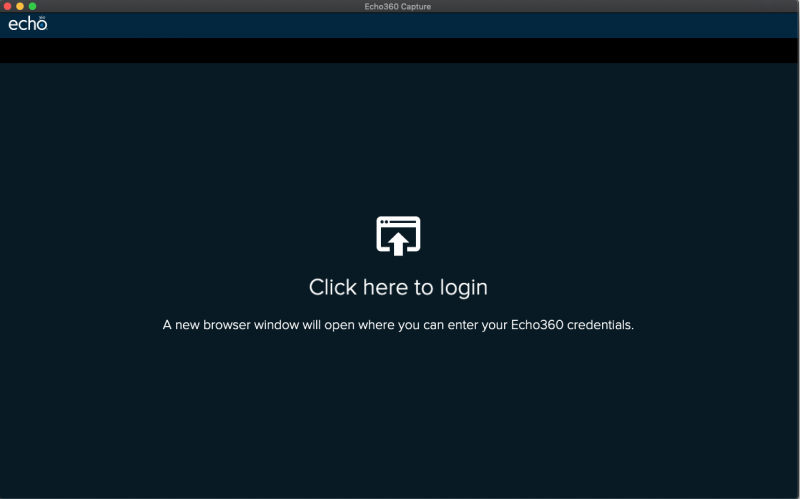
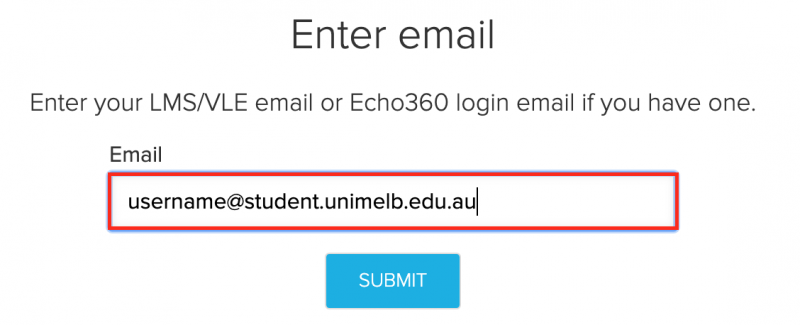
A new window will open in your browser and you will be instructed to enter your University email address followed by your University login credentials.
Important: Use your username@unimelb.edu.au email address to login to Lecture Capture.
When you have successfully logged in, the Universal Capture interface opens, and your name appears in the top-right corner. You can click on your name to logout.
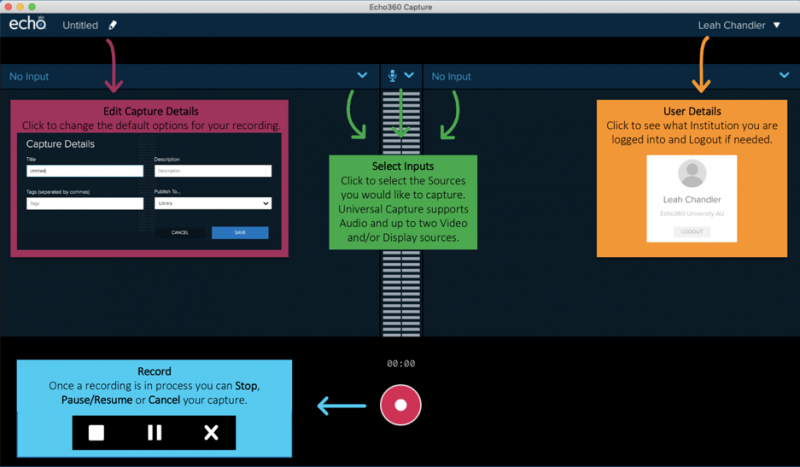
The Universal Capture interface
The image below illustrates the Universal Capture interface, including where to edit the details of the recording, select audio/video input methods, confirm your user details and start a recording.
Create a new recording
Universal Capture is designed to be simple and quick. Just click the Edit pencil icon and enter the details for your recording then click Record. We have provided some basic information to get you started below, and recommend reading the Echo360 guide for more information: Start a Recording with Universal Capture.
Step 1: Enter details for the capture
- In the top of the screen, click Enter Capture Details (shown with a pencil icon) to launch the Capture Details dialog box.
- Enter a Title, add a Description or Tags as appropriate.
- All content will be published in your Library. Once uploaded, your recordings will appear within My Content on the Echo360 Lecture Capture system.
- Click Save.

Step 2: Start the recording
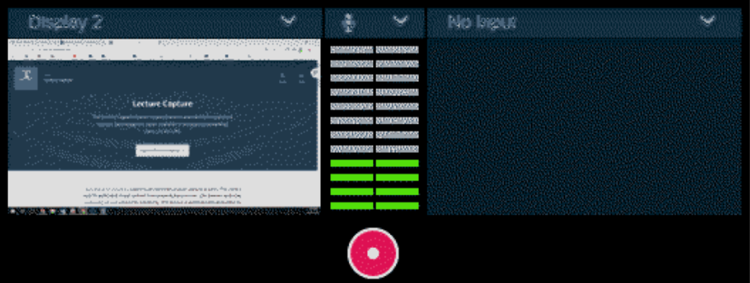
Before you hit record, check your audio and video input settings.
- Click the Microphone icon (audio source) and select the best device for recording (we recommend using a quality headset rather than your computer microphone, if possible).
- Click the Display Source dropdown(s) and select the desired screen to record, for example Display 1 or your computer's webcam. Multiple inputs can be applied if available.
You may select No Input for an audio-only capture.
- Ensure previews are as expected and that there is audio input on the recording level indicator.
- Finally, click the red Record icon. A five-second countdown timer will display, and then the recording will begin.
Step 3: Control the recording
Once you've started the recording, the options to Stop, Pause, or Resume will display in place of the Record icon.
Important notes
- Clicking Stop will finish and complete your recording, meaning that it will finalise and it will automatically be publish to your Library in Echo360.
- A recording cannot remain paused for longer than 20 minutes. After 20 minutes the paused recording will automatically complete and upload to Echo360.
Once a capture is finished the software will indicate the capture is uploading to the Echo360 system.
Useful keyboard shortcuts
Mac
- Command + 6: Pause & resume
- Command + 8: Finish (stop) the recording
- Command + 1: Extend the recording
Windows
- Control + 6: Pause & resume
- Control + 8: Finish (stop) the recording
- Control + 1: Extend the recording
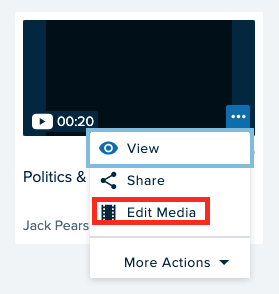
Step 4: Edit the recording
After uploading your recording to the Echo360 Lecture Capture system you may wish to edit your video further.
To trim or cut the length of your recording
Either from Universal Capture Click to View (to go straight to the recording in Echo360) or log into the Lecture Capture system at Echo360 Lecture Capture system.
If you are accessing your recording from Universal Capture, click Edit Media below the video player.
If you are accessing your recording from logging in to Echo360, click My Content in the side menu and locate your video. Hover your cursor over the video thumbnail and click on the three dots icon. From the dropdown menu select Edit Media.
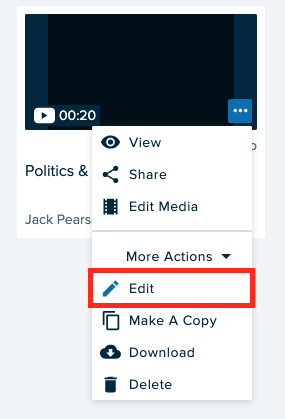
To edit the title and description of your recording
Hover your cursor over the video thumbnail and click on the three dots icon. From the dropdown menu click More Actions and then Edit or click Edit when viewing the video from the player.
Access and download your video content
Your recordings will appear in the My Content tab within Echo360.
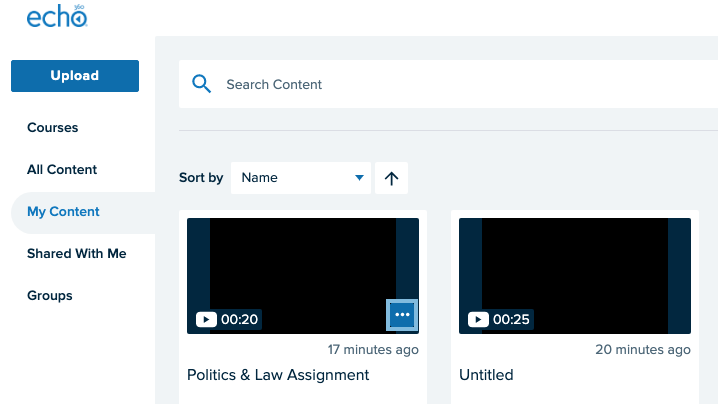
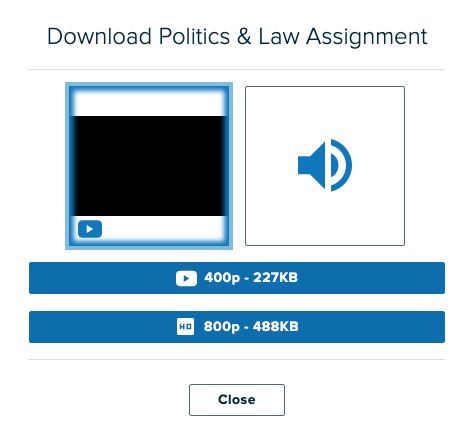
If you would like to download the recording onto your computer:
- Hover over the thumbnail of the recording and select the three dots icon.
- Select More Actions to see the full drop-down menu and select Download.
- Select your desired video resolution to download or an MP3 audio only file and your download will automatically begin.
Submit your Echo360 video to an assignment in Canvas
Echo360 allows you to embed your video recording into the Canvas assignment submissions to be marked by your subject coordinator.
When you are ready to submit your work, refer to the detailed instructions in the submit a video in Canvas using Echo360 guide.
This guide was last updated 08 Nov 2023.
Please report any errors or omissions in this guide by submitting an LMS support request.