Blended synchronous learning quick start guide
Getting started with blended synchronous learning
This guide provides the essential in-class information for teaching in a blended synchronous learning (BSL) format.
You may find it helpful to think of conducting a class in a BSL format involves creating an online meeting in a tool such as Zoom in the same way we have all become used to, with the addition of then using the in-venue microphones and cameras to join your face-to-face cohort with your remote participants.
Creating a Zoom meeting
Before conducting a BSL session it is important to have created in advance your online meeting schedule using Zoom and to have published this link through the LMS for your online cohort to join.
Take note of the meeting ID or link as you will later use this to join the online session from the BSL space.
Zoom meetings can be created in your Zoom client or through the LMS.
Guides on creating a Zoom meeting can be found here:
Starting a BSL session
Remote participants will join your BSL class through the Zoom meeting link you have shared.
To connect with your online cohort in the room:
- Log in to the classroom via the lectern computer.
- Log in to Zoom and launch the shared Zoom meeting link.
- Check Zoom audio and speaker settings are set to the in-venue audio system (this will contain 'HDMI' in the name). Remember to perform a 'sound check' with the Zoom participants - simply asking if they can hear you.
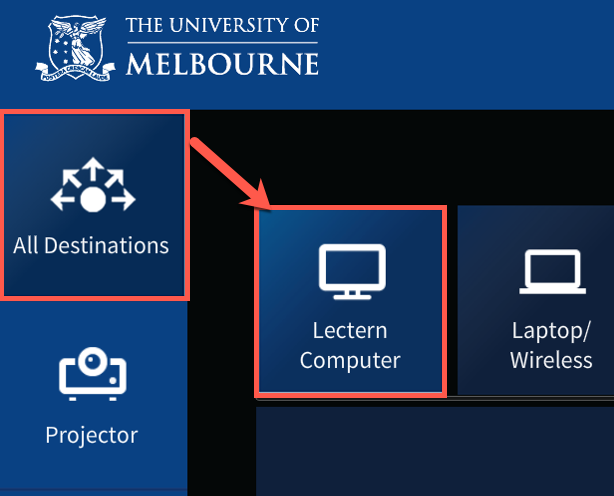
- On the AV touch panel, on the All Destinations tab, select Lectern Computer - this shares the lectern computer display with all the screens in the classroom.
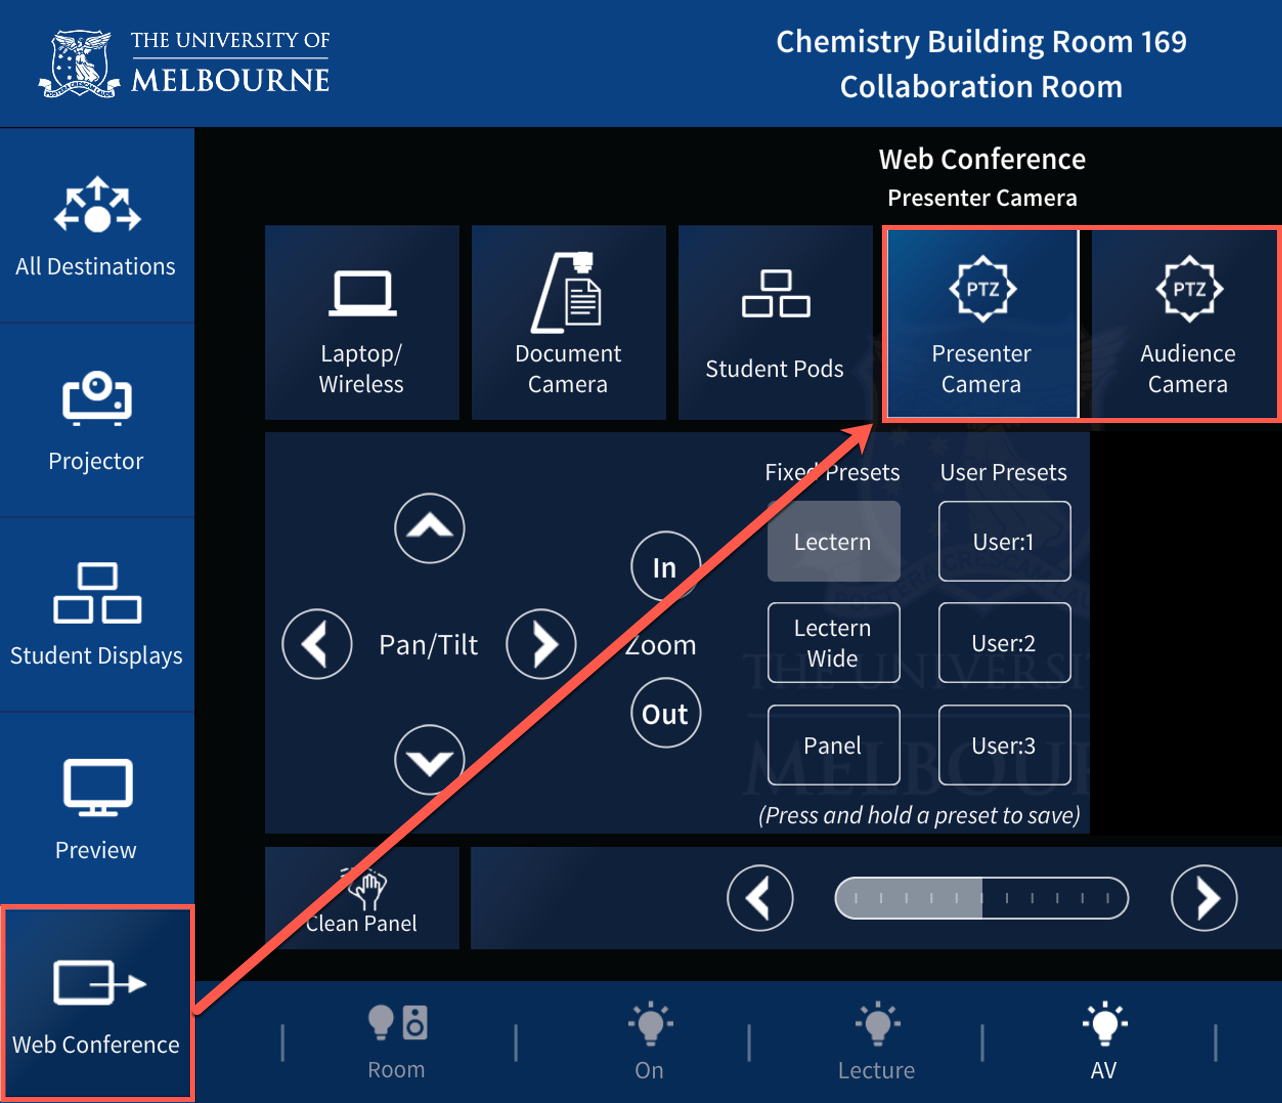
- On the AV touch panel, on the Web Conference tab, select Presenter Camera or Audience Camera to share vision of the BSL space to your online cohort.


Tips to solve or improve audio issues
- To reduce or stop echoing, make sure remote participants are muted and any handheld microphones in the BSL space are off when not in use.
- In the Zoom application, ensure microphone and speaker settings are set to HDMI or ‘Same as system’ so that remote participants can be heard in-class.
- The lectern microphone is affixed to the lectern. If the presenter or participants need to move around the room while speaking, use the lapel mic and handheld microphones.
- Microphones located on the student pods are muted by default. These mics can be unmuted from the AV touch panel or on the volume controls found on the student pod system.
- Ensure participants seated at a student pod are facing the dedicated microphone.
Keeping the online cohort engaged
- Ensure both in-class and remote participants have a way to interact in the class and ask questions of you
- Assign chat moderators to filter questions from Zoom. These could be teaching assistants, tutors or assigned students
- Have planned breaks throughout the session to check in with the moderators
- Encourage remote participants to turn on their cameras so they can be seen and interact with participants in-class. (even just things like asking for a show of hands may keep both cohorts engaged and interacting in the same way)
Sharing your screen
You may wish to share a powerpoint presentation or other content on your screen with your online and face-to-face cohort. The easiest way to share your screen is by choosing 'share screen' through Zoom on the lectern computer.
- In Zoom, select ‘Share screen’
- On the Share pop-up window, select the lectern computer screen, click Share. Remote participants will be able to see your screen
- Open any documents/slide decks that will be used during the session
- Check if in-class and remote participants can see the shared screen
Tips when sharing your screen
Share or make slide decks available on the LMS prior to the session. If technical issues occur when screen sharing, then participants still have a copy of the slides to refer to .
Use Zoom to switch between different views. If the presenter needs to have a fixed view, pin the view.
If content appears 'flipped' in the classroom (eg the text of your slides is back to front) ensure you have unchecked 'mirror my video' in your Zoom client video preferences.
Breakout rooms
Facilitating breakout rooms for BSL delivery is possible but can be technically challenging. Creating breakout rooms in Zoom allows your online cohort to work in groups, while face-to-face students can work in groups in-class.
Tips
- It is recommended that remote Zoom breakout groups are kept separate from in-class groups
- Where possible, mute any unused speakers and microphones to reduce feedback
- Ensure the presenter’s Zoom account is not allocated to any of the Zoom breakout rooms.
We recommend you have a look at the BSL student In-class collaboration video.
FAQs
-
Will there be support staff to assist in the BSL spaces?
Field Services can provide on-site support to you and your teaching team. Please see the BSL support and training page for more information.
-
There is only myself in the BSL space. How can I manage all the cameras, microphones, Zoom chat and AV touch panel all on my own?
Firstly, take your time - and remember that this is very much a regular Zoom meeting of the kind that you are used to, and you are sharing your screen as per a regular meeting and just have to sometimes check your mic and camera are correctly set as you start a meeting. Some staff may have teaching assistants or tutors to assist. Encourage them to attend a drop-in session to familiarise themselves with the BSL space. Another option is to assign participants to monitor the Zoom chat for any questions coming from remote participants.
-
How can I reduce the echo and feedback coming from speakers?
Ensure that unused microphones and speakers are muted or switched off. Ask online participants to mute their microphones as well.
-
How can in-class students share their screen?
Participants can connect to the Zoom session from their laptop and follow the instructions to 'share screen'. Note: students must have their laptop microphone and audio muted to prevent audio feedback and distortion.
-
Can Zoom sessions still created through the LMS?
Yes - Zoom sessions can still be created through the LMS if preferred. Presenters need to make sure they log in through the lectern computer and use the correct Meeting ID.
-
Why can’t I hear my online students through the in-venue audio system?
As a first check, ensure you have selected the audio device that has 'HDMI' in its name as your audio device in the Zoom audio settings. Following that, refer to the Tips to Solve or Improve Audio Issues.
Additional resources
- Blended synchronous learning AV guide
- Interactive touch panel tour
- User Guide - Using a dual boot iMac
- User Guide - document camera
- User Guide - lapel microphones
- Setting up Zoom in the LMS and scheduling a session
This guide was last updated 13 Mar 2024.
Please report any errors or omissions in this guide by submitting an LMS support request.