Assessment literacy tool
The assessment literacy tool can be used to expand student understanding of assessment criteria.
Students are presented with a sample of student work, and asked to provide a mark and feedback for each criterion set by the subject coordinator. Students are subsequently presented with expert (subject coordinator) marks and feedback for comparison.
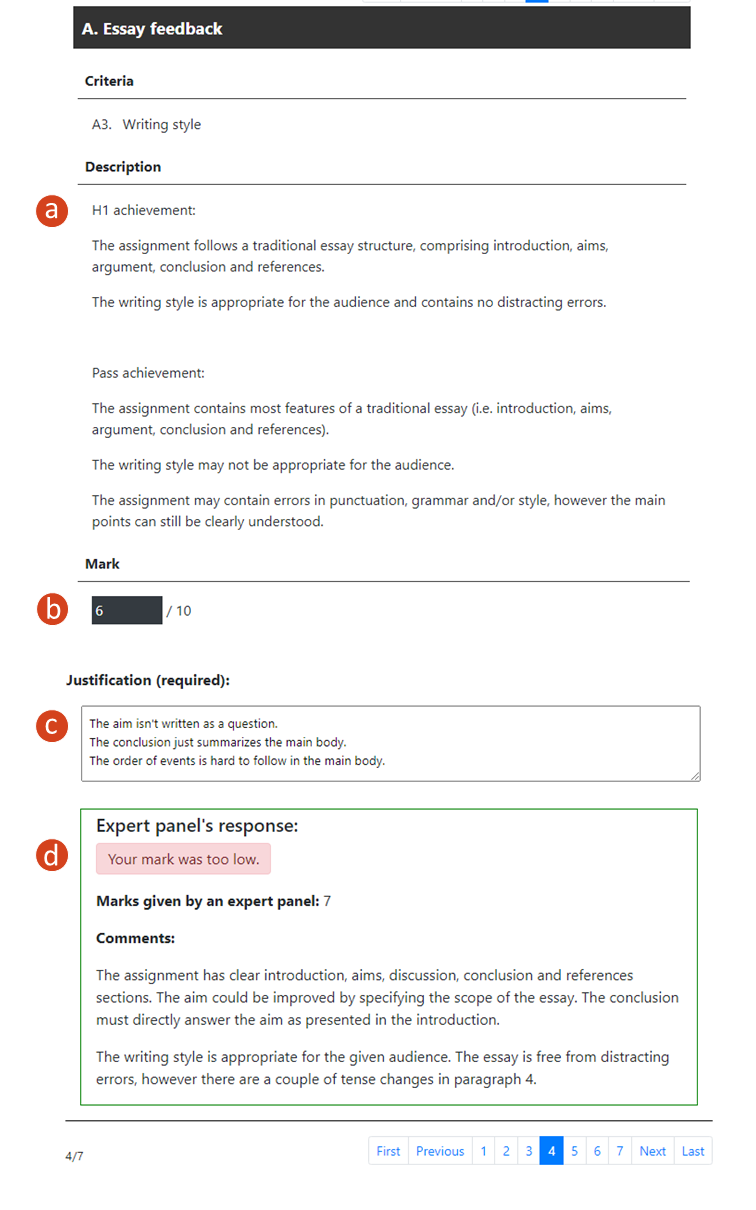
The assessment literacy tool can be used to help familiarise students with assessment criteria for their assessment tasks or the criteria to be used in peer review activities. The image below shows one example of a use case for the assessment literacy tool.
- Students are presented with criteria provided by the teacher that they will use to assess an essay.
- The student provides a grade for the criterion based on the provided criteria description.
- The student justifies the grade awarded.
- After the student submits their grade and justification, they are shown the teacher awarded grade and justification.
Request the installation of the assessment literacy tool into your subject
Whether you are using the tool for the very first time in your subject, or if you are using it again in a subsequent semester, you will need to request the installation of the tool into your LMS subject.
Please submit a Learning Environments support request:
- Request details: Learning Management System (LMS)
- Enquiry type: General
- Subject code: The full subject code of your LMS subject
- Further details: State that you require the installation of the Assessment Literacy tool in your subject
- Click Submit when done.
The support team will let you know when the tool has been installed in your subject.
Initialise the assessment literacy tool dashboard
Multiple tasks can be built from the same assessment literacy tool dashboard. To start building tasks, the tool needs to be initialised. This can be done via LMS Assignments or Modules. If you wish to use the assessment literacy tool for a hurdle requirement or assessment purposes, initialise it as an Assignment. Otherwise, you can initialise it via Modules for self-assessment purposes. If the Display grade as assignment setting is set to Complete/incomplete, a green tick in the grade book will indicate which students have completed all the tasks in that assignment, and allows staff to bulk email students who have not yet completed it.
Assignments
To initialise the assessment literacy tool via assignments:
- Navigate to Assignments.
- Click +Assignment.
- Using the Submission Type dropdown menu, select External Tool.
- Click Find.
- Select Assessment Literacy Tool V2 and click Select.
- Click Save or Save & Publish.
You will be taken to the assessment literacy tool dashboard, continue to create the assessment literacy task below for instructions on how to create a new task.
You can now add this assignment to your modules if you require your students to access it from there.
Modules
To initialise the assessment literacy tool via modules:
- Navigate to Modules.
- Click the + button on the module where you want to add the task.
- Using the Add dropdown menu, select External Tool.
- Select Assessment Literacy Tool V2 and click Add Item.
- Click on the Assessment Literacy Tool V2 link in the module.
You will be taken to the assessment literacy tool dashboard, continue to create the assessment literacy task below for instructions on how to create a new task.
Create the assessment literacy task
Once you have chosen where to initialise your task (assignments or modules) and initialised the tool, to add the document, criteria and feedback to the task:
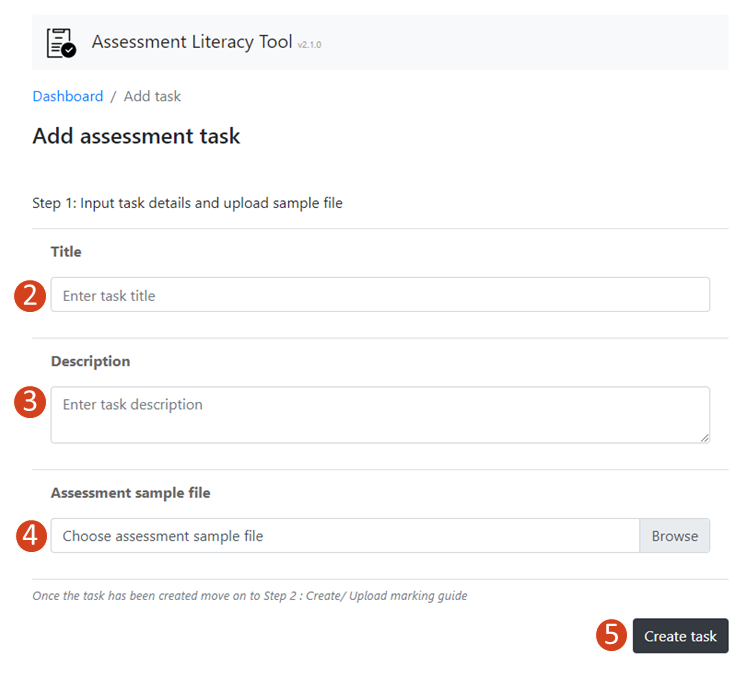
- Click +Add assessment task on the assessment literacy task dashboard.
- In the Enter task title text box, type the name of the task.
- Type the instructions for the task into the Enter task description text box.
- Click Browse and follow the prompts to locate and select the file containing the sample of student work. The file can be a Microsoft Word, Microsoft Excel or PDF document.
- Click Create task.
- Click OK.
Create the marking guide
The next set of menu options allows you to set or upload a marking guide.
To create a new marking guide, use the Editor tab and:
- Select the grading type you wish to use:
- Weighted marking guide: Specify the weight each criterion contributes to the final mark.
- Points based marking guide: Provide point values for each criterion. Selecting Points will give you the option to display criterion grades as percentages or points.
- Provide overall feedback. This is your overall feedback on the sample of student work. This feedback will be shown to students once they have finished reviewing the sample.
- Set the default maximum points per criterion.
- Click +Add Section to initialise the marking guide editor and follow the prompts to set up the marking scheme. Sections can be used to group criteria. For example, you might have a “writing style” section that comprises flow, grammar and punctuation criteria.
- Set:
- Section no. This can be letters or numbers and contain up to five characters.
- Section title. This is a description of the section.
Click Add section followed by OK.
- Repeat steps 4 and 5 for as many sections as needed.
- For each Section, set the criteria.
- Click + Add Criterion.
- Give the criterion a title.
- Provide a description of the criterion. This is seen by the student and helps to provide an accurate rating for the criterion. e.g. this could be achievement level descriptors from a rubric.
- In the Mark box, enter the teacher awarded mark. Students will only see this value after they have submitted their own mark and feedback.
- Set the maximum possible points for the criterion.
- If you chose to use a weighted marking guide, insert the fraction that the criterion contributes to the final grade.
- Provide teacher feedback on the student sample. Students will only see this feedback after they have submitted their own mark and feedback.
- Click Add criterion.
- Click OK.
- Repeat steps a to g as many times as needed (i.e. once for each criterion per Section).

The set-up of the activity is now complete. The tool will calculate the final mark based on your marks for each criterion. If you use a weighted marking guide, ensure that each weight adds to 1.
View statistics and student responses
Records of student responses are available. From the Assessment Literacy Tool dashboard, click the Views dropdown menu.
- Select Preview marking guide to see the student view of your task. Click through the task and provide answers where prompted to experience the task as a student.
- Select Student progress to see a summary of which students have started, not started or completed the task.
- Select Statistics to see a comparison between student and teacher scores for each criterion. A plot of marks is also shown for each criterion, with the teacher mark in green, the average student mark in purple and student responses in grey.
Copy an assessment literacy tool task
Assessment literacy tool tasks cannot be directly copied within the LMS. To copy a marking scheme from one task to another:
- Navigate to the assessment literacy tool dashboard of the task you want to copy.
- Click Actions followed by Edit.
- If students have completed this activity, a warning will pop up stating that student attempts exist. Click OK.
- Click the Edit (pencil) icon next to Marking guide.
- Click Export marking guide. This will download an Excel spreadsheet containing expert marks and feedback of the original task.
- Create a new assessment literacy tool task in the desired location by following the ‘Initialise the assessment literacy tool dashboard’ instructions above.
- Input the task details by following create the assessment literacy task instructions above.
- Click the Upload tab.
- Click Browse and select the Excel document downloaded in step 5.
- Click Upload followed by OK. You can now edit the marking guide copied from the previous task or use it as is.
Resources
This guide was last updated 08 Feb 2023.
Please report any errors or omissions in this guide by submitting an LMS support request.