LMS FAQs
Listed below are the most common frequently asked questions (FAQs) and answers for the University’s Learning Management System (LMS).
Support
-
How do I get help?
Canvas 24/7 phone support line (+61 3 8652 1805) and online chat are available to both University staff and students. You can also report a problem to Canvas. These supports are available in Canvas clicking on Support in the global navigation menu.
Within Canvas Support there is also access to Canvas Community guides and 'walk-through' support. The walk-through feature provides real-time, on-screen, step-by-step guidelines for completing a task within Canvas. The search function allows you to input your query to search these guides and walk-through.
We also offer a series of Canvas workshops and webinars for staff, as well as user guides for staff and students.
Managing subjects
-
Will my subjects be automatically published?
Subjects are automatically published in the LMS 10 calendar days at 10am before the recorded start date in StudentOne. This is across all standard and non-standard teaching periods. All other offerings of subjects such as Merge subjects, Communities and those removed from the auto-publication process, might require manual publication as needed.
System generated pre-publication notification emails are sent to Subject Coordinators and Instructors, 17 calendar days before the subject start date, which lists eligible subjects and clearly communicates the scheduled publication date. Post-publication notification emails are sent once subjects are published in the LMS as confirmation.
Staff with the role of Sub-Account Admin have access to the Auto Publish Management tool, which allows them to oversee the publication schedule and offers flexibility to opt-out subjects from auto-publishing in bulk and as requested by Subject Coordinators.
For further details visit: Subject publication and auto publish management.
-
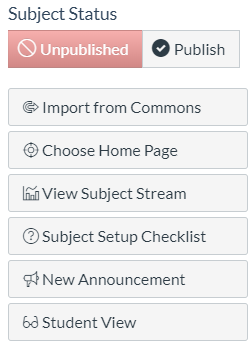
How do I publish my subject?
Staff with the permission to control subject status (Subject Coordinator, Instructor and Subject Designer) can publish their subject in the subject Home Page sidebar.
In Global Navigation, click Subject, then click the name of the subject. In the sidebar, click Publish.
Note: The subject 'Start Date' will also need to be current for students to have access to the subject. See FAQ 'What does the ‘Subject Start Date’ and ‘Subject End Date’ mean?'
Students do not receive notification when your subject is published, but the subject will move from being listed in their Future Enrolments subject list, to their dashboard. You can send an Announcement if you wish to let them know their subject is now available.
Once your subject contains a graded submission, you can no longer unpublish your subject and the Unpublished button will be unavailable.
Publishing a subject For role-specific details, including the equivalent position the Blackboard LMS, please refer to the table in Canvas staff guide: Adding staff to your subject: staff roles and permissions.
-
How do I publish content in my subject?
Modules present the content of your subject in a structured sequence. Modules create a linear flow of resources and activities for the students to access and complete. As a staff member in a subject, you can add Modules, add items to a Module, and manage Module settings. Each Module can contain files, discussions, assignments, quizzes, and other learning materials.
Modules can be published (made visible to students) by clicking
 to the right of the item.
Published items are marked by a green check symbol
 .
.Individual items in a module can be similarly published/unpublished. Please note, when you publish a Module, any previously unpublished individual Module items will automatically be published.
For more information on module management, please refer to the Canvas Community Guide: Modules.
-
Will I get a notification when my subject is created in Canvas?
No, you will not get a notification when your subject is created in Canvas. The integration to StudentOne is set up so that when the subject is created in StudentOne, it is automatically created in Canvas.
If you are added to the subject as a Subject Coordinator (as defined by the Handbook) via the integration, you do not receive any notification. The subject will appear in Subjects > All Subjects > Future Enrolments once created in StudentOne.
If you are added to the subject via the Canvas interface by another staff member, you will receive notification you have been added to the subject.
-
What does the ‘Subject Start Date’ and ‘Subject End Date’ mean?
When a subject is Published, and the start date and end date range is current, the subject will display in the student’s dashboard.
If a subject is Unpublished and the Subject Start date has passed, the subject goes into their Current Enrolments list in All Subjects but does not appear on the Dashboard and cannot be accessed.
Otherwise, the subject will be listed in the Future Enrolments subjects list or Past Enrolments subject list in the All Subjects area depending on these dates.
The LMS Subject Start Date is based on the pre-teaching start date for the offering in StudentOne. If there is no pre-teaching Start Date, then the offering's start date in StudentOne is used instead.
The LMS Subject End Date controls student access. After this date, the LMS Subject will become read-only for students, and it will not be possible to release grades for assessments.
-
Do I need to conclude my subject at the end of the teaching period?
No, you will not generally need to manually conclude your subject at the end of the teaching period. LMS Subjects have been configured to close 180 days from the offering’s end date.
-
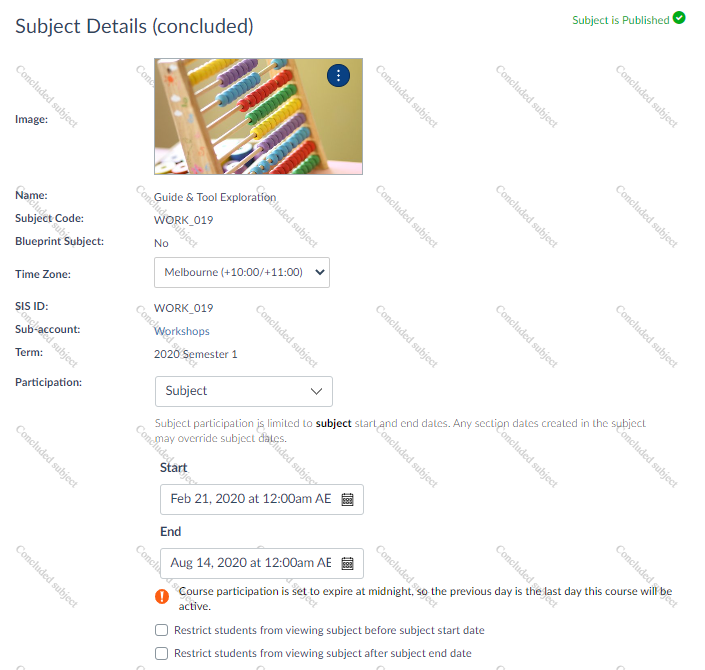
Where can I view that my subject is concluded?
Go to Settings in your subject navigation menu. If your subject is concluded it displays the word ‘concluded’ on the Subject Details page. Example:
-
Why does my subject still appear ‘published’ after the term end date has been reached?
The subject remains in the ‘published’ state after the term end date has been reached because the subject had some form of student interaction recorded (e.g. Assignment submission, Discussions, Quizzes). When this occurs, the subject’s state cannot be changed to ‘unpublished’. The subject content for all users is now ‘read only’.
You are unable to ‘unpublish’ the subject when it is in this state. The subject now appears under ‘Past Enrolments’ and should not be visible on the Dashboard.
-
Why do I have published and unpublished subjects appear in ‘Past Enrolments’?
All subjects appearing under ‘Past Enrolments’ are concluded, because their term or subject end date was reached. This is the case for both ‘published’ and ‘unpublished’ subjects.
Some subjects appear as ‘published’ under ‘Past Enrolments’ because student interaction (like the submission of an assignment) has been recorded. When this happens, the option to ‘unpublish’ an assignment is removed. In this instance, concluded subjects remain in the ‘published’ state.
If a subject was never published (because they were merged or not taught as examples) and they concluded when their end date was reached, they will appear as ‘unpublished’. In this instance, subjects will remain in their ‘unpublished’ state.
-
Why can’t I change the subject status from ‘published’ to ‘unpublished’?
Subjects can’t be ‘unpublished’ once there has been student interaction (e.g. Assignment submissions, Discussions, Quizzes). The subject remains in ‘published’ state, even when the subject concluded.
Note: You can toggle between ‘unpublished’ and ‘publish’ when there has been no student interaction.
-
Do Merge subjects and Communities automatically conclude?
Merge subjects and Communities that don’t have a term end date will not automatically conclude. They continue to appear under ‘Current Enrolments’ and are visible on the Dashboard.
Note: To remove them from your Dashboard, go to Subjects in the Global Navigation bar, then click the ‘All Subjects’ link. Favourite the subject(s) you would like to keep on your Dashboard and unfavourite those you would like to remove.
Currently, the conclusion of Merge subjects need to be manually managed on a case by case basis.
Communities often continue or roll over, therefore we do not recommend to ‘conclude’ Communities. Instead consider concluding the student enrolments.
-
Can I change the font?
No, the Canvas font cannot be changed as it’s a fixed platform design element. By keeping the font consistent, Canvas is responding to the students’ desire to have a consistent LMS experience.
-
What is the banner tool and why should I use it?
The banner tool lets you generate a banner specific for your subject with an image of your choosing. The aim of having a banner in every subject is to provide a consistent user experience for students across all their subjects.
The banner is to be uploaded into your subject at the top of the subject ‘landing page’. The banner includes the subject name, subject code and a meaningful image.

Example of a banner displayed in a Canvas LMS subject
Subject content
-
Where is the best place to put my student resources?
Modules are used to organise subject content by weeks, topic, or whatever organisational structure works for your subject. It is best to put the relevant student resources in the appropriate week or topic module.
With Modules, you are creating a one-directional linear flow of resources and activities for the students to access and complete. Once the module is created content items can be added.
As part of the subject template, a Student Support module will be in your subject. Any additional items related to student support can be added to this module.
For step-by-step instructions on how to create a page for student resources, please refer to the Canvas Community Guide: How do I add course content as module items?
-
Can I make folders in the modules?
No. Canvas uses a module structure, not folders. Modules are used to organise course content by weeks, units, or whatever organisational structure works for your subject. With modules, you are creating a one-directional linear flow of resources and activities for the students to access and complete.
For further information and instructions about how to best use the module feature, please refer to the comprehensive list of Canvas Community Module guides.
-
How does Lecture Capture show up in the LMS?
Lecture Capture can be accessed in the subject menu within the LMS if enabled for your subject.
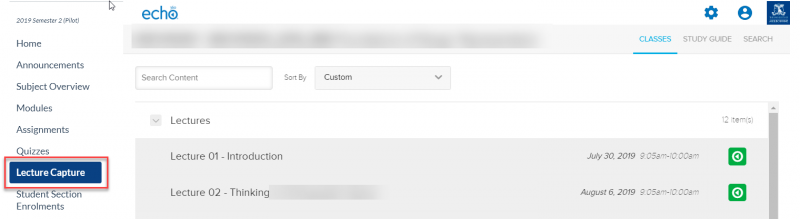
Location of Lecture Capture in a Canvas subject -
What is the best way to put lecture slides into Canvas?
There are three options available to add lecture slides to your subject outlined below, commencing with the recommended approach.
1. Lecture Capture link (recommended)
Adding your slides alongside the associated Lecture Capture recording not only provides students with a better experience; it means students can view the slides within the Lecture Capture link during your lecture and take personalised notes during the lecture. These notes are private to the student and cannot be viewed by staff or fellow students. For more information, view the Lecture Capture guide, taking notes.
To add lecture slides into the Lecture Capture link in your subject:
- Click on the Lecture Capture link in your subject
- Find the relevant lecture recording or scheduled recording in your classes list
- Click +Add Presentation for that lecture
- Upload the lecture slides file (PPT or PDF)
- Advise students in the subject information that lecture slides will available via the Lecture Capture link.
Other options include:
2. Single Canvas Page for all lecture slides
Create a lecture slides Canvas page and add all lecture slides files to this single page.
3. Multiple Canvas pages, one for all lectures within a given module or week
Create a lecture slides Canvas page for each module (week or topic) and include on the page all appropriate lecture slides files for each week/topic on the page.
-
Is the subject handbook link in my subject?
No. Subject Handbooks links are not automatically populated in each subject. Instead, you can copy and paste the link manually into the Subject Overview page of your subject.
However, investigation are underway to have Handbook links added into the Subject Overview page.
-
What content is automatically populated in the Subject Overview?
There is some template content you can edit or remove as needed from the Subject Overview page.
At the bottom of the page in the Subject Summary area is an automatically generated list of all the subject assignments. This includes all the Assignments, graded Quizzes and graded Discussions that have been published in your subject. Assignments will be listed in due date order.
This Subject Summary list cannot be edited directly or removed from the Subject Overview page.
The Assignments are weighted by group table will display your Assignment group weightings if these have been set up in your subject (recommended).
-
If I import the Canvas calendar into my personal calendar, will my personal events sync back to the Canvas calendar?
No, it is not possible to import calendars into the Canvas Calendar and any exported Canvas calendars will not sync back any personal calendars or updates to Canvas.
It is possible to export the Canvas Calendar feed into an external calendar app such as Outlook, iCal, and Google Calendar.
For step-by-step instructions on how to feed an external calendar into the Canvas Calendar, refer to the Canvas Community Guide: How do I view the Calendar iCal feed to subscribe to an external calendar as a student?
-
How does Readings Online work in Canvas?
See the Readings Online FAQs.
Assignments and Gradebook
-
How do I set up a Canvas assignment that utilises Turnitin?
You are able to create a Canvas assignment with the Plagiarism Review selected to generate a Turnitin similarity report. This allows you to use all the features of Canvas Assignments (SpeedGrader, Canvas rubrics, group submissions etc.) and still have the advantages of viewing a Turnitin similarity report on the students submission.
For instructions to create a Canvas Assignment with Plagiarism Review enabled, please refer to the Turnitin staff guide.
-
Do students receive a confirmation email when submitting to a Canvas assignment?
No. Students do not receive an email confirmation that they have successfully submitted to Canvas assignments or a submission ID.
Please advise students to confirm that they have submitted successfully submitted by:
- Clicking on the Assignment link in the subject
- Selecting the relevant Assignment name
- On the top left checking that the Submission is recorded as “Submitted” with a date and time
- View the submission, if desired.
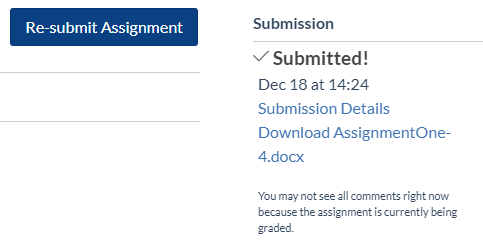
Student confirmation that they have submitted to a Canvas Assignment -
How do I hide assignment grades from students and release them when I am ready?
The Grade Posting Policy for your subject controls whether grades are revealed as soon as they are entered, or whether you control when grades are revealed.
For you to control when grades are released the Grade Posting Policy needs to be set to ‘Manual’ in the Gradebook settings before you enter marks. The assignment grades are then hidden by default and you can release them when you wish.
While the assignment grades are hidden, students can make comments on their submission but cannot view the grades, your comments or rubric feedback. They will have a message in the interface: ‘Grades are unavailable because the instructor is working on them’. Once grades are entered, columns that are hidden from students will display the Visibility icon.
When you are ready to release grades, you can do so via either one of the following two ways:
- Select the Post or Hide Grades icon, located in the top left of SpeedGrader
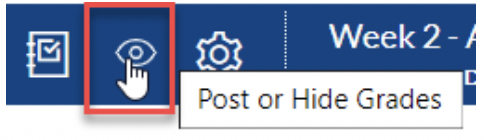
Post / Hide Grades from Gradebook
Or
- Go to Grades, select the appropriate assignment column
- Click on the ellipses in the column heading
- Click Post Grades
- Select Everyone, Graded Student or Sections (if Sections have been set), depending on who you would like to release grades with.
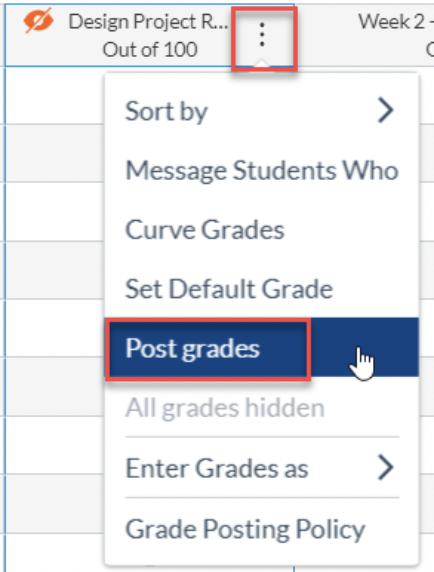
Post / Hide Grades from Gradebook
For further support with hiding grades in Gradebook, please refer to the how do I hide grades for an assignment in the New Gradebook? Canvas Community guides.
- Select the Post or Hide Grades icon, located in the top left of SpeedGrader
-
What is the Grade Posting Policy?
The Grade Posting Policy allows you to control when students see grades. The release of grades can be set to automatic or manual for each assignment, or for your whole subject in the Gradebook settings.
- Automatically post grades: assignment grades will be visible to students as soon as they are available. This is the best setting for online quizzes.
- Manually post grades: grades will be hidden by default and will remain hidden until you release them.

Grade Posting Policy Whole of Subject For more information and support with setting up a grade posting policy, please refer to the following Canvas Community and Canvas Staff Guides:
-
Where do students view their Turnitin Similarity Report?
There are two ways for students to view their Turnitin Similarity Report.
- Click Grades links
- Click the Similarity Report icon next to the assignment, or click Assignment title and then click Similarity Report icon (both options takes the student to the Similarity Report in Turnitin interface)

Similarity Report Icon next on Grades Page
Or
- Click Assignment link
- Click Assignment title
- Click Submission Details (in the right-hand pane)
- Click the Similarity Report icon.
People
-
How do I add staff to my subject?
Staff with a Subject Coordinator role can add other staff in a subject via the Staff Roles tool which is available in the Subject Navigation menu.
For step-by-step instructions, refer to the add staff members section of the staff roles and permissions guide.
-
What do the staff roles mean?
There are a number of staff roles set up in Canvas: Subject Coordinator, Instructor, Tutor, Subject Designer, Auditor, ITAS Tutor and College Tutor.
For details about these roles and how to use the Staff Roles tool, please refer to the staff roles and permissions guide.
-
How do I edit a staff role?
Editing a user role is restricted to Subject Coordinators, Instructors and Sub-Account Admins.
These users can add, remove and edit the role type of other staff members in the subject through the Staff Roles tool.
-
How do I view the students in my subject?
The People page in each subject shows all the users enrolled in your subject:
- Go to the chosen Subject via the Global Navigation > Subjects.
- Access the People link from the Subject Navigation on the left side of the page.
- To view all enrolled students in your subject, select Student from the (All) Roles drop down menu.

Filtering People on Students To export a list of students:
- Go to the Gradebook in the Subject Navigation.
- Actions > Export
- Download the export for a full list of the students and the Gradebook.
For more information, please refer to the Canvas Community Guide: How do I use the People page in a course as an instructor?
-
How do I see how many students are enrolled in my subject?
The People page in each subject can show how many students are enrolled in the subject:
- Go to the chosen Subject via the Global Navigation > Subjects.
- Access the People link from the Subject Navigation menu on the left side of the page.
- To view all enrolled students in your subject, select Student from the (All) Roles drop down menu.
The number of students in your subject will be listed in brackets next to Student.

Student count in a subject To export a list of students:
- Click Grades in the Subject Navigation menu.
- Actions > Export Entire Gradebook.
- Download the export for a full list of the students and the Gradebook.
For more information, please refer to the Canvas Community guide: How do I use the People page in a course as an instructor?
-
Can I add students to my subject?
No. Students are added automatically via an integration with StudentOne. Students self-enrol into subjects in StudentOne, which feeds their enrolment into the equivalent Canvas subjects.
If a student is not in your Canvas subject and should be, the first step is to ask the student to check their Subject enrolment in StudentOne.
If there is still an issue, please lodge a support request and it will be investigated.
-
Why are inactive students are listed in my subject?
The reason why inactive students are listed subjects is to preserve subject historical data. For example, an inactive student may have withdrawn from the subject but contribute to a graded discussion or group assignment.
Inactive students will not be included in the student count. These students will clearly have ‘inactive’ listed next to their name.

Inactive student in Canvas There is a check box to Hide Inactive Users at the top of the People link

Hide Inactive Users check box in People You can also choose to show/hide Inactive users in Grades
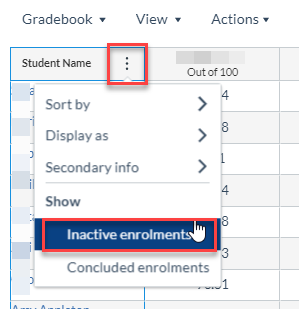
Choosing to show or hide inactive users in Grades -
How do I see student IDs in the Gradebook?
To view Student IDs in the Gradebook:
- Click Options in the Student Name column heading.
- Select Secondary info > SIS ID.
The Student ID will then display under each student’s name.
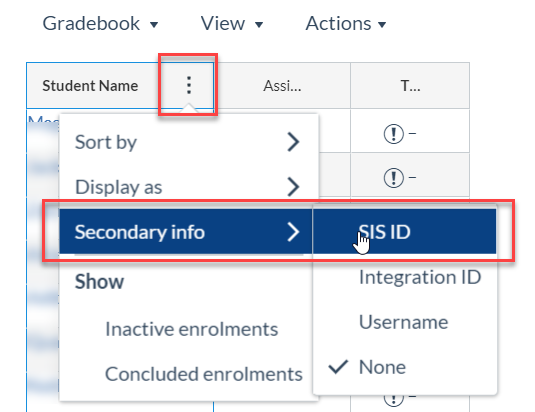
Viewing student IDs in the Gradebook To learn more about how to use Gradebook, please refer to the Canvas Community Guide: How do I use the New Gradebook?
-
Is there a way to have Canvas load student ID photos onto their Canvas profile?
Students will be identifiable in Canvas subjects by their Student ID or Student Username. Student lists can be sorted by first name or last name.
We are going to investigate the option for student ID photos to be used as an identifier in subjects as part of later integration work.
All Canvas users have the option to upload a photo to their Canvas profile.
To upload a photo:
- Go to Account (global navigation) > Profile.
- Click on the empty profile image.
- Click Upload a Picture, then choose a picture.
- Click Save.
For step-by-step instructions for students to upload a photo to their profile, please refer to the Canvas Community Guide: How do I edit my profile in my user account as a student?
Groups and Sections
-
What is the difference between Groups and Sections?
Sections
Sections are used to segment the subject for administrative purposes, typically based on labs, lectures, workshops or tutorial groups. The Gradebook can be viewed by Section to allow markers to view and grade just their Section. Assignments, Quizzes and Discussions can have access restricted to one or more Sections.
Groups
Groups can be created when you want students to collaborate online. The types of collaborations can be group assignment submissions, creating group pages together, or group discussions. Subject Coordinators can also allow students to create their own groups.
Groups membership can be via self-sign-up, manually created or automatically allocated by Canvas. The Gradebook and SpeedGrader can be viewed by Group to allow markers to view and grade just one group. You can create Groups when you want to give students their own Canvas group area to work.
Setting up groups in a subject -
How do I set up my tutorial groups in Canvas?
Tutorial groups can be set up using the Sections tool which segments the subject enrolments into Sections for administrative purposes.
-
How do I create Sections?
Sections are used to segment the subject cohort for administrative purposes, typically based on labs, lectures, workshops or tutorial groups.
Sections are created automatically from student enrolment information. To create additional Sections in your subject, follow instructions within the Student Section enrolments guide. It is important to remember that Section names are visible to students and should not contain sensitive information.
You will need to be assigned the staff role of either Subject Coordinator or Instructor, or have the Sub-Account Admin role to be able to create Sections.
For further support with Assignments, Quizzes and Graded Discussions in a subject Section, please refer to the following Canvas Community guides:
-
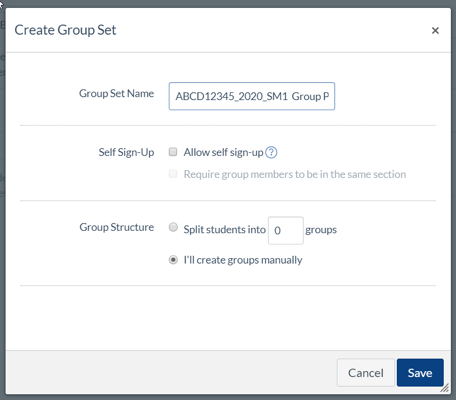
How should I name Canvas Groups?
We recommend you always include the subject code and name in a Group Set name and Group names. This naming convention will avoid a scenario of multiple Groups with the same or similar names. It will allow students to easily locate and access their Groups outside their subjects via the Canvas global navigation menu.
-
Do Sections need to be manually created for each tutorial group or is there an automation process?
Tutorial groups are created as Sections automatically for all subjects.