Zoom in the LMS
Zoom is a high-quality video and audio online conferencing tool. Staff can enable Zoom and manage online collaboration with students directly from their Canvas LMS subject.
Tips and housekeeping
- For a better Zoom experience, use a headset with an attached microphone and a quiet environment with good lighting.
- We suggest creating a new page in your subject with specific information on each online session; what it will cover, duration, expectations from students and etiquette.
- If you have opted to record your online session, remind students of this at the start of the session. Refer to the Student Privacy in Zoom guide for more information.
- Zoom provides two options for hosting online sessions: Zoom Meeting and Zoom Webinar. The Canvas integration will create Zoom Meetings only. Read more about comparing Zoom meetings and Zoom webinars.
- There is a maximum of 300 participants in a Zoom Meeting at any given time. For larger sessions, consider hosting a Zoom Webinar instead.
Enable Zoom in your subject
If you see a Zoom link in your subject navigation menu, it is already enabled in your subject. If the link does not appear in your menu, follow the below steps to enable it in your subject:
- Click on Settings from your subject navigation menu, then select the Navigation tab
- Locate the Zoom link from the bottom row (indicates items are hidden from students) and drag it to the top row
- Scroll to the bottom of the page and click Save
- Zoom is now enabled in your subject
Schedule a Zoom session through Canvas
- Once enabled, go to the Zoom link from your subject navigation menu
- If this is your first time using Zoom, click Authorise to approve the use of Zoom in your subject
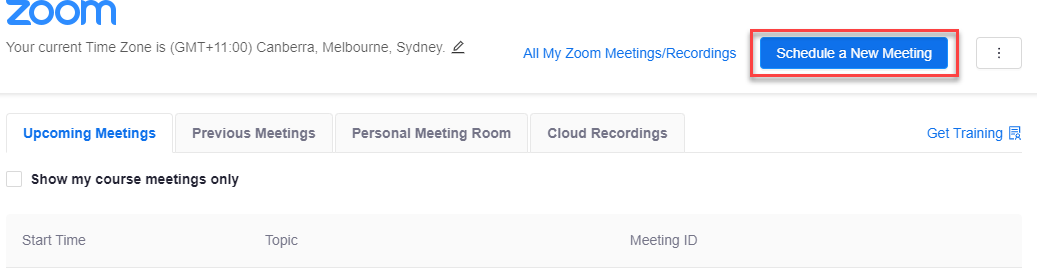
- Click the blue Schedule a New Meeting button in the top-right of screen
- Enter the details as required for your session:
- Enter a relevant name under Topic (e.g. Assignment 1 exploration) and provide an optional Description.
- Click the Calendar icon to select a date and choose a time (Note: date is shown in American format; MM/DD/YYYY).
- Choose the Duration of your meeting, check the Time Zone is correct and select the recurring meeting checkbox if this session will take place regularly, such as a weekly tutorial (further settings will apply).
- Registration: If set to Required, students will need to provide their name and email when joining the session. Students will still be able to join the session if registration is not required, as their details are captured through their Canvas login.
- For sessions larger than 10 participants, we recommend setting Video to Host = On and Participant = Off. You will be able to manage this invidually during the session as needed.
- Leave Audio as Both, to allow flexibility for students in joining the session with a phone or other device.
- Set other Meeting Options as required, remembering to set the Record the meeting automatically if you would like the recording to be made available later.
- Alternative Hosts can be added to allow other staff members assist in hosting your session.
- Click Save
- A summary of your session will be displayed, including the settings applied, the Meeting ID and the Registration URL. Note the options at the bottom of the screen to delete, edit or start the meeting.
Invite students to your session
Once your session is scheduled, the next step is to inform your students about it. At a minimum, students need the Registration URL so that they can join the session at the scheduled time. There are a few ways to provide this information:
- For a one-off session, you may choose to post an Announcement to students with the details of the session, including the link to join the meeting (see below)
- If multiple sessions will be scheduled for your subject, or students are only required to attend some sessions (e.g. with tutorial groups), it may be beneficial to provide the details in a new subject page with the context of each session, as well as what it will cover, duration, expectations from students and etiquette, etc. as mentioned above. Remember to include the link to join the meeting (see below).
- Simply instruct students to click the Zoom link in the subject menu. This will display all scheduled sessions and includes the option to Join the session.
Copy the meeting information
- Go to the Zoom link in your subject navigation menu, and click on the title of the relevant session.
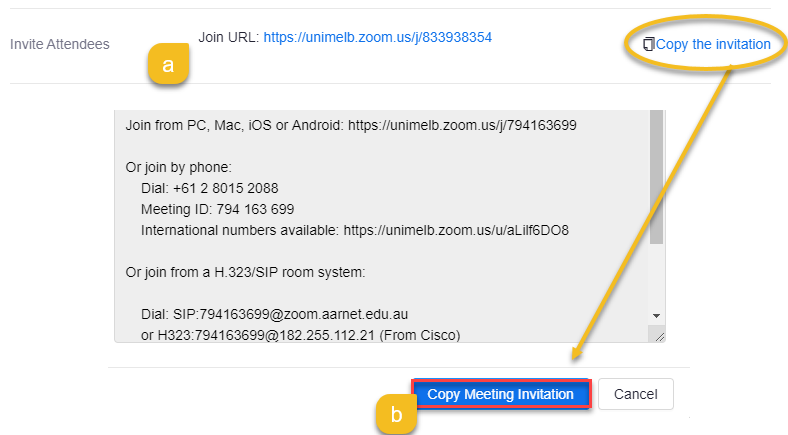
- A summary of your session will be displayed. Under Invite Attendees, either:
- Copy the Registration URL directly (option A shown), or,
- Click Copy the invitation. A pop out window will appear with a generic template to send to participants. Scroll to the bottom and click Copy Meeting Information (option B shown). This copies the full text to your clipboard.
- Paste the information into your content page or a new Announcement (for example) as appropriate.
Start your session at the scheduled time
- Go to the Zoom link in your subject navigation menu
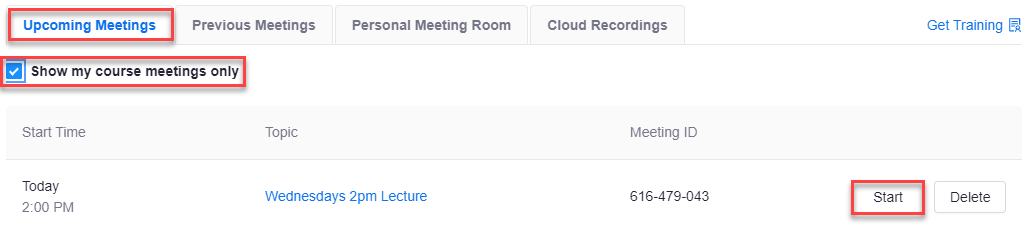
- Under the Upcoming meetings tab, find your meeting and click the Start button
Note: this page will display all of your scheduled meetings. Students will only see the sessions relevant to this subject. You can filter your view by selecting the Show my course meetings only checkbox. - Important: You must click Start to commence your online session as the host. Clicking on the Registration URL noted previously will enter you into the session as a student.
- Follow the prompts to initiate your Zoom meeting.
Tips to manage your session
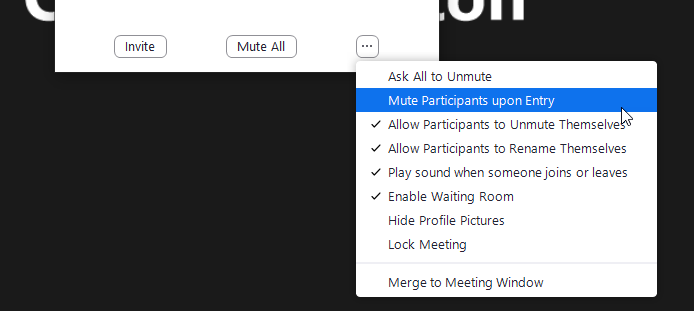
- Mute participants to begin - click Participants in the toolbar and click the Mute All button. You can also select More and make a suitable choice regarding muting of participants in your meeting (such as mute participants on entry).
- Moniter the chat window - Click on Chat to bring up the Zoom Group Chat so you can see students’ questions and commentary.
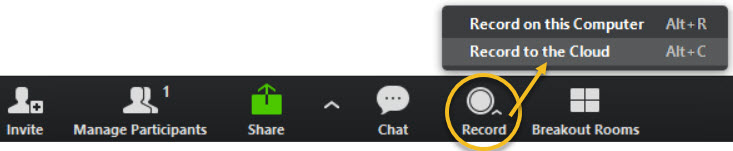
- Manage your recording - If you opted to record the meeting when creating this session, a pause/stop recording button will display and you will receive an email once your recording is ready for download. If you wish to record, click Record then Record to the Cloud (recommended option).
Record and publish your Zoom session in the LMS
As the host of a Zoom session, you have the ability to be record the content of the session for reuse at a later time. The Zoom application will provide a file for the full video recording with audio, as well as an audio-only file, and a copy of the chat transcript. Please refer to the Student Privacy in Zoom guide for important information regarding recorded Zoom sessions.
When scheduling your session, you can choose to record the meeting automatically. If you didn't apply this setting, you can choose to record once the session starts by clicking Record and selecting Record to the Cloud (recommended option). This option will automatically create a copy of the recording in your Lecture Capture (EchoVideo) Library.
Items in your Lecture Capture library are easy to share and make available to students. Follow the steps described in the Embed a Lecture Capture recording in your LMS page guide.
This guide was last updated 24 Jan 2024.
Please report any errors or omissions in this guide by submitting an LMS support request.