Wikis in the LMS
Wikis are a collaborative communication tool that allow students to work together in a private space that is easily editable to complete a piece of work together.
Wikis differ from blogs in that the writing is a collaborative effort where students can all edit the Wiki page to co-create the final piece of work. Typically, they are one or more pages that students design with a flat navigation to present a group project or piece of work.
Wikis can be used for a range of educational purposes, including:
- Group work or group projects
- Building community between students
- Co-creation of ideas and learning
Canvas LMS does not include a wiki tool specifically, however the Groups functionality in the LMS and Pages within groups provide wiki functionality. This guide outlines how to set up a wiki activity in Canvas.
Any Page in the LMS can be set to allow students to edit it, hence being able to be used as a wiki. (Note that students are not able to create their own Pages in the LMS). Similarly, Pages as wikis can also be used within Groups, providing the same functionality but allowing students to keep the wiki private to only the members of their Group. (To set up Groups, see below).
If a wiki activity is for the whole subject, a Group can be created including all the students in the subject, however, more typically wiki activities are assigned to individual Groups.
The following guide provides an overview of creating a wiki activity in Canvas LMS. If you would like to book a consultation for assistance, please submit a support request.
Creating Groups for a wiki activity
Creating Group Sets
To create groups, you first create a Group Set (a set of common groups) in Canvas LMS, then create the associated Groups for the Group Set; either:
- Automatically
- Via manual enrol
- Via self-enrol
Creating Groups
To set up Groups in your subject:
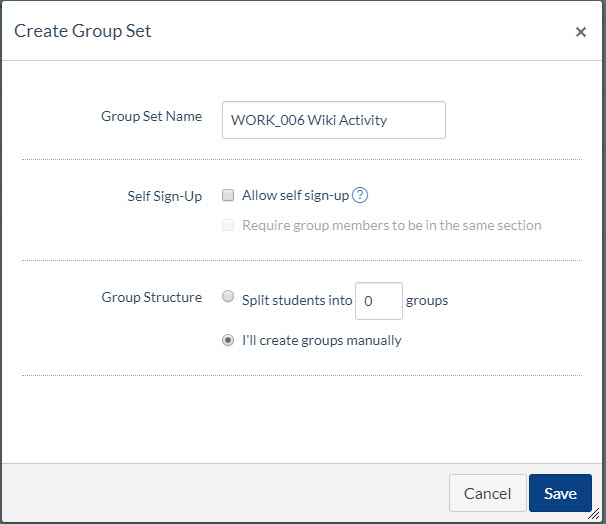
- Go to Subject Navigation: People>>Groups >>+ Group Set

Enter a Group Set name, for example (Subject code and name) wiki activity
Note: We recommend you always include the subject code and name in a Group Set name and Group names. The reason for this is that students can access their Groups outside of their subjects via the global navigation area in Canvas and may end up with several groups with the same or similar names from several subjects unless the subject code/name is included.
- Choose how you wish the Group membership to be populated:
- Allow self sign-up: students can self-enrol in Groups
- Split students into groups: students are automatically assigned to Groups
- I’ll create groups manually: students are manually allocated to Groups.

Note: For Allow self sign-up Groups you will need to ensure the People subject navigation link is available to students so they can sign-up to the Groups.
Note: If you choose I’ll create Groups manually, you can need to click + Group to create the different groups within your Group Set and then drag and drop student names into the appropriate group. Remember to use the subject code within the Group name as noted above.
See this guide for assistance: How do I add a group set in a subject (course)?
Student access to the Group Home Page
Once Groups have been created as above, the group automatically gets a Groups Home Page and the Pages tool where they can create a wiki. Students can access their Group Home Page via the Groups icon in the global navigation.

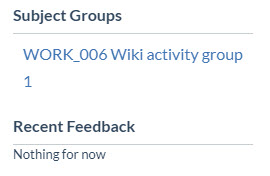
Once enrolled in a group, students can also access their subject Groups in the Subject Groups area on the home page of your subject in the right-hand sidebar.

Students's setup of Pages for their wiki activity within a Group
The Pages area in groups can be used for group wiki activity.
In Pages within the group, students can select a page to use as a front page for their group area. They can also use the linking functionality to make a logical wiki structure.

When viewing All Pages in a group, as a default the Pages are displayed in alphabetical order. It is recommended that students use numbers in the Page name to force the Pages to list in their preferred order.

Creating a graded group wiki activity
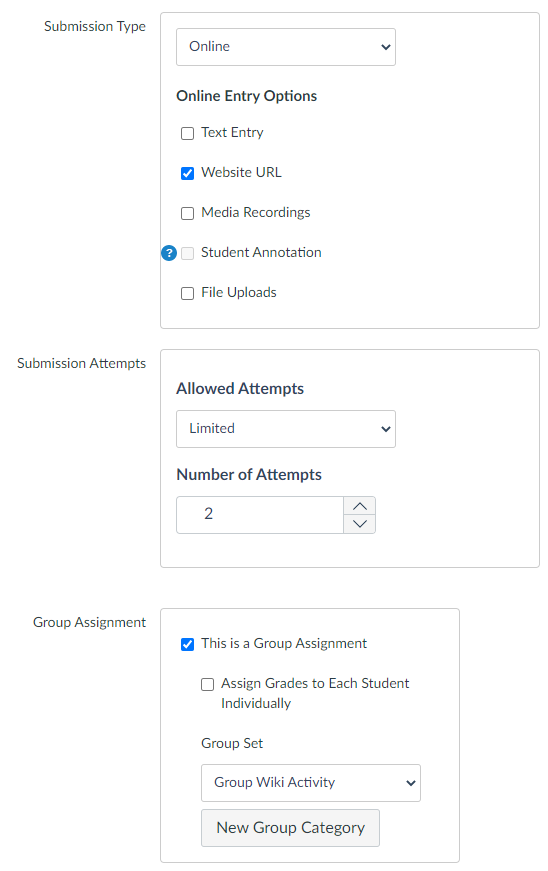
If you wish to track grades and give feedback on a group wiki activity, create a Group Assignment with the Online setting and Website URL submission instructing students to submit their Group wiki URL.
Instructions are given to the student to copy the Group Front Page URL from the navigation bar in the browser and submit that once the work is completed.
Ensure you select This is a Group Assignment for the Assignment so the wiki URL can be submitted once on behalf of the group and all group members can see the marks and feedback.
- Click on the subject navigation link Assignment
- Click + Assignment to create an assignment

- Enter the Assignment Name for your Assignment (e.g. Group wiki activity)
- Write or paste the wiki activity instructions into the rich text editor. Include the instructions to the students that only one person needs to submit to the wiki Group Assignment on behalf of the Group. To copy the wiki URL, ensure the student is on the Front Page for the wiki (Pages) and copying the URL from the navigation bar in the browser.
- In the Points box, enter the points for the assignment. (It is recommended to grade the activity out of ‘100’ and weight the assignment according to its relative value in GradeBook later).
- In the Assignment Group box, choose the appropriate Assignment group or create a new one (suggestion: Group wiki activity)
- In the Display Mark as box, choose the appropriate method to display your grades
- In the Submission Type box, click Online and select Website URL

- Select This is a Group Assignment
- Either select the Group Set already created for the activity or create a new Group Set
- Complete the remaining Assignment settings as desired
- Click Save
Student guide: How do I enter a URL as an assignment submission?
Staff access to the Group Home Page for groups in your subject
As staff in a subject you can view the Group Home Page for groups in your subjects:
- Go to Subject Navigation: People>> Group Set Name
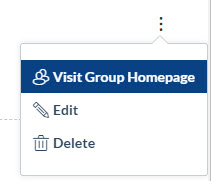
- Click the
 Options button for the Group you wish to visit
 - Click Visit Group Homepage

Note: you can view the Page history of any Page to see who has contributed.
Resources
How do I view all groups in a subject (course) as an instructor?
This guide was last updated 12 Mar 2024.
Please report any errors or omissions in this guide by submitting an LMS support request.