Blogs in the LMS
A Blog is a robust communication tool that allows students to write or post media which other students in the subject can view and comment on.
This guide provides an overview of creating a blog activity in Canvas LMS. If you would like to book a consultation for assistance, please submit a support request.
Blogs allow students to post using various media forms such as text, video, audio and images. In the LMS, students in the same subject, Group or Section can see each other's posts and comments and engage in a collaborative learning experience.
Blogs can be used for a range of educational purposes, including:
- Reflective learning diary
- Learning journal
- Work placement journal
- Development of writing and language skills
- Critical reflection on readings
- Capturing lab work
- Sharing research or resources
- Group work digital diary
- Recording creative process.
Possible educational benefits of asking students to complete a blog activity include:
- Regular, small, formative assessments
- Regular feedback
- Ability for staff to monitor students’ understanding
- Cohort community building
- Developing a culture of sharing
- Expanding thinking beyond individual understanding
- Students being able to identify their own strengths and weaknesses
- Potential to raise standards throughout the cohort
- Opportunities for reflection and critical analysis
- Improvement of writing with regular opportunities to write.
Overview
Canvas LMS does not include a specific tool for blogging, however, depending on the purpose, a blog activity can still be created in the LMS using a number of tools:
- Canvas Discussions can be used as a blogging tool, as they allow students to see each other's posts and to make comments on them.
- Canvas ePortfolios can be used as a blogging tool.
If your blogging activity is designed for personal reflection only, without the need for peer interaction and commenting, then the Assignment tool is a suitable tool for achieving this (see guide: Journals in the LMS).
Blogs in the LMS using Discussions
LMS Discussions can be used as a blog tool as they allow students to see each other’s posts and make comments on them. They can also be graded if required.
Discussions can be setup to be viewed and interacted with in three ways:
- A Discussion for each individual student where students can post and reply to each other.
- A Discussion that allows access to a specific Section of students within the LMS only.
- A Discussion that allows access only to a specific Group of students within Canvas.
A Discussion for each individual student where students can post and reply to each other
One way of setting up Discussions for a Blog activity is to create a Discussion for each individual student, giving each Discussion the student’s name. The student can then use their own Discussion to make their posts, as well as view and make comments on other students’ posts.
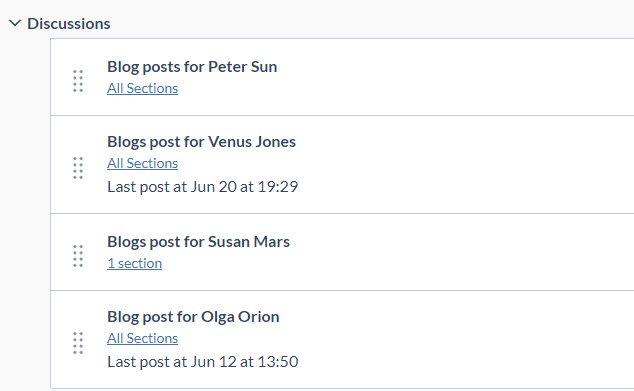
Alternatively, you could turn on the setting to allow students to make their own Discussion by:
- Clicking the Cog icon in Discussions.
- Ticking the option under Student Settings: Create discussion topics.
Ask the students to create a Discussion with their own name. When the student creates the Discussion they can choose:
- That Everyone can view the Discussion.
- Just a Section (that they are in) can view the Discussion.
- Just a Group (that they are in) can view the Discussion.
Note that students are automatically able to create Discussions within any Group they are in.
It is recommended that you make the subject navigation link ‘Discussions’ available to students if you are using Discussions for Blog activities. To do this:
- Go to subject navigation: Settings>>Navigation.
- Drag Discussions to your preferred place in the subject navigation.
- Click Save at the bottom of the page.
See guide: How do I manage Subject (Course) Navigation links?
To create a Discussions for each individual student where all students can post and reply to each other's posts, follow these steps:
- Click on the subject navigation link ‘Discussions’.
- Click + Discussion to create a discussion.

- Enter the Topic title for your ‘Discussion’ (suggestion: use student name).
- If desired, paste the Blog activity instructions into the rich text editor.
- In Options, tick Allow threaded replies to ensure a logical threaded conversation.
Please be aware that if you select Marked the discussion will also appear in Assignments and there will also be a Gradebook column for each discussion you create. This is NOT recommended if creating a discussion for each student in your subject, as there would then be as many Gradebook columns.
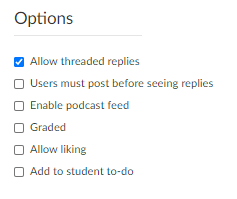
- Click Save & Publish to make discussion available to students
Tip: If creating a Discussion for each student, a simple way to do this is to Duplicate the first discussion you make, then rename it for the next student.
- From the Discussions page, click the Options
 button for the discussion you wish to duplicate.
 - Click Duplicate.
- Click on the duplicated Discussion.
- Click Edit to rename Discussion with next student’s name.
The Discussion will appear in the following places for students to see: ‘Discussions’ menu link, under ‘Assignments’ (if ‘Grades’ have been assigned to the Discussion), as well as within any ‘Module’ the Discussion has been added.
LMS Discussions guides can be found in our staff guides for the LMS.
A Discussion that allows access to a specific Section of students within the LMS only
If you have setup Sections in your subject, you can allocate a Discussion to just that Section of students. When creating a Discussion, in the Post To box, select one or more of the Sections you want to allow to have access to the discussion.
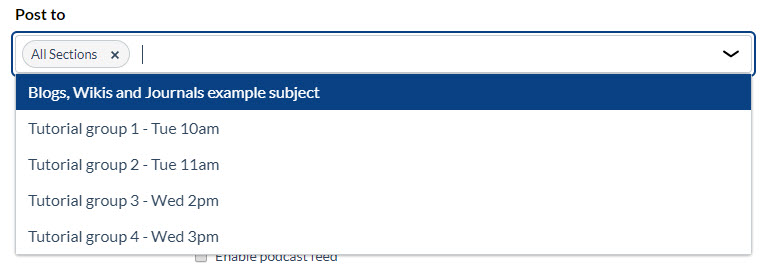
The Discussion will be listed under subject navigation: Discussion, under Assignments (if ‘Grades’ have been assigned to the discussion), as well as within any Module it has been added to.
On the Discussions page, the Discussion will state how many Sections can view the Discussion, and if you click on this, you will see the names of the Sections.
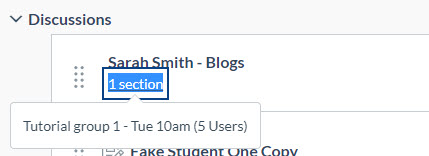
Students will be able to see and comment on blog posts within their sections but not post in other sections.
LMS Discussions guides can be found in our staff guides for the LMS.
A Discussion that allows access to a specific Group of students (and is accessed through their Group home page)
To create a Discussion for a specific Group within the LMS, the Group Set and Groups need to be created first. Creating Groups within the LMS automatically gives the students within that group a set of tools for collaboration, including Discussions.
Creating groups
To set up Groups in your subject:
- Go to Subject Navigation: People>>Groups>> + Group Set.
- Enter a Group Set name, for example Subject Code x, Blog Activity x.
Note: We recommend to always include the subject code in both the Group Set name and the individual Group name. The reason for this is that students can access their Groups outside of their subjects via the global navigation area in Canvas and may end up with several groups with the same or similar names from several subjects unless the subject code/name is included.
- Choose how you wish the Group membership to be populated:
- Allow self sign-up: students can self-enrol in Groups.
- Split students into groups: students are automatically assigned to Groups. This options lets you set up group structure and offers the option to split students into groups with x-number of students per group.
- I’ll create groups later: group structure is set up manually in which students can be manually (drag & drop) assigned to Groups.
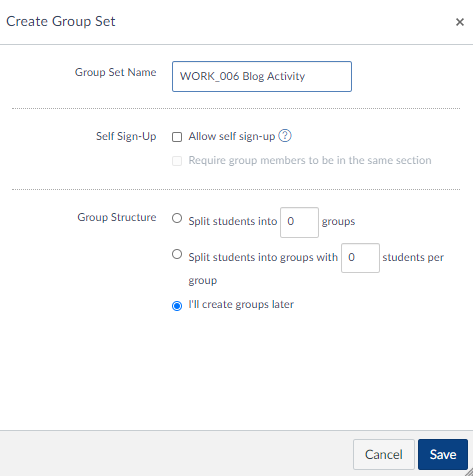
Note:
- For self sign-up and automatic allocation Groups, you can choose to include only the group members from the same Section (Sections need to be created beforehand in the subject).
- For I’ll create the groups later, you need to click + Group to create the different groups within your Group Set. Drag and drop student names into the appropriate groups. See below on best practice for how to name Groups.
- For self sign-up Groups, ensure the People subject navigation link is available to students so that they can sign-up to Groups.
See this guide for assistance: How do I add a group set in a subject (course)?
Students access to the Group Home Page
Once you have created Groups, a Groups Home Page is available to students, accessible via the Groups icon in the global navigation. Students can also access their group via the Subject Groups area on the home page of your subject in the right-hand sidebar.
Within their Groups Home Page students will have access to Discussions where they can create different Discussions as a Group.
The Discussion area in Groups can be used for Group ‘blog’ activities, in the same way as described above.
Staff access to the Group Home Page for Groups in your subject
Staff in a subject can view each Group’s Group Home Page by:
- Go to Subject Navigation: People>>Group Set Name.
- Click the Options button for the Group you wish to visit.
- Click Visit Group Homepage.
See: How do I view all Groups in a subject (course) as an instructor?
A Discussion that allows access to a specific Group of students (and is accessed through the Discussion link in the subject menu)
To create a Group Discussion:
- Go to the Discussions link in the subject menu.
- Click +Discussion to create the Discussion.
- Under Group Discussion, tick this is a Group Discussion.
- Select a Group Set you have already created or create a new Group Set.
- Continue setting up the Discussion as desired.
The Discussion will appear under the subject navigation link: Discussions in your subject.
When you view the Discussion, you will see a list of the different Groups in the Group Set and a link to the Group Discussion area for each Group.
Note: The navigation thread at the top of the page will change to the Group when you click on the Group name from the Discussion.
The Group Home Page Discussion area will also include the group Discussion you have created and any Discussions the students have create.
The Discussion will be listed under subject navigation Discussion under Assignments if Grades have been assigned to the Discussion, plus within any module it has been added to. Students can also access the group Discussion by the Groups link in global navigation.
Visibility and commenting on ‘blog’ posts will be within the Group but not between Groups.
Blogs in the LMS using ePortfolios
Students can create their own ePortfolios in the LMS which can be used as an alternate way to make a blog activity.
In the ePortfolio area, students can make a private ePortfolio with pages that allow comments. Each page can be used to represent a blog post, allowing other students in the subject, as well as the instructor, to make comments. The ePortfiolio has a shareable link that can be posted in the subject and students can continue to make posts throughout the semester.
To track grades and give feedback for an ePortfolio activity, create an assignment with the setting Online and Website URL, instructing students to submit their blog ePortfiolo URL.
Instructions for students to create blog ePortfolio
- Click Global Navigation link: Account then ePortfolio.
- Click Create an ePortfolio.
- Enter an ePortfolio name.
- DO NOT check 'Make it Public'.
- Click Make ePortfolio.
- Either use the wizard to guide you to create an ePortfolio, or click Go to the Actual ePortfolio.
- On the right, make pages within your ePortfolio to represent each blog post, ensuring you have clicked Allow Comments on this Page and Make Comments Public for each page you create.
- To share your blog ePortfolio with the subject, copy the share link from the landing page for the ePortfolio.
- Go to the Discussion area in the subject and locate the Discussion for the blogging activity; reply to the main post with a message that includes your ePortfolio link. This will give all students in your subject access to your blog ePortfolio.
This guide was last updated 23 Nov 2022.
Please report any errors or omissions in this guide by submitting an LMS support request.